Corpus Studio Manual

Version 3.6
First edition: September 28, 2009
This edition: November 25, 2019
Erwin R. Komen
Radboud University Nijmegen
Technical Service Group, Humanities Lab
Corpus Studio Manual
Version 3.6
First edition: September 28, 2009
This edition: November 25, 2019
Erwin R. Komen
Radboud University Nijmegen
Technical Service Group, Humanities Lab
Contents
4.3.3 Saving period information
4.6 The “Constructor Editor” tab
5 Walkthrough #1: make a research project from scratch
5.2.1 Specify general information
5.2.3 Import a “definitions” file
5.2.5 Putting the queries in order
6 Walkthrough #2: creating a project with the wizard
6.1 Cesax: prepare a corpus search
6.2 CorpusStudio: creating a new project
7.1 Restricting input to part of a corpus
8.1 Specifying input files manually
8.2 Using files with different exentions
8.3 Creating period definitions
8.3.1 Make a new period information file
8.4.1 Creating an Xquery-psdx project
8.4.3 Accessing constituents through Xquery
8.4.5 Executing an Xquery project
8.5 Producing a database of results (Xquery)
8.6 Queries on a database of results
9.1 How do I get the number of results per text?
9.2 Why do I miss results if I use the complement as input?.
10.2 Schema for xml formats used
10.3 Useful Xquery function definitions
10.3.1 Convert a chain into a sequence
10.4 Built in functions for Xquery-psdx projects
Corpus research can be done with a variety of programs, which usually are command-line oriented. The program “CorpusStudio” provides a shell between the user and the programs doing the actual searching in the corpora. Specifically, CorpusStudio handles two corpus research software programs.
(1) CorpusSearch – This program is meant to work with Penn-Treebank syntactically annotated corpora. The program itself is written in Java, and executed from the command-line in Windows.
(2) Query – This program is an open-source one, developed by Saxon. It is not aimed at corpus work as such, but provides a general implementation of the Xquery language. This Xquery language (and its associated Xsl as well as Xpath) is a well guided public domain initiative for general research work in XML databases. When corpora are coded in XML, then Xquery provides one of the most generally accepted ways to query them.
The basic unit in CorpusSearch is the Corpus Research Project, containing the following elements:
a) General information about a corpus research project, such as date, author, purpose.
b) All the queries used by the project.
c) The order in which the queries are to be used.
d) The output files produced by successive application of the queries.
e) A list of input files to be used for the queries.
Since the corpus research projects comprise all the data needed to perform a particular task on a (selectable) set of input files, they offer many advantages. Some of them are:
· Exchange of corpus research projects between researchers. It will be easy to see just how your colleague has dealt with the data.
· Assistance in teaching courses on corpus research.
· A form for students to hand in assignments on corpus research work.
· An easier way to track errors in your corpus research projects.
The CorpusStudio program should be installed straight from the internet on the following address:
http://erwinkomen.ruhosting.nl/software/CorpusStudio
You will find directions over there. Instead of having a downloadable package, the CorpusStudio is a “ClickOnce” application. When you install it from the location above, it will keep track of changes and ask you if you would like to install an updated version if and when such a version becomes available. Mind you—you are not being tracked or registered as a user!
CorpusStudio only runs on Windows (XP and above) computers, and it assumes you have Microsoft .Net runtime version 3.5 (or higher) installed on your computer.
This section describes the general settings for CorpusStudio. If you are just starting, and do not want to bother too much with the details, you can skip this section. Do come back to it later on, when you would like to fine-tune CorpusStudio for your own purposes!
Selecting Tools/Settings brings you to the window that allows general settings to the CorpusStudio program to be made. This window contains a number of important, global settings, which are listed here.
We will first look at the General tab page (see Figure 1).
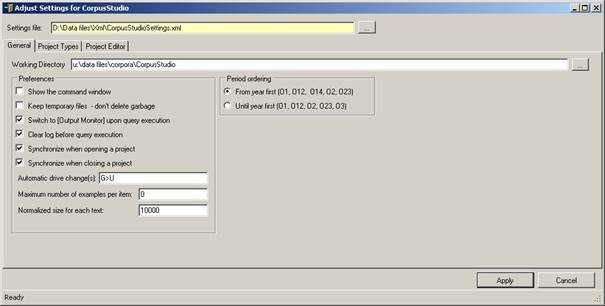
Figure 1 The “General” tab of the Settings
· Working directory: the location where CorpusStudio should store its Corpus Research Project files (those with a crpx extension).
· Command window. The CorpusSearch engine is run in a command shell. This option allows you to watch what it is doing. (Obsolete.)
· Keep temporary files. Check this option to keep the temporary files CorpusStudio produces. These files might be rather large, so it is not recommended to keep this option on, unless you are debugging the program.
· Output Monitor. When checked, this option causes the program to switch to the Output Monitor tab page, as soon as query execution (F10) has finished.
· Clear log. Clear the log page before starting a fresh execution of queries.
· Synchronize when opening. As soon as a new corpus research project (crpx file) is being opened, the newer query files in the project will overwrite those in the specified query directory, and the newer query files in the query directory will overwrite those in the project.
· Synchronize when closing. Same as above, but then upon closing the program or closing the current corpus research project.
· Drive change. Automatically convert the drive specified on the Files tab page of a corpus resarch project. For example: G>U means that when a file or directory on the Files tab has G:\data\temp.q, CorpusStudio will convert it into U:\data\temp.q. Use with care!
· Examples per item. This specifies the maximum number of examples per “item” CorpusStudio should collect in the resulting HTML file. If you set this to “0”, then all examples will be collected.
· Normalized size. Texts vary in sizes (in terms of number of sentences), and this number allows you to specify a normalized size. The default value is 100, which is okay for practical purposes. The average size of all texts in the syntactically annotated Penn-Helsinki-York corpora is about 940.
· Period ordering. Periods are specified in the Period Editor. Each period has a starting year (“From”) and a closing year (“Until”). When CorpusStudio presents the results of a series of queries to you, it can order the periods from which the data come in two ways.
o From first. This leads to the following order of subperiods:
§ O1 (450-800)
§ O12 (450-950)
§ O2 (850-950)
o Until first. This leads to the following order of subperiods:
§ O1 (450-800)
§ O2 (850-950)
§ O12 (450-950)
Select the “Project Editor” tabpage in order to define the different kinds of projects CorpusStudio can work with (see Figure 2). There are two important predefined project types, and please do not (for the moment) pay attention to other types.
The current version of CorpusStudio pays attention to the file extensions and comment marker specifications, but it does not take the “Command Line” into account.
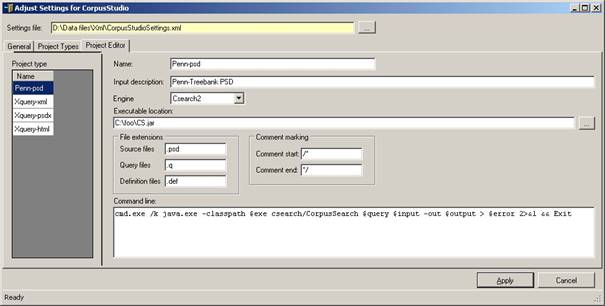
Figure 2 The project editor tab of the general settings
1) Penn-psd. This type takes Penn-Treebank PSD (.psd) files as input. It works with the JAVA program cs.jar. Changes in the location and/or naming of the cs.jar file should be made here. You are advised to keep your cs.jar file in the directory c:\foo (you can put it there manually).
2) Xquery-psdx. This project takes .psdx files as input, processes them with the JAVA program query.exe (made available by Saxon), and produces .psdx files as output. This project makes use of the internal Xquery engine, so that the location of the executable file is irrelevant.
3) Negra-tig. This project takes .tig files as input. Such files are called either Negra or Tiger-xml. Examples of corpora availble in this format are the CGN (Corpus Gesproken Nederlands), and the Negra corpus. This project makes use of the internal Xquery engine, so that the location of the executable file is irrelevant.
4) Alpino-xml. This format is not (yet) supported.
The Project Editor also contains the file extensions and command marking symbols peculiar to the project types. Here is an overview of the settings required for the two project types currently available in CorpusStudio.
|
|
Penn-psd |
Xquery-psdx |
Negra-tig |
Alpion-xml |
|
File extensions |
|
|
|
|
|
Source files |
.psd |
.psdx |
.tig |
.xml |
|
Query files |
.q |
.xq |
.xq |
.xq |
|
Definition files |
.def |
.xq |
.xq |
.xq |
|
Comment marking |
|
|
|
|
|
Comment start |
/* |
(: |
(: |
(: |
|
Comment end |
*/ |
:) |
:) |
:) |
Table 1 Specifications of Project Types supported by CorpusStudio
Corpus research projects are XML files with the extension .crpx. Create a new project using File/New, or open an existing one using File/Open. A corpus research project contains the following elements:
1) General information about the project, such as its name and purpose
2) Information about the input and output File and Directory locations
3) All the Definitions used by and defined for this project
4) All the Queries used by and defined in this project
5) The Constructor Editor contains a specification of the query execution order
Please get into the habit of providing as much information as possible in the General tab of the corpus research project, so that you (and others) will know in the future what the purpose of this corpus project was, and how you envisioned to reach that purpose.
There are more tab pages available in CorpusStudio, but these do not hold the specifications of a corpus research project—they serve to visualize the specifications and view the output of query execution. The tabs are the following:
1) The Hierarchy and the Tree tabs visualize the query execution order
6) The Output Monitor show the progress of query execution
7)
The Results tab give the results of
executing a series of queries
(Those results are also saved in an HTML file)
8) The Viewer allows you to quickly scan through individual files
The different tabs of the CorpusStudio main window will be discussed in the following subsections.

Figure 3 The general tab specifies the main features of a corpus research project
The “General” tab allows you to specify several important features of your Corpus Research Project. There are a number of things that have to be supplied obligatory. Others are optional. You are strongly advised to provide all information, even the optional items.
1) Name. The name for this corpus research project. It is advisable to use a name without spaces, so that the filename, which coincides with the project’s name, is consecutive too. When you change the name of a project, and save it (using Ctrl+S, or File/Save), then the program will ask you whether you want to save the project under this new name.
2) Author. Specify all people responsible for this project.
3) Project type. Choose between “Xquery-psdx” and “Penn-psd”. See section 3.2.
4) Date created. Choose the date on which this project was created.
5) Date last edited. CorpusStudio will keep track of this date itself.
6) Project Preferences:
a) Preceding context lines. The number of lines in the Results tab that should precede the line found by a query.
b) Following context lines. The number of lines in the Results tab that should follow the line found by a query.
c) Show syntax of each result. Whether you want to have a syntactic break-up of the line found by a query. For the Penn-psd projects, this will give part a bracketed labelling result. For the Xquery-psdx projects, this will give a one-level deep rendering of constituents.
d) Lock this project against synchronisation. Any corpus research project that is going to be filed/archived for future reference, for instance a project that delivered results you have published in a paper, should be “locked”. This locking overrides the otherwise specified synchronisation of query and definition files, as specified in Tools/Settings (see 3.1).
7) Goal. Concisely specify the goal of this whole project. If your project combines several goals, then consider dividing it up into more projects, each with one goal.
8) Comments. You are free to add any additional important comments to the project as a whole. For instance, specify the strategy you use in this project to reach the research project’s goal. Another good practise is to include the History of a project here (see Figure 3).
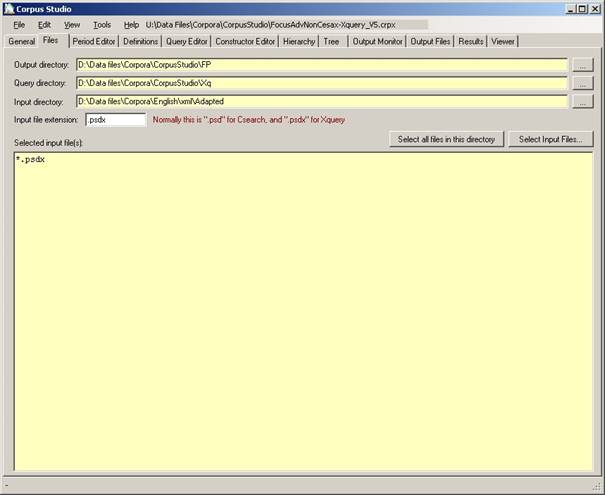
Figure 4 The files tab specifies the location of files and directories
CorpusStudio needs to be aware of the location of input files and some other directories before it can execute queries. The Files tab should therefore be filled in as quickly as possible when a new project is started.
1) Output directory. Specify the directory where CorpusStudio should store the results of a query execution task. The results consist of (a) an html file and (b) an xml file.
2) Query directory. Specify the directory where a backup of your queries will be placed. The Corpus Research Project file (with crpx extension) contains all your queries, but they are synchronized with those in the query directory you specify. If you use one query directory for all your projects, then synchronization allows each project to benefit from the improvements made in the query specified in a particular project.
3) Input directory. This is the directory where your corpus files are located. The corpus files (psd for the Penn-psd projects, and psdx for the Xquery-psdx project type) are taken from the directory specified here as well as the subdirectories of the input directory.
4) Input file extension. The extension for input files is defined for each project type in Tools/Settings/ProjectEditor. Sometimes you may want to use a project handling input files with a different extension. The setting here can then override the default input extension. The extension should start with a period.
5) Selected input files. Two buttons allow you to specify whether all files in the input directory should be taken into account for the query execution, or just those you specify.
a) Select all files in this directory. If this option is chosen, a wildcard will be used which indicates that all files with the specified extension are to be taken into account when queries are executed.
b) Select input files. This button allows you to select individual files. Use the control or the shift buttons to select individual files or a range of files. Individual files can only be selected from the directory specified in the Input Directory field. If you want to specify files from subdirectories, then you are confined to use Tools/Manual_Input_Files (see 7.1).
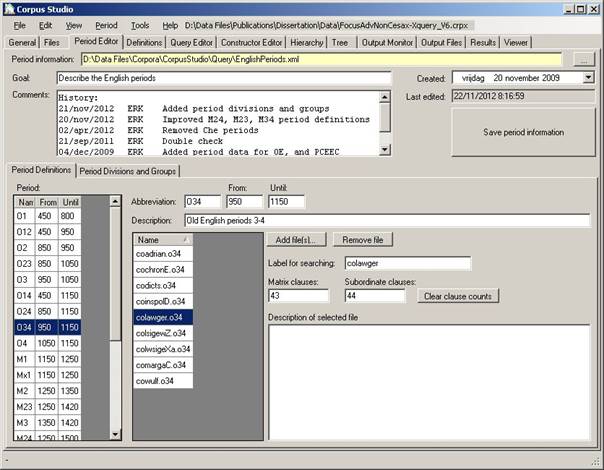
Figure 5 The Period Editor specifies which input files belong to which period
The period editor tab shows all information contained in the period information file, and allows the user to create, edit and delete this information. Period information is used by the query execution algorithm, to figure out which results belong to which time period. The query execution results are shown per time-period.
I M P O R T A N T
Do not use the period editor to define which input files should be treated.
Definition of which files function as input should be done by putting the necessary input files in a designated (sub)directory, and setting the input in the General tab to this directory (see section 4.2).
The information provided by the Period Editor counts for all projects, and even is the same for different project types (see Tools/Settings/Project_Editor). It provides a general description of which files in the corpus are part of which period. It also contains information about the size (in main clauses and subclauses) of each file in the corpora.
If you would like to work with only a part of the corpus as input, then put all the files for that part of the corpus in a particular directory, and specify that directory as input in the “Files” tab. See section 6.1 for a more detailed explanation and examples.
The Period Editor itself has two tab pages: one where the periods in use are defined, and one where these periods can be grouped into larger period divisions. Each of these tab pages will be treated in turn.
The information contained on the “definition” part of the Period Editor tab is this:
1) Period Information. The name of the XML file containing the period information.
2) Goal. The goal of this file.
3) Comments. Any additional information, such as version information.
4) Created. The date when the period information file was first created.
5) Last Edited. The system keeps track of the date when the last changes were made.
6) Period. This contains a list of all defined periods, showing each one’s name and dates.
7) Abbreviation. The abbreviation used for the selected period.
8) From. The year when this period starts.
9) Until. The last year of this period
10) Description. Additional comments pertaining to this period.
The individual files for each period can be selected in the listbox that is positioned in the middle of the Period Editor tab.
11) Add file(s). Use this button to add one or more files to the selected period. You can alternatively use Period/Add_Files.
12) Remove file. Remove the currently selected file from this period. (The file is not removed from the hard drive, the only deletion is its reference from this period.) You can alternatively use Period/Remove_File.
13) Label for searching. The identifier used to denotate sentences from this file (lower case).
14) Matrix clauses. The number of IP-MAT (or ‘S’ for other schemes) clauses in this file.
15) Subordinate clauses. The number of IP-SUB clauses in this file.
16) Description of selected file. You can add information about this file having to do with the period it has been placed into.
I M P O R T A N T
Using the period editor for synchronic genre/dialect research
If you have a synchronic corpus, you can divide it up into genres and/or dialects. If you supply each genre and/or dialect with a different “Period” abbreviation, and specify the files for each of these subdivisions here in the Period Editor, the results will show a division into the genres/dialects you have specified. The order of processing and display is alphabetical.
It can be useful to group detailed periods into larger divisions of periods, and this is where the second tab page within the period editor enters the picture:
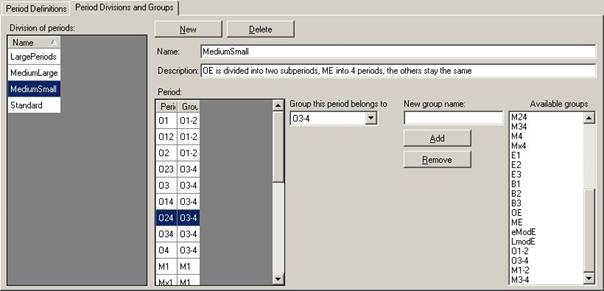
Figure 6 Definition of period groups
CorpusStudio automatically creates a division of periods which it calls “Standard”. This division of periods assigns each period to a group with the same name as that period. So the ‘standard’ division in effect retains the groupings that have been defined in the Period Definitions tab page.
Alternative divisions can be made by clicking the “New” button on the “Period Divisions and Groups” tab page. The user is requested to provide a name for the period group (in the example above the period group’s name is “MediumSmall”). CorpusStudio will initially assign each of the available periods to a grouping with the same name as the period. So period “O24” is assigned to period group “O24” and so on.
The user-defined re-division of periods into groups probably requires additional group-names. Adding and removing of group names can be done like this:
1) Add group names. Enter the group name in the box “New group name”, and then press the button “Add”. Check that the name appears in the listbox “Available groups”.
2) Remove group names. Select the group name in the listbox “Available groups”, and then press the button “Remove”. Check that it has actually been removed. (The current version of CorpusStudio may not yet check for situations where you have already been using a group name that you are now removing, so you need to check this yourself.)
Once new group names have been defined by the process just described, they can be used for re-grouping purposes. The process of re-grouping goes like this:
1) Select the period you want to assign to a new group. (In the example above the period “O24” is selected.)
2) Select the group you want this period to belong to from the combobox entitled “Group this period belongs to”.
Period groups may be non-consecutive; the user is free to form them in the way the situation demands. Be sure to use the save button once you have tediously defined period groups, so that the period definition backup file contains the latest details.
The period information that is being used in a particular corpus research project usually resides in two places: inside the corpus research project and on the “backup” location in the topmost textbox labelled “Period information.”
When the user makes changes to the period definition or to the period groups, these changes are automatically processed within the copy of the Corpus Research project currently being worked on. It is only when the automatic synchronisation function has been switched on that changes in the period definitions will also be processed in the “backup” copy of the period information.
The user can at any time make sure changes within the period definitions are processed in the backup location by pressing the large “Save period information” button on the right hand side of the Period Editor tab page.

Figure 7 The Defnitions tab contains one or more definition files to be used
The Definitions tab allows you to edit definition files. The types of definition files differ, depending on the particular project type you are working with (e.g. Xquery-psdx or Penn-psd). Once you have selected the Definitions tab, the menu options for Definitions become available.
· Import. If you have (received) a definitions file, and it is not located in the query directory (see section 4.2), then you can “import” it to your query directory using this command.
·
New. Start a new definitions file from scratch. If you already have
a definitions file, it will remain loaded in your corpus research project.
(N.B: the query execution of CorpusStudio has not been tested for
handling more than one definitions file yet.)
· Add. If you want to add a definitions file, and keep it in its original location (or if it is already located in the query directory), then this command will make this definitions file part of the current corpus research project.
· Remove. Remove the reference to the currently selected definitions file from this corpus research project. (If you have saved your corpus research project previously, a copy of this definitions file will remain in the query directory specified in the “General” tab.)
· Change Location. If you have a definitions file, but want to change its backup location (the location used for synchronisation), then “Change Location” allows you to do that.
· Up. Move the selected definitions file one position up in the list of definition files.
· Down. Move the selected definitions file one position down in the list of definition files.
The definition tab itself allows you to edit a definitions file. The following information is available for a definitions file:
· Name. The name of your definitions file without extension, and without path.
· Created. The date when this definitions file has been created.
· Last edited. This date is automatically set by the system.
· File. The full name and location of your definitions file.
· Goal. Succinctly specify the goal of this particular definitions file (especially if you use multiple definition files).
· Comments. Any additional comments (e.g. edit history) you would like to make about your definitions file.
· Text of the definitions. The definitions themselves can be specified here. Make as much use as possible of comments. This will allow you to trace back your intentions in the future.
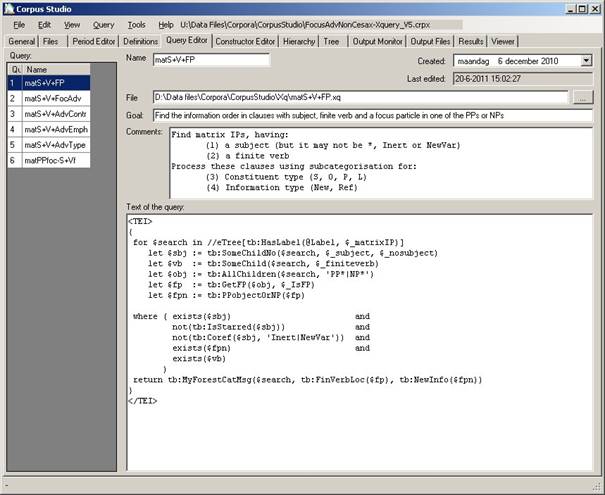
Figure 8 The Query Editor tab contains definitions of the queries belonging to this project
The Query tab allows you to edit query files. The types of query files differ, depending on the particular project type you are working with (e.g. Xquery-psdx or Penn-psd). Once you have selected the Queries tab, the menu options for Queries become available.
· Remove. Remove the reference to the currently selected query file from this corpus research project. (If you have saved your corpus research project previously, a copy of this query will remain in the query directory specified in the “General” tab.)
· New. Start a new query file from scratch. Depending on the project type (Xquery-psdx or Penn-psd) you will be asked to supply initial information for this query, such as the name of the query.
· Add. Select an already existing query file and make it part of this project. The backup location of your query file (see synchronization) will remain as it is, unless you change it with “Change Location”.
· Copy. The “copy” function is a convenient way to make a new or extended query based on an existing one. You will be asked to provide a new name for the copy of the query.
· Change Location. If you have a query file, but want to change its backup location (the location used for synchronisation), then “Change Location” allows you to do that.
· Up. Move the selected query file one position up in the list of query files.
· Down. Move the selected query file one position down in the list of query files.
The query tab itself allows you to edit a query file. The following information is available for a query file:
· Name. The name of your query file without extension, and without path.
· Created. The date when this query file has been created.
· Last edited. This date is automatically set by the system.
· File. The full name and location of your query file.
· Goal. Succinctly specify the goal of this particular query.
· Comments. Any additional comments you would like to make about your query. This is a good place to explain a bit more specifically what your query is supposed to be doing.
· Text of the queries. The query itself should be specified here.
o Penn-psd projects. There is little room for comments here. Just keep your queries as succinctly and to the point as possible. Be sure you know what you are doing when using the logical OR and the NOT (or !) operators.
o Xquery-psdx projects. Make as much use as possible of comments within the definition of your query. This will allow you (and others) to trace back your intentions in the future. Make sure that your Xquery functions are specified in the definitions file.
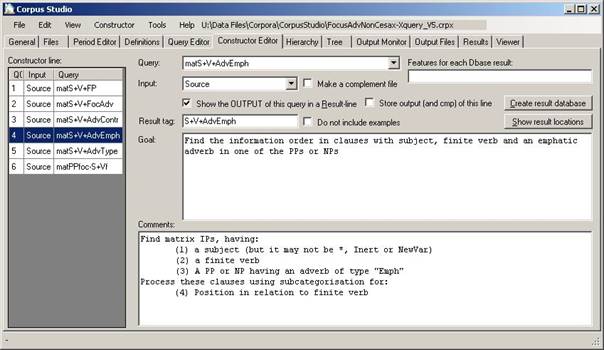
Figure 9 The Constructor Editor tab specifies the query execution order
The constructor editor allows you to define the order in which the queries are executed, and what the input is for each particular query. Both Penn-psd as well as Xquery-psdx project types allow the output as well as the complement to serve as input for another query.
A number of menu items become available under Constructor, once you have found your way to the Constructor Editor tab.
· Add. Add a query to the end of the constructor editor lines.
· Insert. Add a query immediately before the currently selected constructor editor line.
· Remove. Remove the currently selected constructor editor line from the queue.
· Up. Move the selected line in the constructor editor one up (if possible).
· Down. Move the selected line in the constructor editor one down (if possible).
The constructor editor tab itself allows you to specify what actions need to be taken when the current line in the constructor editor queue is executed.
· Constructor line. Add a query to the end of the constructor editor lines.
· Query. Add a query immediately before the currently selected constructor editor line.
· Input. Select the correct input line. The particular input lines you can choose from depends on the available outputs and complements defined in previous constructor lines. Every constructor line allows you to choose “Source” as input, which means that the query in this constructor line takes all the source files as its input. If you are in line #4 (as in the example above), you will be able to choose between 1-out (the output of constructor line #1), 1-cmp (the complement of constructor line #1), 2-out, 2-cmp, 3-out, and 3-cmp.
· Make a complement file. Set this flag if you would like the current constructor line to make the complement of its output available to the following constructor lines. Beware of complement-usage. The complement for Xquery processing constitutes all sentences in the input files that fail to meet the criteria set out in the query. The complement for CorpusSearch processing is a little bit different. Please see the CorpusSearch documentation for details.
· Show the OUTPUT of this query in a result line. There can be intermediate queries, the output of which you do not need to have shown in the overal results (see the “Results” tab in 4.10). Set this flag if you do not want to show the output of this line in the results.
· Store output (and cmp) of this line. This option is only valid for the CorpusSearch2 engine. If this option is set for a particular line in the constructor editor, then the output and the complement are combined into.psd files in the output directory you have specified. The files have the format <projectName>-QC_out.psd and <projectName>-QC_cmp.psd.. Use this option with care, because the results may be quite large, and processing may slow down as a result.
· Result tag. This is the tag (short description) that appears as rowheader in the results’ overview table (see the “Results” tab in 4.10).
· Do not include examples. If the query in the current line could produce a lot of results, and it only functions as a baseline, then you could set this flag to indicate that examples for this result line need not be taken up in the results HTML file that constitutes one of the main outputs of CorpusStudio. Alternatively you can set the maximum amount of examples (“examples per item”) to, for instance, 150 in Settings/General.
· Goal. Specify the goal of this query within the whole framework of the contructor lines. If the goal here coincides with the goal specified in the query editor, just double-click in this textbox, and the goal specified in the query editor will be copied here.
· Comments. Any comments or explanations needed for the operation of the current line in the query execution constructor. You can copy the comments from the query editor by double-clicking in this textbox.
There is one advanced features available for all query types.
·
Show result locations. An overview is produced of all the results for this particular
constructor line. The results are divided in periods, and files per period.
Each result lists its location in terms of forestId and eTree Id (although
these values only make sense for the Xquery-psdx projects). If a
syntactic layout of this result has been made, it too is being shown (in the
“PSD” column).
N.B: The result locations contains the number of results per text
in a table at the end.
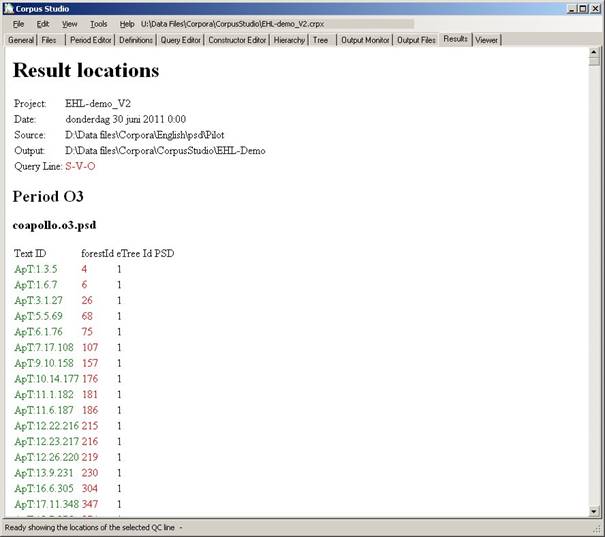
Figure 10 The result locations of one line in the constructor editor
There are a few other advanced features available, but these one only apply to Xquery-psdx projects. They allow for the creation of an xml database based on the output of the current query. See the Cesax Manual for a more detailed explanation.
The xml format of the database is the same CrpOview scheme as the one used for the xml file containing all output of a Corpus research project. There are a few “standard” fields supplied for the database. You can add your own fields in the following way: (1) let your query produce a semi-colon separated string with the values for your fields, (2) make this string available as “message” variable using the Xquery function tb:MyForestMsg or tb:MyForestCatMsg, (3) specify the names for these features in the “features for each Dbase result” textbox.
· Features for each Dbase result. Specify the feature names and their relative number in the message string (see above) in the format: <FeatureName>@<OrderNumber>, where consecutive features are separated by semicolons. If you have, for instance, three values made available in the “message” variable, and you want the 3rd and the 1st to be put in a database, then specify: MyName@3;MyName@1.
· Create result database. Push this button to start the database creation process. CorpusStudio will tell you where it has placed the resulting XML database, and how it has named it. Be sure to change its name (and location) to your desires, so as to prevent the database from being overwritten accidentily, when you access this project again later.
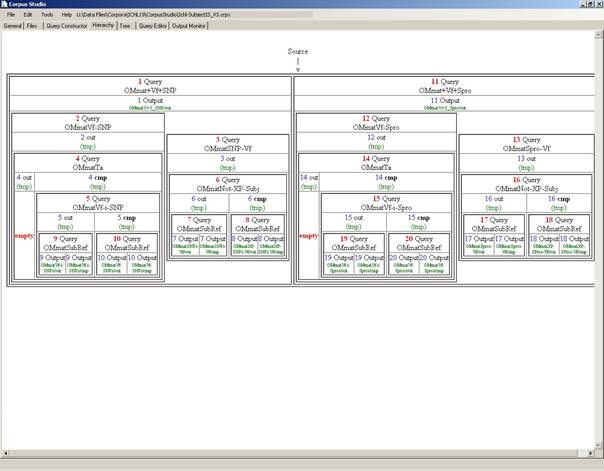
Figure 11 The Hierarchy tab shows the query execution order
When you access the hierarchy tab, CorpusStudio draws a representation of the hierarchy of your queries as defined in the constructor editor. Places where a result is produced, but it is not used in the Results tab are labelled as “empty”. The example above shows two such empty labelled outputs. But these are outputs from an intermediate query (named “tmp” by CorpusStudio), so all is in order.
If you do not like the way the hierarchy is presented here, consider using the Tree tab instead.
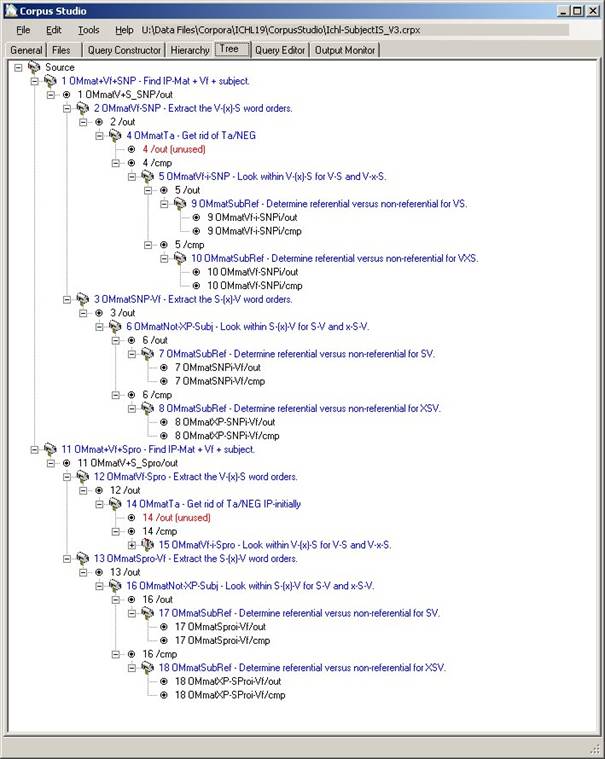
Figure 12 The Tree tab visualized the query execution order in another way
The Tree tab shows a treeview of the query execution ordering specified in the Constructor Editor. Queries are shown as mailboxes, and are coloured blue. Output and complements are shown as bullets and are normally coloured black. When there is something exceptional about the output, it is coloured red. In the situation above there are two outputs that are reddened, because their output is not being used as input to other queries, nor is their output shown in the results overview.
Double-clicking a query will bring you to the corresponding query in the Query Editor. You can update a tree by pressing F8 (or View/Update_Tree). Tree expansion and collapsing of trees can be done using Shift+F8 (or View/Expand, View/Collapse).
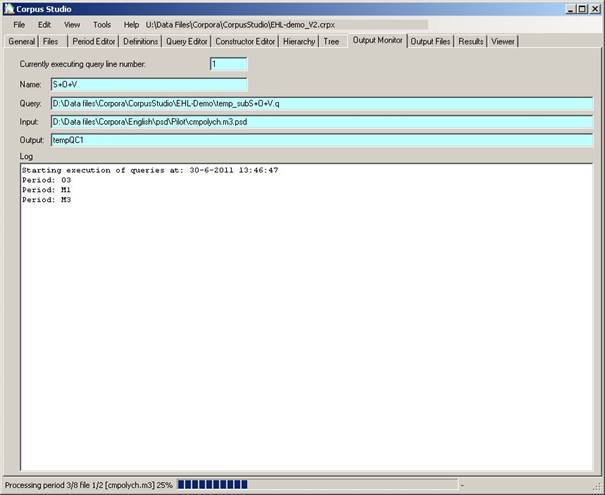
Figure 13 The Output Monitor tab keeps track of the query execution
The Output Monitor tab allows you to monitor the progress of query execution (which starts after you have pressed F10—see 5.4). Execution of queries is done in the following order:
1. Periods (as defined in the Period Editor): increasing date and name (see also “period ordering” in section 3.1).
2. Filenames: increasing name of files for each period.
3. Sentence: each file is processed sentence by sentence.
4. Query. Queries are processed in the order specified in the Constructor Editor.
The basic unit of processing in CorpusStudio, therefore, is the sentence, as it is being processed for all queries. The advantage of this execution order is that errors in queries are detected very early in the process.
As files and queries are being processed, CorpusStudio displays the following:
· Query line number. The number of the line specified in the Constructor Editor.
· Name. The result-line-description specified for this constructor line.
· Query. The complete backup location of this query.
· Input. The name of the current input file.
· Output. The (temporary) name of the output being produced.
· Log. The start and end time of the query execution is displayed here, and as the queries are being processed, the period names are logged.
The statusbar at the bottom of CorpusStudio shows how far each particular file has been processed by the queries defined in the Constructor Editor (so if you have 4 lines in the constructor editor, you will see 25%, 50%, 75% and 100% here).
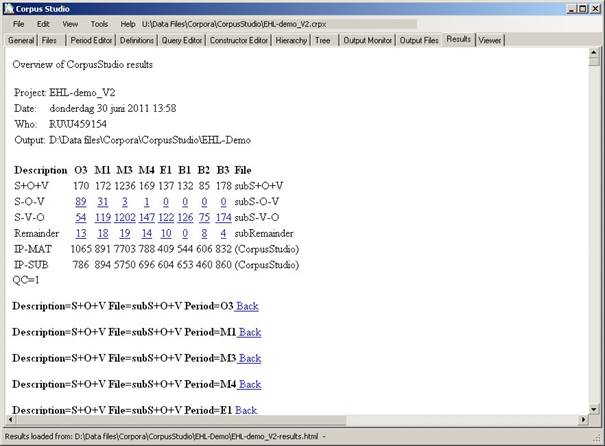
Figure 14 The Results tab shows results in tabular form and contains the examples
After query execution has completed, the results are provided in two different ways:
1. XML. An xml file is produced (in the CrpOview format as specified in 9.1). This file contains all the results of all query lines. But it does not contain the example sentences themselves, nor does it contain their context.
2. HTML. An html file is shown in the Results tab and is saved on the location specified. (The filename consists of the corpus research project’s filename, where –results.html have been added).
The html file displayed in the Results tab contains the following information:
· Project. Name of the corpus research project.
· Date. Day and time when the execution of this project was completed.
· Who. Author of the project in terms of the user name on the computer used to run this project.
· Output. Directory where the output html and xml files have been placed.
This general information is being followed by a table that summarizes the results numerically. Each row in the table coincides with a line in the Constructor Editor (unless that line’s “Show the output” flag was unchecked). Each column in the table represents one of the periods as specified in the Period Editor.
The last two rows in the table show the amount of main clauses and sub clauses in the input files as a whole for each period. The last column in the table shows filenames (for older versions of CorpusStudio), or repeats the name of the line as defined in the Constructor editor.
Jump to examples by clicking the number in a cell
By clicking on the number in a cell you are directed to a position within the html file where the example sentences for the period and constructor line number specified by the cell are located. The start of a section of examples contains the following elements (see Figure 15):
· Description. Name of the results line as available in the summary table above and as specified in the Constructor editor.
· Object File. (Same as above. )
· Period. The period from which these results are taken.
· Back. Press this button to go back to the overview table. Alternatively you can go back to the start of the html file by pressing Ctrl+Home.
Each example is numbered, and consists of several elements:
1) File. Short name of the file in square brackets. The example has [bain-1878].
2) Preceding context. The number of “preceding context” lines specified in the General tab. Each line is preceded by its location identifier.
3) Result. The line that meets all conditions in the queries is shown in blue.
4) Following context. The number of “following context” lines specifed in the General tab.
5) Syntax. If you have flagged “Show syntax” in the General tab, then this line shows the syntax of the sentence containing the result. The precise way by which the syntax is being shown depends on the project type. The example below illustrates the syntax for an Xquery-psdx project.
6) Message. If you have specified a message line—which can only be done for the Xquery-psdx and the Negra-tig projects—then the message line forms the end of the information for each example.

Figure 15 One example in the results file
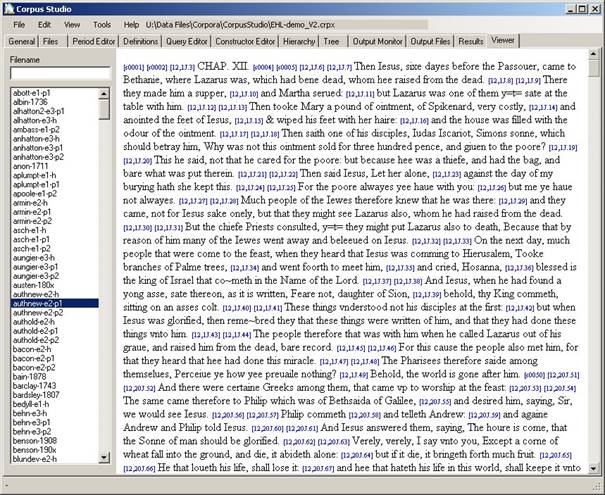
Figure 16 The Viewer tab allows viewing files available in the input directory
When you access the Viewer tab, a list is being made of all the input files that are available under the “Input directory” path currently specified in the Files tab. Select a file to have its contents displayed in the browser on this page. You can find words or sentences in a file by using Ctrl+F.
This section takes you through a typical CorpusStudio task, from the creation of a new corpus research project until the evaluation of the results of that project. Our task here, as an example, will be to compare the number of sub clauses having an SVO word order versus those that have an SOV word order as the English language changes in time.
The first thing we have to do is create a new corpus research project, which will contain the definition of our research task, all its queries, the way by which they are ordered etc. After you have started CorpusStudio—if you have not already done so—select File/New (or press Ctrl+N). You are prompted to provide two essential pieces of information:
· Corpus Research Project name. Give a succinct and, preferably, consecutive name for your corpus research project. Consider using underscores instead of spaces. Do not provide the extension crpx—CorpusStudio will supply that where it is needed.
· Query type. Select one of the query types that are available. The query type specifications are visible in Tools/Settings. They should not be altered, unless you are really sure of what you are doing.
We will call our corpus research project: subVOorder, since that succinctly captures what we are attempting to do. We will be making use of the Penn-Helsinki-York parsed corpora of different stages of English, and we will use the CorpusSearchII engine to do so. The projecttype will therefore have to be Penn-psd.
After confirming our choices, a new project is created, and some default directory locations are provided in the Files tab. The defaults are based on the last project we have used. Take the following steps:
1. Directories. Alter the directory locations to your likings (see section 4.2 for an explanation of the different locations).
2. Extension. Make sure the file extension is set to .psd (including the period).
3. Select input files. Press “Select all files in this directory”. The “Selected input files” textbox should now show “*.psd”.
4. Save. It is good practice to fix the changes we’ve made on crucial moments by saving the altered research project file. Press Ctrl+S or select File/Save.
a. CorpusStudio will suggest to save our file as subVOorder.crpx in the default directory for corpus research projects as we have specified in Tools/Settings/General (see 3.1). Confirm this choice.
b. Now go to the General tab, and continue in the next section.
Do go to the General tab, and fill in any information you can think of that is relevant for this corpus research project. We can specify the following information for our project:
1. Author. Fill in your own name here (or keep the name that has been supplied automatically by CorpusStudio).
2. Goal. Succinctly describe the overall goal of this corpus research project. A suggestion:
a. Compare SVO versus SOV word order in sub clauses.
3. Comments. This is the place where we can be a little bit more informative. Here’s a suggestion:
We test for word order SOV versus SVO in sub clauses.
These are the steps
(1)
Baseline: all sub clauses (IP-SUB*) having a subject, an object
and a finite verb
(2) SVO order: those of (1) with order ...S...V...O
(3) SOV order: complement of (2) with order ...S...O...V
(4) remaining: complement of (3) should have remaining situations.
Note: review the remainder in (4) to see if we've missed something.
History:
11/10/2010 ERK Created
01/07/2011 ERK Minor revisions
4. Date created. CorpusStudio will have supplied the current date there. If you want to specify a different creation date, this is the place to do so.
5. Preferences for this project
a. Preceding context lines. Let us ask for 2 lines of the preceding context to be given, so that we have an idea where example sentences come from.
b. Following context lines. I suggest taking 1 following context line.
c. Show syntax of each result. Let us check this flag, so that we get a better idea of the syntax of the results that are found.
d. Lock this project. We do not need to lock this project (see 4.1).
We have now supplied enough general information. This will help us in future to see what this particular research project was all about. We have also supplied valuable information that defines the results we will be going to see.
Our new project is going to work with several diachronic English corpora. We need to supply a period definition file in the Period editor that tells the program which text belongs to which period (the period definitions do not tell the program which files it needs to process—that information is taken from the “Input directory” specification in the Files tab; see 4.2).
If you do not have a period definitions file yet, visit the CorpusStudio homepage pointed to on the Radboud University site, and download the file “EnglishPeriods.xml”.
Once you have downloaded the correct period file, incorporate it into your project by choosing Period/Import_period_information.
It is good practice to have a “definitions” file where we define what we, for instance, mean with “subclause”, “main clause”, “subject NP” etc. You do not have to reinvent the wheel, so feel free to visit the CorpusStudio homepage pointed to on the Radboud University site, and download the definition file OE+MEU.def that is intended for work with the CorpusSearchII engine. (Creating your own period definition file is explained in 7.3.)
Once you have downloaded this file, you need to incorporate it into your project. Do this by choosing Definition/Import.
This command will copy the definitions file to the query backup directory, so that any changes you make are processed automatically (provided you have the synchronisation flags set in the General tab of Tools/Settings).
We are now ready laying the “foundation” of the corpus research project. We have defined all general information, have defined the directories where input should be taken from, where output should go to etc. We have our definitions ready. The next step is to define the actual queries.
Our project will need three queries:
1. subS+O+V. Get all sub clauses that at least contain a subject, an object and a finite verb.
2. subS-O-V. Get those sub clauses that contain S-O-V in the indicated order.
3. subS-V-O. Get sub clauses containing a subject, a finite verb and an object in the order S-V-O.
Create each query using the following procedure:
1. Create. Use Query/New, and supply the information needed for a new query:
a. Name. The short name as defined above.
b. Node. The highest node we should be considering. Set this to IP-SUB*.
c. Add to ignore. Retain this to \** (see the CorpusSearch website).
d. Definitions. Our own definitions file OE+MEU should be defined here.
e. Remove nodes. Uncheck this flag. Checking this flag can have large repercussions on the usability of the output you get. See the explanation.
f. Print indices. Check this flag (do read the explanation).
2. Edit. Provide the Goal, Comments and the actual Text of the queries as shown here:
|
subS+O+V |
subS-O-V |
subS-V-O |
|
Get sub clauses containing a subject, object and verb |
Get sub clauses containing the order subject-object-verb |
Get sub clauses containing the order subject-verb-object |
|
Subject, object and verb may be in any order |
The word order is: (1) Subject (2) Object (3) finite Verb There may be constituents intervening! |
The word order is: (1) Subject (2) finite Verb (3) Object There may be constituents intervening! |
|
node: IP-SUB* add_to_ignore: \** remove_nodes: f print_indices: t define: OE+MEU.def
query: (subIP iDoms subject) AND (subIP iDoms objectonly) AND (subIP iDoms finiteverb)
|
node: IP-SUB* add_to_ignore: \** remove_nodes: f print_indices: t define: OE+MEU.def
query: (subIP iDoms subject) AND (subIP iDoms objectonly) AND (subIP iDoms finiteverb) AND (subject Precedes objectonly) AND (objectonly Precedes finiteverb)
|
node: IP-SUB* add_to_ignore: \** remove_nodes: f print_indices: t define: OE+MEU.def
query: (subIP iDoms subject) AND (subIP iDoms objectonly) AND (subIP iDoms finiteverb) AND (subject Precedes finiteverb) AND (finiteverb Precedes objectonly) |
3. Save. Make sure to save each addition to the corpus research project using Ctrl+S.
The queries above make use of the definitions in OE+MEU.def. So the term “subIP” stands for IP-SUB*, as defined in this definitions file. The term “subject”, likewise, is not a literal, but is defined by the following two lines in the definitions file:
subjectoe: NP-NOM|NP-NOM-#|NP-NOM-RSP
subject: $subjectoe|NP-SBJ*
The first line defines the subject for Old English (where subjects are marked as nominative NPs), and the second line combines this OE definition with the definition for subject (NP-SBJ) used in more recent corpora. See the CorpusSearch website for the usage of definitions.
We have all necessary queries, but now they need to be processed in the right order. That is going to be the topic of the next section.
Once you have supplied all the necessary queries, CorpusStudio needs to know in what order the queries are to be processed. So go to the Constructor editor tab. Here’s where we will make 4 (four) construction lines.
1. Get all sub clauses with an S, a V and an O.
a. Select Constructor/Add. This will produce one constructor line with default settings. We will edit these settings for our purposes.
b. Make sure the query subS+O+V is selected. This is the general query that selects sentences having a subject, object and finiteverb as direct children of a sub clause. (These sentences include those with a transitive verb and existential clauses with a nominal complement.)
c. Set the input to Source. We want all input files to be taken into consideration.
d. Uncheck the Complement tag. We are only going to make use of the output of this query, not its complement.
e. Check the Show Output flag. We want to have this line on the summary table in the results.
f. Check the Do not include examples flag. We do not need to have examples of the subclauses that contain S,O,V in any kind of order.
g. Double click in the Goal textbox, in order to copy the goal from the query.
h. Double click in the Comments textbox to copy the comments from the query.
2. Get sub clauses with word order S-O-V.
a. Select Constructor/Add. This will add a second constructor line with default settings. We will proceed by editing these settings.
b. Make sure the query subS-O-V is selected. This query selects sentences having a subject, object and finite verb as direct children of a sub clause, and it specifies that the subject precedes the object and the object, in turn, precedes the finite verb.
c. Set the input to 1/out. We use the output of the previous constructor line (which uses query matS+O+V), so that we only look at those sentences that have a sub clause with a subject, an object and a finite verb.
d. Check (!) the Complement tag. The output of this line consists of S-O-V clauses, but we can use the complement as input to the next line, since it will contain sub clauses with an S, a V and an O, but not in the S-O-V order.
e. Check the Show Output flag. We want to have this line on the summary table in the results.
f. Uncheck (!) the Do not include examples flag. We do want to have examples of the subclauses that contain word order S-O-V.
g. Double click in the Goal textbox, in order to copy the goal from the query.
h. Double click in the Comments textbox to copy the comments from the query.
3. Get sub clauses with word order S-V-O.
a. Select Constructor/Add. This will add a third constructor line with default settings.
b. Make sure the query subS-V-O is selected. This query selects sentences having a subject, object and finite verb as direct children of a sub clause, and it specifies that the subject precedes the finite verb, which, in turn, preceds the object.
c. Set the input to 2/cmp. We use the complement of the previous constructor line (which uses query matS-O-V), so that we only look at those sentences that have a sub clause with a subject, an object and a finite verb but not with word order S-O-V.
d. Check (!) the Complement tag. The output of this line consists of S-V-O clauses, but we can use the complement as input to the last line.
e. Check the Show Output flag. We want to have this line on the summary table in the results.
f. Uncheck (!) the Do not include examples flag. We do want to have examples of the subclauses that contain word order S-V-O.
g. Double click in the Goal textbox, in order to copy the goal from the query.
h. Double click in the Comments textbox to copy the comments from the query.
4. Get sub clauses with other word orders.
a. Select Constructor/Add. This will add a fourth constructor line with default settings.
b. Make sure the query subS+O+V is selected. This query selects sentences having a subject, object and finite verb as direct children of a sub clause in any order.
c. Set the input to 3/cmp. We use the complement of the previous constructor line (which uses query matS-V-O), so that we only look at those sentences that have a sub clause with a subject, an object and a finite verb but not with word order S-O-V nor with word order S-V-O.
d. Uncheck (!) the Complement tag. This is the last query, and we only need to look at the output of this query.
e. Check the Show Output flag. We want to have this line on the summary table in the results.
f. Uncheck (!) the Do not include examples flag. We do want to have examples of the subclauses that contain word orders different thatn S-O-V and S-V-O in sub clauses.
g. Define the Goal as:
i. Get sub clauses containing a subject, object and verb, but not in SVO or SOV order.
h. Formulate a Comment like this:
i. The SOV and SVO word orders have already been filtered away in steps #2 and #3.
All processing steps have now been formulated in the correct order. Make sure you save the results by pressing Ctrl+S (or selecting File/Save). Let us now spend a little time on double-checking whether the query ordering will proceed in the correct order.
Select the Hierarchy tab in order to verify the ordering of the queries. If all is well, you will see a picture like this:
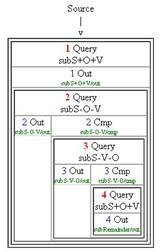
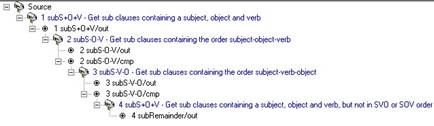
Figure 17 Verifying the queries in the subVOorder project
The hierarchy shows that the 1st query line takes “Source” as input, and that its output serves as input to the second query line. The complement of the second line feeds into the third query line, and the complement of the third line feeds into the fourth line. All is well.
Selection of the Tree tab and pressing Shift+F8 leads to the treeview shown in the figure above. This too shows that the correct queries are going to be executed in the correct order.
We are now ready to execute the queries in the correct order. Do this by pressing F12, or choosing Tools/Execute.
1. CorpusStudio switches automatically to the Output Monitor tab, and takes several minutes to process the information.
2. You can watch the progress, take a break, or do some other work.
a. You are not advised to switch to other tab pages of this corpus research project. This could lead to unexpected results.
b. You are not advised to open another instance of CorpusStudio. The synchronisation settings would lead to unexpected results, and might result in loss of information.
c. If you want to interrupt the process, press F11. As soon as it is possible, the program will stop execution of the queries. No results will be available.
3. Once the query execution has been finished for all files in the input directory specified in the General tab of this corpus research project, a resulting html file will be created and shown. CorpusStudio will take you to the Results tab. Your table should look something like the one I have provided in Figure 18.
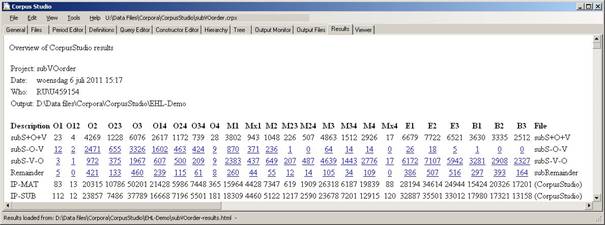
Figure 18 Resulting table for the subOVorder research project
When CorpusStudio has directed you to the Results tab, you should be able to see the summary table of the results. Beware, however, there may be more summary tables. There is a main summary table (as in Figure 18), but after this main table there is one summary table for each of the “Period Groups” that you have defined in the Period Tab (see ).
We can now “leaf through the results” in order to see what has happened, and whether the results are as we would have expected.
1. General trend. The general trend can be gleaned from the results table to some extent. What we see is that the number of SOV word orders found within one period declines with respect to the number of SVO word orders in that same period.
a. Periods O24 and O4 seem to form the turning point from mainly SOV to mainly SVO.
b. Excel. You could copy the table with the numbers to Excel (or your favourit spreadsheet program) and calculate the actual percentages of SVO with respect to SOV or with respect to the baseline.
2. Look at SVO. We start by looking at some examples of SVO in older English (since that is the time we would least expect these word orders).
a. Click on the subS-V-O result line for period O2.
b. Check some of the sentences here—do they really have SVO word order? Which elements intervene between S-V and between V-O? Are these sentences restricted to a particular verbal category?
c.
Looking at one
example already helps. The example is from [cobede,BedeHead:1.6.14.6]. The
example shows a real subject-finite_verb-direct_object word order in a sub
clause:
Đæt
Seuerus se casere onfeng micelne dæl Breotene.
d. Checking the syntax of the example helps too. The subject and the object are correctly identified.
i. The subject is (8 NP-NOM Seuerus se casere).
ii. The verb is (16 RP+VBI onfeng).
iii. The direct object is (18 NP-ACC micelne dæl Breotene).
iv. The whole syntax of this sentence:
/*
7 IP-SUB: 7 IP-SUB, 8 NP-NOM, 18 NP-ACC, 16 RP+VBDI
*/
(0 (1 CODE <T06850000500,1.6.14>)
(3 CP-THT (4 C +D+at)
(6 IP-SUB (7 IP-SUB (8 NP-NOM (9 NR^N Seuerus)
(11 NP-NOM-PRN (12 D^N se) (14 N^N casere)))
(16 RP+VBDI onfeng)
(18 NP-ACC (19 Q^A micelne)
(21 N^A d+al)
(23 NP-GEN (24 NR Breotene))))
(26 , ,)
(28 CONJP (29 CONJ &)
(31 IP-SUB-CON (32 NP-NOM *con*)
(34 NP-ACC (35 D^A +tone))
(37 PP (38 P mid)
(40 NP-DAT (41 N^D dice)))
(43 RP+VBD tosceadde)
(45 PP (46 P fram)
(48 NP-DAT (49 ADJ^D o+drum) (51 ADJ^D unatemedum) (53 N^D +teodum))))))
(55 . .))
(57 ID cobede,BedeHead:1.6.14.6))
3. Look at SOV. Return to the main results table by clicking Ctrl+Home. Now look at SOV examples in later English (since this word order gradually was lost).
a. Click on the subS-O-V result line for period B1, which suggests that there still is an SOV word order in a sub clause as late as the B1 period (defined in the Period editor as running from 1700 until 1769).
b. Check the sentence there. Does it really have SOV word order? Which elements intervene between S-O and between O-V?
c. The one instance with SOV word order is from [brightland-1711,5.36], and the syntax of the sub clause shows that the subject is represented by a trace, which is marked as *T*-1 in this corpus.
i. We probably do not want to include “empty” or “trace” subjects in our results.
ii. We should therefore add an additional requirement to the subject in our query files.
4. Look at the remainder. Return again to the main results table by clicking Ctrl+Home. Now look at some of the “remainder” word orders in later English.
a. Click on the Remainder result line for period B3.
b. Check some of the 164 instances found over there.
c.
The first instance there is from
[BAIN-1878,374.226], containing:
But
why [IP may not we learn them] exactly as they occur in the mother
tongue?
d. The word order here is VSO:
i. Vfin (the auxiliary may)
ii. S (the pronoun we)
iii. O (the direct object pronoun them).
e. We should have excluded sub clauses that are part of a question clause, for instance by adding the following condition to our queries:
i. (!CP-QUE* iDoms subIP)
There is much more to creating and verifying corpus research projects, but as far as CorpusStudio is concerned, this chapter has given you enough information to deal with projects using the CorpusSearchII engine. Do make use of the query language information on the internet (you can use Help/Query_languages/CorpusSearch to go to the website).
The CorpusSearch engine is not being developed further, as the website says, so you could consider switching to Xquery. You can use the Cesax program to convert psd programs to the psdx format. Such texts can then be processed using the Xquery language (see 7.3.4).
Instead of creating a project from scratch, CorpusStudio allows the creation of a research project with the help of a wizard. Provided one has identified the structure that needs to be found in the related “Cesax” program, the CorpusStudio wizard allows the relatively simple creation of a complete project without the need to know any Xquery. And even if programming expertise is available, the wizard makes it possible to quickly create a structure that can then be adapted to one’s particular purposes.
The first step in the process, then, is opening a syntactically parsed .psdx file in Cesax, and selecting a sentence that contains a configuration that is at the primary interest of the researcher. If one would be looking for main clauses in Chechen, for instance, that contain the equivalent to the English “when-clause”, the clause in Figure 14 might be a good point to start.
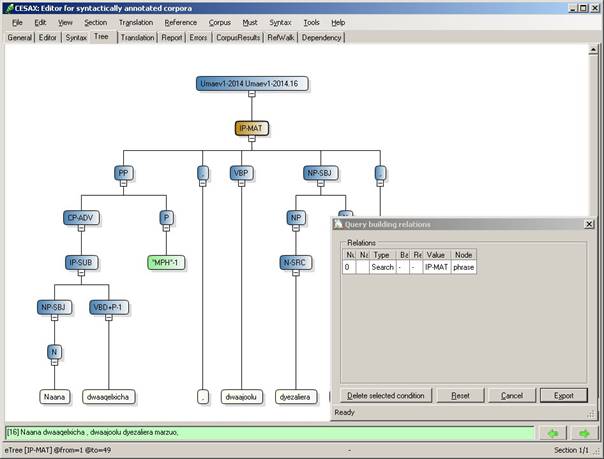
Figure 19 Preparing a Corpus Research for CorpusStudio
The preparation of a corpus research involves selecting all relevant constituents, and this is done in the “Tree” tab page in the following way:
· Select the hierarchically highest node (the “IP-MAT” in Figure 14) and press SPACE. The “Query building relations” window appears, and this first selected node receives the variable name “search”.
· Select all relevant sub-nodes, and each time press SPACE. The program will come up with a textbox, which is where you provide a relevant name for the selected node. See Figure 15:
o The constituent “NP-SBJ” has received the name “sbj”. The “Query building relations” window shows that it is the “child” of “search”, which always is the first node.
o The constituent “VBP” has received the name “vFin”. The “Query building relations” window shows that it too is a “child” of “search”.
o The constituent “PP” is about to receive a name. The name-entering textbox has appeared, and the user is giving it the name “whenClause”.
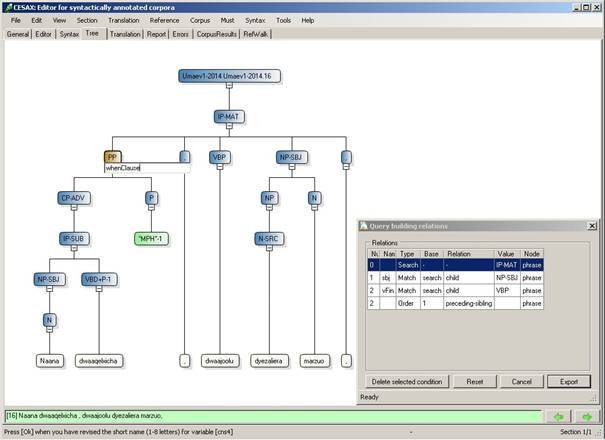
Figure 20 Providing variable names for selected constituents
What about constituent order? Notice that the node vFin has received an ordering relation: node “2” (which is the vFin) should receive node “1” (the sbj). Cesax initially assumes that the identified constituents must appear in the order in which they are available in the clause. If this is undesirable, then the individual ordering conditions can be deleted by “Delete selected condition”. And if anything goes wrong in the query preparation, “Reset” can be used to start the process afresh.
The next step for the purpose of identifying the correct constituents when looking for Chechen “when-clauses” would be to select the constituent “VBD+P-1”, since this heads the when-clause; otherwise a query might just be looking for main clauses with a finite verb, a subject and any kind of PP.
Once all nodes that are needed in identifying the clauses one is looking for have been added to the “Query building” window, “Export” needs to be pressed. This issues the command to save the ingredients of the query-to-be to a special file on the computer. It is this special file that the program CorpusStudio will use in its Query Creation Wizard to automatically prepare the Xquery code that looks for the structure we are interested in.
Once the Query Creation Wizard in Cesax has been run, it is time to switch to CorpusStudio. The program should be opened, and then the Corpus Research Project Creation Wizard can be run. The procedure starts by choosing File/New, which brings up the following dialog box:

Figure 21 Choosing a project type and naming the project
For the purpose of this walkthrough the project type is “Xquery-psdx” (since we are working with .psdx files), and the name of the project is “ChechenWhen_version1”. Once the project type is selected and the name entered, “OK” can be pressed. This immediately brings up the first step in the “Project initialisation wizard”:
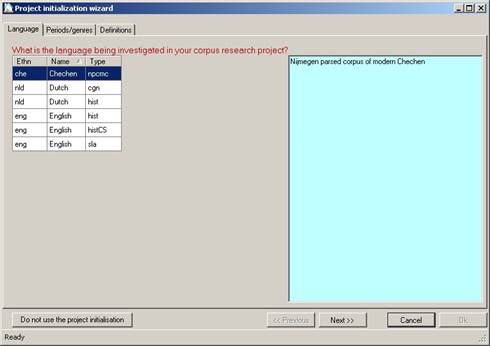
Figure 22 Project initialisation: language
This first step requires the selection of one of the pre-configured languages. For our project, the first language “Chechen” is chosen. (It is possible to work with other languages, but not with the project initialisation wizard as it is right now; should you want to add a language to the wizard, please contact the CorpusStudio help desk.)
The initialisation consists of three steps, and we have had the first one. The next step comes up once “Next” has been pressed.
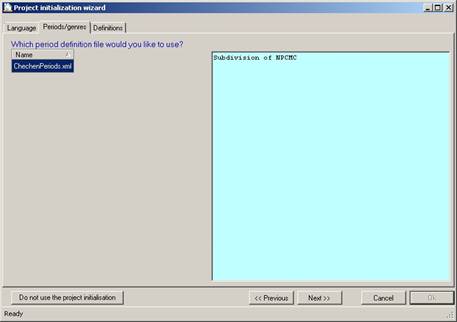
Figure 23 Project initialisation:Period or Genre
The second step in the wizard requires one to specify one of the “period definition files”. Most of the projects that are currently available only have one such file. This xml file contains the names of all the text files belonging to a particular corpus, and for each file it holds information regarding its genre and/or time-period. The Chechen texts are divided in two ‘periods’: C3 and C3t. The former covers modern Chechen texts that have been written straight away, while the latter covers Chechen texts that have been translated from other languages (e.g. Russian or English).
The last step in the project initialisation can be selected by pressing on “Next”.
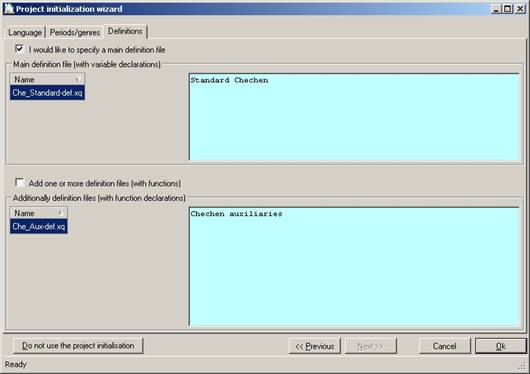
Figure 24 Project initialisation:Definitions
The last step of the wizard allows one to select one or more definition files. Such files contain definitions of variables (e.g. the labels that are used as ‘subject’, or all the different finite-verb labels) as well as user-written functions (we will come to that later). For the purpose of this walkthrough we select the main definition file (it is common practice to at least include such a file, since it may come in handy at some point), and we will not select any additional definition files.
The corpus files (psd for the Penn-psd projects, psdx for the Xquery-psdx project type, and tig for the Negra-tig project type) are taken from the “Input directory” specified on the Files tab page as well as the subdirectories of that directory. If you would like to restrict the input to only part of a corpus, you will have to play a bit with the file structure, and, possibly, duplicate some texts in the corpora.
It is good practice to provide the texts from the corpora in a hierarchical file structure, like the one given here for the English corpora:
English/psd/AllPeriods/OE - Old English texts (YCOE).
English/psd/AllPeriods/ME - Middle English texts (PPCME2).
English/psd/AllPeriods/eModE - Early Modern English texts (PPCEME).
English/psd/AllPeriods/LmodE - Late Modern English texts (PPCMBE).
English/psd/Pilot/All - Provide one text from each of the periods
Using the file structure above, you can restrict the input to texts from one period only (e.g. OE or ME), you can look at a small pilot corpus (the Pilot/All subdirectory), or you can take the whole corpus as input (by specifying the English/psd/AllPeriods as input directory).
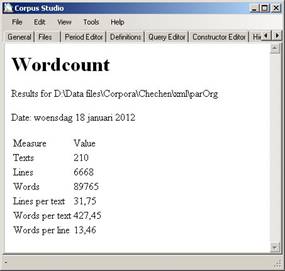 Wordcounts
You may wish to verify the number of words, lines or texts in a particular corpus or in a corpus part you have defined yourself. This can be done through Tools/Wordcount, but only for psdx corpora. Specify the directory where the corpus (or part of the corpus) resides, and, the counting starts.
Note: the number of ‘lines’ is the number of sentences that are distinguished in the text (in xml terms: the <forest> elements). To find out what has been taken as ‘line’ in a particular text, load that text in Cesax and do View/Text.
Note: the number of ‘main clauses’ is reported in the Results of a query, and this number is not equal to the number of lines (in general). See also section 8.3.5.
There are some advanced tasks you can use CorpusStudio for that need some more explanation. Do skip this section if you do not need the tasks specified here!
When you want to select a particular input file with a name or extension not captured by the automatic tools, you can use Tools/Manual_input_files. This command turns off the read-only feature of the “Selected input file(s)” textbox on the Files tab. You are now able to edit this textbox manually.
If all you want to do is specify a diverging extension of the input files for this project, make use of the “Input file extension” textbox instead!
If you have input files, for instance, for processing with CorpusSearch, but with an extension upsd instead of psd, you can specify this alternative extension on the Files tab in the textbox labeled “Input file extension”. Make sure you start the extension with a period.
A well-defined period file is essential to the processing of corpus research results. Do read section 4.3 on the Period-editor tab page. This section explains a few specific tasks in more detail. If you already have (downloaded) a period information file, then you can easily skip this section. But if you have been preparing your own corpus of files (e.g. through Cesax), then this is where you need to spend some time!
If you want to start a completely new Period Information file, proceed as follows.
1. Start a new project, and give it a name of your liking.
2. Select the Period editor tab.
3. Choose Period/Create_period_information.
4. Choose an appropriate location and name for the new period information file. (You do not need to supply an extension—CorpusStudio will give it the xml extension.)
5. Fill in the informational fields for this new period information file
a. Goal. Succinctly specify the scope and goal of this file.
b. Comments. Add any additional information for this period file.
c. Created. Keep the system-chosen date, or change it to your liking.
6. Add periods (see add period above, steps 1-3).
7. Add texts to each period (see add texts above, steps 1-5).
8. Repeat steps 4-6 of the instructions under “add period” to make sure the new period information file gets properly saved.
If you have made a new period information file for an existing corpus, consider making it available to the larger community of CorpusStudio users. Please consult the CorpusStudio homepage referred to from the Radboud University website.
If you only want to add a period definition to a period definition that already exists, all you need to do is this:
1. Go to the Period editor
2. Select Period/Add
3. Supply the name of the new period.
4. Make sure this project is not “locked” against synchronisation (see the General tab page of this corpus project in 4.1).
5. Make sure the general synchronisation flags are checked on the General tab in Tools/Settings.
6. Save the project by using Ctrl+S or File/Save.
a. Saving a project when synchronisation is set will automatically transfer changes to the period definition into the Period Information file specified on the Period editor tab.
Suppose you have a new corpus of a different language that you would like to process with CorpusStudio. Before you can use the texts from this corpus, you either need to add them to existing periods or make a completely new Period Information file.
If you want to add texts to an existing period information file, proceed as follows:
1. Go to the Period editor
2. Select the period you would like to add files to in the listbox labelled as “Period”.
3. Select Period/Add_files or press the “Add file(s)…” button.
4. Locate and select the new corpus files you would like to add, and then press Open.
a. This will add the texts to the currently selected period
5. You can supply additional information for each file here, if you want to. You are not advised to fill in the “Matrix clauses” and “Subordinate clauses” textboxes yourself here. CorpusStudio will calculate the number of main and subordinate clauses of the files you have added as soon as first execution including them takes place.
6. Repeat steps 4, 5 and 6 of the instructions above for adding a period defiinition, so that the synchronisation transfers the additions to the periods to the Period Information file you have specified.
It can be useful to group detailed periods into larger divisions of periods. CorpusStudio automatically creates (well, it should create) a division of periods which it calls “Standard”. This division of periods assigns each period to a group with the same name as that period. So the ‘standard’ division in effect retains the groupings that have been defined in the Period Definitions tab page.
(Note: if CorpusStudio has not been as cooperative as it should, and has neglected to make the “Standard” division, do send me a note and tell me how his happened. And don’t forget to make the “Standard” division of periods yourself, if you find yourself in this situation.)
You may want to add period divisions for a number of reasons, some of which are:
1. Genre differentiation.
2. Combining several small periods into larger period-divisions.
3. Language learning cohort differentiation.
4. Translated versus non-translated texts.
Whatever the reasons are, you can make your own new “Division” by using the following steps:
1. Create a division. Use the “New” button on the “Period Divisions and Groups” tab page). Give this division a logical (short) name as well as a description.
2. Create groups. The new division (say “Genre”) consists of groups (say “Proze” and “Poetry”) and you need to add these period groups. Fill in the “New group name” textbox and then press “Add”. Double check to see if this new group name has been added to the list of group names
3. Link periods to groups. The next step is to link each of the small detailed periods you have to the correct period-group (see 4.3.2 for details).
Once you have defined your period divisions, make sure you save the results (see 4.3.3). Make a backup of your period-division xml file just in case. And if you want to, consider making it available to the CorpusStudio homepage.
The results of executing shows the number of main clauses and subordinate clauses (see 4.10 as well as the two walkthroughs). These numbers are not calculated ‘on the fly’ each time. They are calculated only once (when the softward sees that they have not been done). And then they are stored in the period definition file.
Note: when the make-up of psdx files changes, make sure to ‘reset’ the counts of the associated entries in the period definitions.

Figure 25 Clause count resetting
Resetting the main clause and subordinate clause counts can be done by opening the Period Editor, selecting the relevant period, selecting the file in that period, and then pressing the “Clear clause counts” button (see Figure 25).
Note that the period definition file then needs to be saved again.
There are currently three types of projects using the Xquery engine:
1. Xquery-psdx. This is the xml equivalent of the available treebank psd files, for example, for Old English (YCOE), Middle English (PPCME2), early Modern English (PPCEME) and late Modern English (PPCMBE). Sentences are marked as <forest>, syntactic units as <eTree> and words (endnodes) as <eLeaf>. The structure of these nodes is strictly hierarchical, and resembles the syntactic structure. The xml schema used for the psdx format is available online (see 9.2). A batch converter that translates psd files into the psdx format, called TreebankToXml, is available on the Radboud University site.
2. Negra-tig. This format has been used to encode parts of the Dutch CGN (Corpus Gesproken Nederlands) and the German Negra corpora. Sentences are coded as <s>, non-terminal nodes as <nt> and terminal nodes as <t>. Each <s> node simply takes a list of <t> and of <nt> nodes, and the structure of the syntactic phrases is dealt with by providing each <nt> node with a number of <edge> children, which are pointers to either <t> or <nt> nodes.
3. Alpino-xml. Parts of the CGN have been transformed in this format, and a considerable amount of Dutch texts have been added through the Lassy project. Sentences, syntactic phrase and terminal nodes are all encoded through <node> nodes. Their hierarchy resembles the syntactic hierarchy of the sentence.
This current section discusses the way in which the three types of corpus research projects differ from Penn-psd projects (which are treated in section 5).
Creation of an Xquery-psdx project largely runs along the lines of the creation of a Penn-psd project, as described in section 5.2. The differences are as follows:
1. When creating a new research project (using Ctrl+N), select the type of the project as Xquery-psdx, Negra-tig or Alpino-xml.
2. Put all your definitions into one definitions file. Consider downloading the definitions file that comes with a set of Xquery function aimed at working with the Xquery-psdx format. (See the CorpusStudio homepage.)
3. You can make use of several built-in Xquery functions, as defined in appendix 9.3. All of these functions use the prefix ru:
4. The queries for Xquery-psdx projects should adhere to the format described in 7.4.2.
Queries for the Xquery projects need to adhere to a particular format. An example query is given here.
<TEI>
{
for $search in //eTree[ru:matches(@Label, $_matrixIP)]
let $sbj := tb:SomeChildNo($search, $_subject, $_nosubject)
let $vb := tb:SomeChild($search, $_finiteverb)
where ( exists($sbj) and
exists($vb)
)
return ru:back($search)
}
</TEI>
The most important elements in the query are:
1. Tag: the correct opening and closing tag should be used
2. Brackets: curly brackets must be inside the opening and closing tags
3. Code: the Xquery code within the brackets must at least consist of a for, where, return sequence, and the return sequence must have a call to ru:back().
First of all, the tag. The query should be enclosed between an appropriate opening and closing tag. This tag differs per project type:
|
Project |
Tags |
|
Xquery-psdx |
<TEI> … </TEI> |
|
Negra-tig |
<subcorpus> … </subcorpus> |
|
Alpino-xml |
<alpino_ds> … </alpino_ds> |
The next essential is the presence of curly brackts: the body of the query must be between curly brackets {…}. The code of the query within these curly brackets consists of a for … let … where … return expresion, but the let part is optional.
· for. Use the for statement to zoom in on the node you would like to focus your attention on. The name of the tag used for this node depends on the project type.
o Xquery-Psdx. Each sentence is inside a <forest> element. The constituents within the sentence are all <eTree> (embedded tree) elements. The terminal nodes that contain the lexical content are the <eLeaf> (embedded leaf) elements. In the Xquery-psdx example above, the $search variable in the for statement selects all <eTree> nodes that have an IP-MAT label.
o Negra-tig. The non-terminal nodes are inside a <nt> element, and the terminal nodes inside a <t> element. A Negra-tig for statement would, for instance, select <nt> nodes as follows: for $search in //nt[ru:matches(@cat, $_matrixIP)].
o Alpino-xml. Each sentence is in a <alpino_ds> element (usually each file contains just one sentence). All the constituents up to the lowest terminal node level are in <node> elements.
· let. Use let statements to pick on particular nodes—children of the main node, ancestors of them, siblings, etc.
· where. Use the where statement to test your conditions. You can use boolean operators and and or. Negation is accomplished by the built-in function not().
· return. The return part can be a call to the built-in function ru:back(). The function ru:back() can take up to three arguments, and the different possibilities are listed below, where ndArg is the node you would like to be particularly emphasized in the result examples, the string variable strCat is used for subcategorisation (see 7.4.4), and the string strMsg is the message you would like to have displayed with this particular result. (The message string can also be used for database creation; see 7.5.)
o ru:back(ndArg).
o ru:back(ndArg, strMsg).
o ru:back(ndArg, strMsg, strCat).
<TODO: explain how to make your own return function>.
The Xquery language allows us to access the syntactic constituents in a number of different ways. Remember that syntactic constituents form a hierarchical tree. The xml representation of the syntactic tree in the Xquery-Psdx projects is a hierarchical tree of <eTree> elements. The whole syntactic tree of one sentence consists of these <eTree> elements, and has a <forest> element at the top. The actual ‘words’ (the lexemes or endnodes in the syntactic tree) are encoded as <eLeaf> elements. Here is a piece of (slightly simplified) xml code that captures the sentence “Linguistics is fun.”
<forest forestId=’1’ Location=’s01’>
<eTree Id=’1’ Label=’IP-MAT’>
<eTree Id=’2’ Label=’NP-SBJ’>
<eTree Id=’3’Label=’NS’>
<eLeaf Type=’Vern’ Text=’Linguistics’ />
</eTree>
</eTree>
<eTree Id=’4’Label=’BEP’>
<eLeaf Type=’Vern’ Text=’is’ />
</eTree>
<eTree Id=’5’Label=’ADJP’>
<eTree Id=’6’Label=’ADJ’>
<eLeaf Type=’Vern’ Text=’fun’ />
</eTree>
</eTree>
<eTree Id=’7’Label=’.’>
<eLeaf Type=’Punct’ Text=’.’ />
</eTree>
</eTree>
</forest>
<TODO: explain how to reach the different constituents using the Xpath axes>
The output of queries is normally provided for each line defined in the Constructor Editor. Subcategorisation makes it possible to provide a subdivision of the results for one line in the Constructor editor. Suppose you have a query that looks for S-V-O sentences. When you want to know what different kinds of subjects SVO sentences occur in, act as follows:
1. Provide a variable (e.g. $strCat) with the type of the subject. You can simply take a feature of the subject (if your particular xml corpus provides that), or write a function giving you the subject type, e.g: $strCat := tb:SubjectType($sbj). This function could return, for instance, the values pronoun or fullnp.
2. Take either the function tb:MyForestCat or tb:MyForestCatMsg as “return” functions of your query.
3. Provide $strCat as argument to the return function.
When your query has been executed, the query itself will, as usual, have its own line in the results table. On top of that there will be one line in the results table for each different value you subcategorize on. The SVO example above would have one line for pronoun subjects and another line for fullnp subjects.
Execution of a project that uses the Xquery engine takes place in exactly the same way as execution of Penn-psd projects: press F10 or select Tools/Execute. The only difference is the way in which the queries are being executed internally. The Penn-psd projects use a command shell to call an external java function, while the Xquery projects make use of the saxon Xquery engine inside CorpusStudio.
CorpusStudio allows for the creation of an xml database based on the output of a particular line in the Constructor editor (see also 4.6). Right now, this is only possible for Psdx-Xquery projects.
The xml format of the database is the same CrpOview scheme as the one used for the xml file containing all output of a Corpus research project (see appendix 9.1). There are a few “standard” fields supplied for the database:
· Text. The sentence in which the hit occurs, including the preceding and following context lines that have been specified.
· Psd. A syntactic break-down of the search hit in bracketed labelling.
· Pde. The translation of the ‘hit’ sentence into English, if this has been supplied in the psdx text file.
User-defined fields can be added to the database output in the following way:
a) Have the query produce a semi-colon separated string with the values for the user-defined fields.
b) Make this string available as “message” variable using the Xquery function ru:back() (see the [strMsg] argument in section 9.4.7).
c) Specify the names for the user-defined features in the “features for each Dbase result” textbox.
An example query that (a) creates a semi-colon separated string for the user-defined fields and (b) makes it available as ‘message’ variable in the ru:back() function looks like this:
<TEI>
{
(: Look for main clauses :)
for $search in //eTree[ru:matches(@Label, $_finiteverb)]
…(other Xquery code is skipped)…
(: Make features :)
let $db := concat($feat_cls, ';', $feat_obj, ';',
$feat_lab, ';', $feat_txt, ';', $lem, ';',
$sNum, ';', $vbType, ';', $type)
(: There should be a lemma and a type :)
where (
$lem != ''
and $type != ''
)
(: Return the main clause :)
return ru:back($search, $db, $cat)
}
</TEI>
The variable $db is filled with a semi-colon separated string through the Xquery function concat(), and this string is the second (!) argument of the built-in CorpusStudio function ru:back().[1]
The procedure to specify the names of the user-defined features, so that they appear in the textbox features for each Dbase result, is as follows:[2]
1. Features tab: open the “Features” tab page within the Constructor Editor in one of two ways.
a. Press the […] button just above the “features for each Dbase result” textbox
b. Press the tab page “Features”
2. Add features: use the bottom-right button “Add” and specify a name in the dialog box. Make sure the name does not contain any spaces.
3. Delete features: select the feature in the listbox, and use the button “Remove”
4. Sort features: select the feature (make sure it is selected!) and then use the Up-Arrow and Down-Arrow buttons on the bottom side of the window
5. Pre-calculation:
the program assumes by default that the features that are specified here receive
a value (even spaces or hyphens count as values) in the query that is
associated with this constructor line.
It is only features that are not specified in the semi-colon separated list
(the $db variable in the example above) that should have a not-flagged
“Pre-calculation”.
The “Features” tab for the example above looks like this:
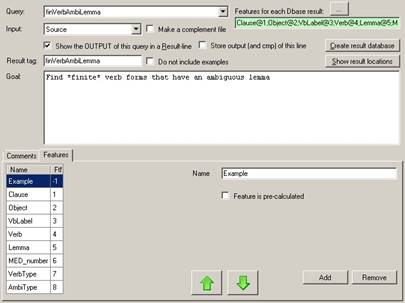
Figure 26 User-defined features for a database of results
The eight features that are passed on through the $db variable in the example above receive the names “Clause”, “Object”, … “AmbiType”. The order of the features in the $db variable is retained. (Changing the order of the features in the database Feature tab page results in a mismatch between feature name and value.)
The feature “Example” has an un-flagged “Feature is pre-calculated” property, since it is not part of the $db variable. It receives a location “-1”. Unspecified features like this will appear in the created database (without having any predefined values), and they will precede the other features.
Once the features have been specified in the database Features tab page, and provided the queries have been run (using F10 or Tools/Execute_Constructor), a database can be created by pressing the button “Create result database” on the Constructor editor tab. CorpusStudio will create the database and supply the location where it has placed the resulting xml file.
Be sure to change the name (and the location) of the database, so as to prevent it from being overwritten accidentily, when the project is executed again later.
The database that is created in this way is an xml file, and it can be used in a number of different ways:
1. Editing. The “Cesax” program contains a special database editor tab page, and it allows jumping to the lines in the psdx texts easily from within the database. The editor is supplied with commands to do find-and-replace operations on the user-defined database fields. It also allows database features to be transferred to the psdx texts themselves, should that be desirable.
2. XSLT stylesheet. It is possible to use an xslt file to transform the xml database file to html or another type of xml. The format of the database xml file is supplied in the appendix (section 9.2), and can serve as reference for this option. Development should take place through the software supplied by other parties.
The previous section has outlined how a database of results can be produced using CorpusStudio. Such a database can then be imported into the “Cesax” program, and edited, tweaked and expanded from there (see the Cesax manual for information about that process).
Once you have a good, solid, verified database of results, you may want to combine the results in different ways and count them. Since the database results are in xml format, you can use any program you want to do the counting. If you are familiar with Microsoft Access, you could use that program. You could, however, also consider using CorpusStudio for this task.
CorpusStudio allows creating projects that have a result-database as input. Create a database processing project in the following way:
a) Create a new project of type “Xquery-psdx”.
b) Go to the “Files” tab page, and press on “Select Input Files…”
c) Select one (and only 1) xml file that contains your result database
i) Do not change the “input file extension” (it remains .psdx)
ii) Make sure you save your project
Once you have prepared your project as indicated here, you can write queries for it. Go to the “Query” tab page, and select “Query/New” from the menu-bar. Make sure you check “The query involves a database”:
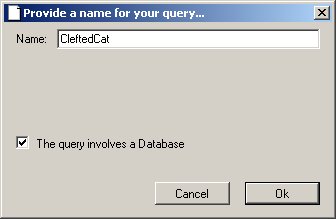
CorpusStudio will initialize your database query in the following way:
1. <TEI>
2. {
3. (: Look through all the result entries in the database :)
4. for $search in //Result
5. (: Get the value of Feature1 :)
6. let $ft1 := $search/child::Feature[@Name='Feature1']/@Value
7. (: Get the value of the Cat[egory] :)
8. let $cat := $search/@Cat
9.
10. (: The feature must have a value, and so must the category :)
11. where ( not($ft1 = '')
12. and not($cat = '')
13. )
14. (: Subcategorize on the value of Feature1 :)
15. return ru:back($search, '', $ft1)
16.}
17.</TEI>
You need to edit the query that CorpusStudio supplies according to your own needs. While doing so, you can make use of your own features (see line #6 for a way to retrieve the value of the feature called “Feature1”; you need to change “Feature1” in the name of your own feature). You can also make use of the “Cat” value; this value is visible and searchable in the Cesax display of the database.
As with other queries, you can define your search criteria in standard Xquery terms, make use of the ru: preceded built-in functions and make use of your own tb: preceded functions defined in the Definitions tab.
The main goal of CorpusStudio is to provide a user-friendly interface facilitating Corpus Research Projects, which typically consist of a number of queries that have to be run in a particular order to get the desired results.
The CorpusSearch2 engine, used for processing treebank encoded psd files, contains more functionality than selecting sentences that fulfill a number of syntactic criteria. One of the additional options provided with CorpusSearch2 is made available in CorpusStudio too, and this is the “lexicon” option. If you supply a query just with the line make_lexicon: t, then the CorpusSearch2 engine makes a dictionary of words occurring in the texts, and divided over the syntactic categories of the endnodes they occur in. CorpusStudio combines the results for all the texts specified in the “Input” (see tabpage “Files”), and makes these available in the html file shown on the “Results” tabpage, which normally contains just the query results. Figure 19 contains an example of the result.
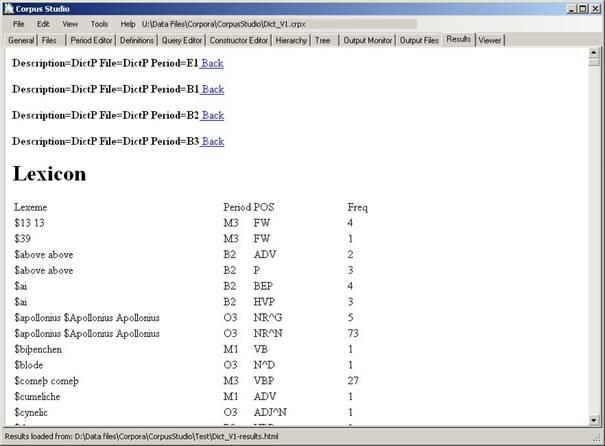
Figure 27 CorpusSearch2 lexicon output made available in CorpusStudio
The lexicon results are provided in the form of a table that can be copied to Excel and then processed further by the user. Result statistics are subcategorized on the period and the Part-Of-Speech tag.
This section lists the “frequently asked questions” that have come up until now. You are welcome to send your questions to E.Komen@Let.ru.nl, and I will see if your question (and its answer) should be placed here in this section.
Once you have executed your queries using F10 (or Tools/Execute), you can get a more detailed overview of the results for one query line in the following way:
1. Go to the Constructor editor tab.
2. Select the line whose output you would like to view in detail.
3. Press Show result location.
You are now redirected to the Results tab. This now gives an overview of the results for this query line. At the bottom of the results you will find a table with a count of results per text.
Suppose you have a query that produces an output as well as a complement. Your query may focus on subclauses, of which there may be several in each sentence. As soon as a particular sentence has at least one hit in one of its subclauses, the rest of its subclauses will not be made available to the complement, because the complement only accepts sentences as a whole. You will therefore miss certain subclauses: they will not provide a hit in the output of one query, and they are not made available as input for another query where they could have given a hit.
The solution to this problem is to be very much aware of what you are doing. If you work with queries that can, as a maximum, produce one hit per sentence, then you can use the complement approach. If this is not the case, then don’t use complements. There are two alternatives to the complement approach:
1. Use the output of one query as the input for all the required other queries.
2. Use the Xquery engine and set up a subcategorization query.
This appendix contains vital information for those who would like to process the results of a corpus research project themselves (see 9.1), and also for those who would like to know more about the different xml formats used for corpus research projects, Xquery-psdx etc (see 9.2).
When a set of queries is executed, results are gathered in two forms. The first form is an HTML file, the content of which are shown in the “Results” tab page. The second form is an XML file, and it is the format of this file that is being discussed in this appendix.
The name of the results XML file is <FileName>-results.xml, and it is located in the same directory as the HTML output file.
The results XML file consists of the following sections:
· General
o The project name, creation date, source and destination directories
· PeriodList
o This is a copy of the PeriodInformation xml file, containing only information about those texts from the corpora, that are actually being used in the queries for this corpus research project.
· Table <OutList>
o A list of <Out> elements, each of which describes one QC line as defined in the Constructor Editor.
· Table <CatOutList>
o A list of <CatOut> elements, which contains all individual subcategorisation names.
o Each element links to an <Out> element by coindexing (CatOut.QCline=Out.OutId).
· Table <CatList>
o List of <Cat> elements, each of which contains the count, mean and sdev results for one cell in the subcategorisation results table.
o Each line contains the results for the combination Period/QCline/Subcategory.
o The results for all periods for one particular subcategorisation line can be found by coindexing (CatOut.QCline=Cat.QCline AND CatOut.Name=Cat.Name).
· Table <OviewList>
o A list of <Oview> elements, each of which contains the Count, Mean and Sdev results for one cell in the results table (i.e. the non-subcategorized elements of it).
o Each line contains the results for the combination Period/QCline.
o The results for one particular line defined in the constructor editor can be found be coindexing (Out.Descr=Oview.Out).
· A list of all individual <Result> elements
o Each element links to a cell in the <Oview> table through coindexing Result.OviewId=Oview.OviewId.
o Each element also links to a cell in the <Cat> table through coindexing of Result.Cat=Cat.Name.
The relation between the different XML tables is illustrated in Figure 20.
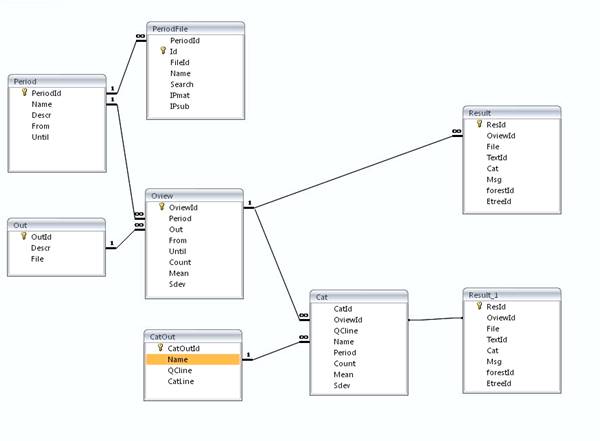
Figure 28 Relations between the tables in the Results XML file
CorpusStudio makes use of several different xml formats. Each of these formats is described by a schema, an xsd file. These schema are available on the CorpusStudio homepage which you can reach from the Radoud University website. Table 2 gives an overview of the different schema files that should be available.
|
Schema file |
Root xml tag |
Usage |
|
CrpResult.xsd |
<CrpOview> |
|
|
CorpusResearchProject.xsd |
<CorpusResearchProject> |
|
|
PeriodDef.xsd |
<PeriodList> |
|
|
Psdx.xsd |
<TEI> |
|
Table 2 Xml schema definitions in use for CorpusStudio
You are, of course, at liberty to make your own Xquery functions, but there are a number of functions you may find useful, and these are included in this section. Some of these may actually be available already on the homepage of CorpusStudio.
Note that some of these functions use built-in Xquery functions which are described in section 9.4. Since they make use of the CorpusStudio in-built facilities, such user-defined Xquery functions will obviously not work outside of CorpusStudio.
You might want to convert a following or preceding coreferential chain into a sequence of nodes, which you can then process using the standard Xquery sequence processing FLOWR functionality. The following Xquery function recursively converts a chain into such a sequence, and it starts at the node you provided.
(: ----------------------------------------------------------------
Name : tb:Chain
Goal : Get all the nodes on the chain started by [$ndThis]
History:
03-04-2012 ERK Created
---------------------------------------------------------------- :)
declare function tb:Chain($ndThis as node()*) as node()*
{
(: Get the next element -- if existing :)
let $nxt := if (count($ndThis)=1) then ru:chnextidt($ndThis)
else ru:chnextidt( ($ndThis/.)[last()])
(: Combine the new node with the others :)
return
if (exists($nxt)) then $ndThis union tb:Chain($nxt)
else $ndThis
};
Several Xquery functions have been built into CorpusStudio that should facilitate working with Xquery-psdx projects. The functions are described in this section. All functions are part of the ru section.
Definition: ru:all(ndArg1, strType, strPattern) (under construction)
Types: ndArg1 node()
strType xs:string à Precedes, Follows, Child, Sibling
strPattern xs:string
output node()
Description: Find all nodes that relate to ndArg1 by a relation of strType. If strPattern is not empty, only return the selected nodes if their label (or cat) compare with the pattern you provide.
Note: The implementation of this function has not been completed yet. You are advised to use for-loops and other Xquery functions in conjunction with ru:one in order to simulate ru:all functionality.
Definition: ru:ant(ndArg1)
Types: ndArg1 node()
output node()
Description: Return the antecedent node of ndArg1.
Note: This function is not able to handle empty nodes as input, so you have to build a wrapper around it to take care of that.
Definition: ru:antidt(ndArg1)
Types: ndArg1 node()
output node()
Description: Return the antecedent node of ndArg1, provided the ‘RefType’ of the link from ndArg1 is ‘Identity’ or ‘CrossSpeech’.
Note: This function is not able to handle empty nodes as input, so you have to build a wrapper around it to take care of that.
Definition: ru:ard(ndArg1, strType)
Types: ndArg1 node()
strType xs:string
output xs:boolean
Description: Mark the referential distance of constituent ndArg1 of your own defined strType. The HTML results of the CorpusStudio run will contain a table with average referential distances (ARD) subdivided over your strType values as well as over the periods as defined in the Period Editor. The referential distance measure taken is the “IP-distance” – the number of “IP chunks” between the constituent ndArg1 and its antecedent. If there is no antecedent, or if the referente from ndArg1 is cataphoric, then a measure of “0” will be taken. The results tab page will show two variants of the ARD: one that includes zero measures and one that does not.
Definition: ru:avd(ndArg1, ndArg2, strType)
Types: ndArg1 node()
ndArg2 node()
strType xs:string
output xs:boolean
Description: Mark the average distance between constituent ndArg1 and ndArg2 of your own defined strType. The HTML results of the CorpusStudio run will contain a table with average distances (AVD) subdivided over your strType values as well as over the periods as defined in the Period Editor. The referential distance measure taken is the “IP-distance” – the number of “IP chunks” between the constituent ndArg1 and its antecedent ndArg2.
Definition: ru:avg(intNum, strType)
Types: intNum xs:integer
strType xs:string
output xs:boolean
Description: Keep track of the average over the values supplied by intNum. The HTML results of the CorpusStudio run will contain a table with these averages, which will be subdivided over your strType values as well as over the periods as defined in the Period Editor.
Definition: ru:back(ndArg1, strMsg, strCat)
Types: ndArg1 node()
strMsg xs:string (optional)
strCat xs:string (optional)
output node()
Description: This built-in function is an alternative to the tb:Forest functions that are supplied in the standard “definitions” file. The function should be placed at the end of the main for … let … where … return (FLOWR) loop, as part of the return statement. The function returns the <forest> node, supplied with additional attributes, such as the identifier of the ndArg1 node.
There are two optional (string) variables that can be supplied. The variable strMsg may contain a string (produced for example using Xquery standard concat) with information that is supplied with the output of this particular result. The variable strCat may contain a subcategorization string. The output for this particular queryline will then, in addition to the normal tabular output, be subdivided over the values of strCat. One may, for example, take NP features such as the NPtype or the GrRole as subcategorization values.
A user implementation that can be used instead of the built-in ru:back function should minimally look as follows:
declare function tb:back($ndThis as element()?) as element()
{
(: Get the <forest> element of which we are part :)
let $src := $ndThis/ancestor-or-self::forest
(: Get the ID of ourself :)
let $id := $ndThis/@Id
(: Copy the attributes to a new forest element :)
return element forest { attribute TreeId {$id},$src/@* }
};
Definition: ru:before(ndArg1)
Types: ndArg1 node()
output node()
Description: If existing, return the first <eTree> node occurring before ndArg1 but having similar characteristics in the following way (only for “psdx” projects):
(1) attribute @Label is the same
(2) it has an <eLeaf> child with the @Text value the same as ndArg1’s child
Definition: ru:cat(ndArg1, strType)
Types: ndArg1 node()
strType xs:string (“phrase”, “function”)
output node()
Description: Return the phrasal or functional part of the category of ndArg1.
Definition: ru:chnext(ndArg1)
Types: ndArg1 node()
output node()
Description: Return the node following on ndArg1, and pointing to it. The node may also be a descendant of ndArg1, as happens often in a relative clause.
Note: This function is not able to handle empty nodes as input, so you have to build a wrapper around it to take care of that.
Definition: ru:chnextidt(ndArg1)
Types: ndArg1 node()
output node()
Description: Return the node following on (or descending from) ndArg1, and pointing to it, provided the ‘RefType’ of the link from ndArg1 is ‘Identity’ or ‘CrossSpeech’.
Note: This function is not able to handle empty nodes as input, so you have to build a wrapper around it to take care of that.
Definition: ru:chlen(ndArg1, strType)
Types: ndArg1 node()
strType xs:string (preceding, following)
output integer
Description: Return the length of the
chain starting from ndArg1.
The direction of the chain depends on strType.
When strType is “preceding”, then the length of the
preceding chain is returned, and when strType is
“following”, then the length of the following chain is returned.
Note: The length is zero (0) if only ndArg1 exits, and there is no antecedent (with strType ‘preceding’) or no following node pointing back to ndArg1 (with strType ‘following’).
Definition: ru:conv(strText, strType)
Types: strText xs:string
strType xs:string à ‘OE’, ‘Lcase’, ‘Ucase’, ‘clean’
output xs:string
Description: The string strText is converted on the basis of the conversino type specified in strType. Two conversion types are currently supported. The first one, signalled by “OE”, converts +a, +t, +d etc into their corresponding unicode strings æ, þ, and ð respectively. The second and third one, signalled by “Lcase” and “Ucase”, convert the string into its lower-case or upper-case equivalent respectively.
A few combinations are allowed too: ‘Lcase+OE’ and ‘Ucase+OE’.
Definition: ru:dist(ndArg1, ndArg2, strType)
Types: ndArg1 node()
ndArg2 node()
strType xs:string à ‘word’, ‘forest’
output xs:integer
Description: Get the distance between constituent ndArg1 and ndArg2 in the measure defined by strType. The measure may be word, in which case the number of intervening words is returned. If it is forest, then the difference between the forest Id’s under which ndArg1 and ndArg2 are located is returned. A negative distance indicates that there is an error.
Definition: ru:distri(intNum, strType) (under construction)
Types: intNum xs:integer
strType xs:string
output xs:boolean
Description: Keep track of the distribution over the values supplied by intNum. The HTML results of the CorpusStudio run will contain one table per strType with the distribution of the values supplied by intNum. The distribution is subdivided over the periods as defined in the Period Editor.
Definition: ru:docroot()
Types: output node()
Description: Return the highest node in the current document. This is the <TEI> root in .psdx files, for instance. This function allows one to get out of the local environment of the current sentence (the <forest> element in .psdx files), so that, for instance, the meta information available at the beginning of the text can be accessed.
Definition: ru:ErrMsg(ndArg1, strLoc, strText)
Types: ndArg1 node()
strLoc xs:string
strText xs:string
output xs:boolean
Description: The output of this function is always true. A message box is displayed with the message strText, and the user can press “OK”, but only under the following conditions: (1) the function is being evaluated, (2) the location of node ndArg1 coincides with strLoc.
Definition: ru:feature(ndArg1, strName)
Types: ndArg1 node()
strName xs:string
output xs:string
Description: Get the feature value of the feature named strName. This is equivalent to ndArg1/child::fs/child::f[@name=’strName’]/@value. The string with this value is returned.
Definition: ru:hasf(ndArg1, strName)
Types: ndArg1 node()
strName xs:string
output xs:boolean
Description: Check if the node ndArg1 contains a feature named strName. This is equivalent to checking the existence of ndArg1/child::fs/child::f[@name=’strName’]. Returns true if this feature exists, and false otherwise.
Definition: ru:head(ndArg1)
Types: ndArg1 node()
output xs:boolean
Description: Determine what the head of the NP node ndArg1 is. This function only works for the historical English corpora, and only for Noun Phrases.
Definition: ru:isnew(ndArg1, intIdtDist, strRefOk)
Types: ndArg1 node()
intIdtDist xs:integer
strRefOk xs:string
output xs:boolean
Description: Check if the node ndArg1 is new in a particular sense:
a) The reference
type of ndArg1 is ‘New’ or ‘NewVar’
b) The reference type is ‘Identity’ or ‘CrossSpeech’ and also:
i. The IPdist to the antecedent is larger than intIdtDist
ii. Or else the antecedent of ndArg1 has a
label like strRefOk
and adheres to ru:isnew itself.
Definition: ru:lex(strWord, strPos)
Types: strWord xs:string
strPos xs:string
output xs:boolean
Description: Add the word strWord to a list of lexicon/dictionary entries, keeping
track of the frequency. Forms with different part-of-speech tags (strPos) are kept separate. The resulting dictionary can
be opened using Cesax.
Words taken from the English historical corpora that are passed on to the
lexicon are advised to be treated first through ru:conv(…,
‘Lcase+OE’). This makes sure the lexemes are kept
case-insensitive and the possible leading $-signs are filtered out.
Definition: ru:line(intNumber)
Types: intNumber xs:integer
output node()
Description: Return the sentence that is intNumber lines further away from me (if positive) or
before me (if negative). The “sentence” is a <forest> element for the psdx projects.
A special case is ru:line(0), which
returns the current <forest> element in such a way,
that the preceding and following forests (as well as the hierarchically higher
nodes) can be accessed.
Definition: ru:Location(ndArg1, strType)
Types: ndArg1 node()
strType xs:string
output xs:string
Description: The function Location seeks to find the location of the node ndArg1 with respect to the main clause (i.e. IP-MAT*) inside which it is located. The resulting string with the location depends on the particular strType chosen. The output string, in general, contains letters for nodes preceding and following ndArg1 within the main clause. The following types are distinguished:
detailed - The calling node ndArg1 is shown with a capital letter.
The following letters are used: s (subject), o (object), t
(temporal NP),
l (left dislocation), c (CP), i (IP), p (prepositional
phrase), v (verb),
a (adjunct), x (other).
selected - The calling node ndArg1 is shown with a capital letter.
The following letters are used: s (subject), o (object), l
(left dislocation),
p (prepositional phrase), f (finite verb), c (CP), v
(other verb form),
x (other).
finverb - Use f for the
location of the finite verb, and x for other constituents. Mark my own
position with s (subject), o (object), l (left
dislocation) or
p (prepositional phrase).
Definition: ru:matches(strText, strPattern)
Types: strText xs:string
strPattern xs:string
output xs:boolean
Description: The string strText is compared with the pattern supplied by strPattern. The behaviour is much like the visual basic function like. The strPattern can contain a set of different patterns, separated by a vertical bar “|”. Here is an example: DoLike(“NP-POS-3”, “NP|NP-*”). This function will return true, since NP-POS-3 matches with the second pattern in the list: NP-*.
Definition: ru:matches(strText, strPatYes, strPatNo)
Types: strText xs:string
strPatYes xs:string
strPatNo xs:string
output xs:boolean
Description: The string strText should match the pattern supplied by strPatYes, but should not match that of strPatNo. The behaviour is much like the visual basic function like. The strPatYes and strPatNo can contain a set of different patterns, separated by a vertical bar “|”. Here is an example: DoLike(“NP-POS-3”, “NP|NP-*”). This function will return true, since NP-POS-3 matches with the second pattern in the list: NP-*.
Definition: ru:Message(strText)
Types: strText xs:string
output xs:boolean
Description: The output of this function is always true. When the function is evaluated (which happens when it occurs in a boolean expression), a message box is displayed with the message strText, and the user can press “OK”.
Definition: ru:NodeText(ndArg1)
ru:NodeText(ndArg1, strType)
Types: ndArg1 node()
strType xs:string à ‘OE’, ‘Lcase’, ‘Ucase’, ‘clean’
output xs:string
Description: Return the text of the terminal nodes within ndArg1. The text is delivered as it is, separated by spaces where needed. A second argument strType allows implicit use of the function ru:conv to streamline the output.
See also: ru:PhraseText
Definition: ru:one(ndArg1, strType, strPattern)
Types: ndArg1 node()
strType xs:string
strPattern xs:string
output node()
Description: Find the one node that relates to ndArg1 by a relation of strType. If strPattern is not empty, only return the selected node if its label (or cat) compares with the pattern you provide. The values of strType can be the following:
iPrecedes – the immediately preceding sibling of ndArg1
iFollows – the immediately following sibling of ndArg1
FirstChild – the first child of ndArg1
LastChild – the last child of ndArg1
FirstTerm – the leftmost terminal node under ndArg1
LastTerm – the rightmost terminal node under ndArg1
PrecHigh – the highest descendant of ndArg1’s parent preceding ndArg1
FollHigh – the highest descendant of ndArg1’s parent following ndArg1
Parent – the parent node of ndArg1
Descendant – the first descendant of ndArg1 fulfilling the conditions
Definition: ru:out(strCsv)
Types: strCsv xs:string
output xs:boolean
Description: Store the information in strCsv. This information can contain different entities, which have to be separated by a semicolon. The information is added to one file for the whole corpus research project, and each line is automatically supplied with three standard elements:
text – the filename of the text (without path and extension)
period – the period abbreviation of the text
line – the line number within the constructor editor
After a corpus research that uses the ru:out function has finished, it will indicate the location and name of the .csv file where the results have been stored. This file can be opened and processed with programs like Excel.
Definition: ru:periodgrp(strDivision)
Types: strDivision xs:string
output xs:string
Description: Return the period-group (as defined in the period-editor tab) of the currently processed file, depending on the period-division strDivision.
Definition: ru:PhraseText(ndArg1)
Types: ndArg1 node()
output xs:string
Description: Return the text of the terminal nodes within ndArg1, supply brackets around the text and start the first bracket with the category of the phrase ndArg1. The text is delivered as it is, separated by spaces where needed.
See also: ru:NodeText
Definition: ru:random(ndArg1, numPtc)
Types: ndArg1 node()
numPtc single (floating point number of single precision)
output xs:boolean
Description: A random (floating point) number is generated between 0 and 100 and compared with the percentage numPtc. If the random number is below numPtc, then the function returns true else false. Use this function in the where condition of your query to get a representative percentage of all your data.
Definition: ru:refnum(ndArg1)
Types: ndArg1 node()
output xs:string
Description: If the constituent represented by ndArg1 contains an internal coreferential identifier, such as when it has a child *T*-1, then ru:refnum() returns the number of this identifier.
Definition: ru:RefState(ndArg1)
Types: ndArg1 node()
output xs:string
Description: Return an estimation of the referential status of the constituent represented by ndArg1. The estimation takes into account the NPtype (which should have been supplied, e.g. using Cesax), postmodification, and the usage of an indefinite article.
Definition: ru:relates(ndArg1, ndArg2, strType)
Types: ndArg1 node()
ndArg2 node()
strType xs:string
output xs:boolean
Description: true if ndArg1 relates to ndArg2 with
a relation strType.
The values of strType can be the following:
iPrecedes – ndArg1 is the immediately preceding sibling of ndArg2
Precedes – ndArg1 linearly precedes ndArg2 (the rightmost terminal node of ndArg1 precedes the leftmost terminal node of ndArg2)
iFollows – ndArg1 is the immediately following sibling of ndArg2
Follows – ndArg1 linearly follows ndArg2
iDominates – ndArg1 is the parent of ndArg2
Dominates – ndArg1 is an ancestor of ndArg2
Sibling – ndArg1 is a sibling of ndArg2
Definition: ru:reduce(strType)
Types: strPattern xs:string
output xs:string
Description: Reduces the string in strPattern to one that has no subsequent identical characters.
Definition: ru:retrieve(strType)
Types: strType xs:string
output xs:string
Description: Returns the value stored in storage space strType
Definition: ru:rootnode(ndArg1)
Types: ndArg1 node()
output node()
Description: If ndArg1 points to another constituent, then ru:rootnode returns the node that is last on the coreferential chain of ndArg1. The function returns “nothing” if ndArg1 does not point to anything.
Definition: ru:sameindex(ndArg1)
Types: ndArg1 node()
output node()
Description: Get the first node under the current forest having the same index as the label of the node ndArg1.
Note: This function is not yet implemented.
Definition: ru:setattrib(ndArg1, strName, strValue)
Types: ndArg1 node()
strName xs:string
strValue xs:string
output xs:boolean
Description: Change the value of
attribute strName of node ndArg1
into strValue.
Save the text file (for the moment only .psdx) with
the emended attribute values. This function will only be evaluated when you
take it up in the where part of the query.
Note: This function is experimental.
Definition: ru:stack(strText, strType)
Types: strText xs:string (‘add’, ‘contains’)
strType xs:string
output xs:boolean
Description: Different functions for storing strings and checking the presence of them in a stack that is cleared in the following instances: (a) a new text starts, (b) a new section starts in a text. The action depends on strType. The action ‘add’ pushes the word in strText into the stack, and the action ‘has’ just checks if the word strText is currently somewhere in the stack.
Definition: ru:store(strValue, strType)
Types: strValue xs:string
strType xs:string
output xs:boolean
Description: Store value strValue in the global storage space named strType.
The function returns true if the storage was succesful.
Definition: ru:textsize(strName, strType)
Types: strName xs:string
strType xs:string (‘main’, ‘sub’, ‘words’)
output xs:integer
Description: Get the size of the text
called strValue in terms defined by strType: ‘main’ = main clauses, ‘sub’ = subclauses,
‘words’ = words.
The function returns true if the storage was succesful.
Definition: ru:timblprep(strCsv, intPerc)
Types: strCsv xs:string
intPerc xs:integer
output xs:boolean
Description: Store the comma-separated information provided in strCsv in a trainingset file and a test set one, which can be used by TiMBL. The information can contain different entities, which have to be separated by a semicolon or a comma. The information is added to one file for the whole corpus research project, and each line is automatically supplied with one standard element:
line – the line number within the constructor editor
The parameter intPerc gives the percentage of lines that should be put into the training set. The lines are divided in a random manner.
Definition: ru:Trace(strText)
Types: strText xs:string
output xs:boolean
Description: The output of this function is always true. When the function is evaluated (which happens when it occurs in a boolean expression), the string supplied as strText is displayed on the Output Files tab.
Definition: ru:words(ndArg1)
Types: ndArg1 node()
output xs:integer
Description: Get the number of words in the constituent ndArg1.
[1] The main part of this code has been skipped. It contains definitions for the variables ($feat_cls, $feat_obj, $feat_lab, $feat_txt, $lem, $sNum, $vbType, $type) that are passed on in the $db string, and it also contains a definition for the subcategorization variable $cat, which is the third argument in ru:back().
[2] The textbox itself, having a green background color, cannot be filled manually.