CESAX: Coreference Editor for
Syntactically Annotated XML corpora
Reference Manual
Radboud University Nijmegen,
Faculaty of Arts, Humanities Lab, Technical Service Group
Erwin R. Komen
Version 3.10 – April 15, 2019
Contents
3.4 Using Cesax for the first time
3.5.2 The tab page “Coreference Types”
3.5.3 The tab page “Phrase Types”
3.5.5 The tab page “NP features”
3.5.6 The tab page “Constraints”
3.5.7 The tab page “Categories”
5 Main task: creating parsed texts
6 Main task: editing parsed texts
6.4 Editing part-of-speech tagged texts
6.5 Editing dependency-parsed texts
7 Main task: enriching parsed texts
7.1.1 Adding features manually
7.1.2 Adding features from a database
7.1.3 Changing nodal attributes from a database
7.1.4 Adding features automatically
7.2.1 Creating a back translation
7.2.2 Changing a back translation
7.2.3 Exchanging back translations with colleagues
7.2.4 Using a back translation in the coreference annotation process
8 Main task: coreference resolution
8.2.2 Interrupting coreference resolution for manual tweaking
8.2.3 Dealing with ambiguous PGN features
8.2.4 Finishing coreference resolution
8.2.5 Restarting coreference resolution
8.3 Manual coreference editing
8.4 Carry over from Cesac: Must
8.6 Check and repair overlapping chains
8.8 Walking coreferential chains
8.8.1 Elements of the RefWalk tab page
9 Main task: conversion between treebank formats
9.1 Individual text conversion
10 Main task: preparing a corpus search with CorpusStudio
11 Main task: working with a corpus database
11.1 Manual editing of records in the database
11.2 Automatic and user-guided annotation
11.3 Filtering results databases
11.5 Exporting and importing feature values
11.5.1 Association of features to a point in the text
11.5.3 Exporting features directly to texts
11.6 Database output for statistics
11.6.1 Making a corpus database report (for Excel)
11.6.2 Preparations for SPSS processing
11.6.3 Preparations for processing by Timbl
12.4 Automatically resolved coreferences
12.5 Statistics of fully automatic coreference resolution
14.1 The format used by Cesax: psdx
14.2 The back translation format: psdy
14.3 The format of Corpus Results Databases
14.4 The format of coreferential chain xml files
14.7 Language specific head rules
14.8 Stanford to Cesax tagset conversion
The Cesax program provides a windows environment to handle a number of tasks that involve corpus texts:
a) Creating parsed texts (section 5).
b) Editing parsed texts (section 6).
c) Enriching parsed texts (section 7).
d) Coreference resolution (section 8).
e) Conversion between treebank formats (section 9).
f) Preparing a corpus search (section 10).
g) Working with corpus databases (section 11).
This introduction briefly discusses the tasks Cesax can handle; detailed descriptions of the tasks can be found in the indicated chapter numbers. Overviews of key aspects of Cesax (and the corresponding CorpusStudio program) can be found in the references cited in section 2.
Cesax offers a number of options to create parsed text, although most of these options are but an interface to other software doing the ‘real’ job. English and German plain text files can be syntactically parsed into constituency treebanks (the labelled bracketing psd format) through the help of the Stanford parser, which is automatically downloaded and whose training data is used for this process. Spanish texts can be parsed too, but in a bit more cumbersome process. Texts are first dependency-parsed (where each word is assigned to be under one other word, its head) using the Maltparser on a training set. The dependency parsed material is then converted into a relatively minimal constituency parse by making use of a set of rules. Syntactic parsing is available for Chechen too, but in a much more limited way. Section 5 describes the different options in more detail.
Since most parsed texts have, at least to some extend, been created using statistical means, there may be errors in them. This is even more so with texts that have been parsed using one of the approaches described in section 5. Cesax offers manual editing of the parse-trees. Its capabilities are described in section 6.
It is sometimes desirable to add information to existing (or newly created) syntactically parsed texts, thereby enriching them. This is particularly so when it concerns features that cannot completely be derived automatically. Such features include: NP types (such as ‘pronoun’, ‘definiteNP’), grammatical categories of NPs (such as ‘subject’, ‘object’), PNG (person/number/gender) marking of NPs, type marking of adverbials and class marking of verbs. Scholars who have trouble understanding the languages tackled by the corpora may be pleased to learn that Cesax facilitates enriching the texts with back translations as well as transliterations into other orthographies. A parallel text view allows the user to add a modern English back translation line to each line in the original text. Cesax’s built-in enrichment processes are described in section 7.
One particular type of text enrichment is that of coreference resolution. Cesax allows semi-automatical antecedent resolution of all NPs—not only of pronouns and demonstratives, but also of proper names and definite NPs. Based on a separately motivated set of hierarchical constraints, which are inspired by earlier work on coreference resolution (Beaver, 2004) as well as attested linguistical hierarchies (Gundel, Hedberg, & Zacharski, 1993), it determines for each NP what the most likely antecedent is. If it comes up with one most likely candidate, and if there is no reason to raise suspicion, it then establishes a coreference link. Discourse new NPs are likewise recognized—unless there is reason to believe that user interaction is needed. Depending on the text, Cesax can automatically resolve more than half of all NPs. All suspicious cases are deferred to the user’s judgment, who will, in about another half of the cases, agree with the suggestion made by Cesax’s constraint ranking algorithm. See section 8 for details of this task.
One of the aims of Cesax is to make its tools and functionality available to an audience that is as wide as possible. This is why the program allows converting treebank texts from alternative formats to its native psdx one, and it also allows the native psdx format to be transformed into other treebank formats. The currently available conversion options are described in section 9.
The Cesax program can work in close collaboration with CorpusStudio, a program that facilitates complex searches through xml and treebank texts. There are two areas where the cooperation between the programs is most visible in Cesax. The first area is in that of preparing a corpus search. It is possible to prepare a corpus query by selecting the nodes in the treeview of a sentence from a text. This information can then be made available for CorpusStudio, where a query creation wizard guides the user through the process. The preparation process within the treeview is described in section 10.
The second area where the programs cooperate tightly is that of corpus research databases. CorpusStudio facilitates the creation of such corpus research databases, and they can be viewed, edited, and prepared for further (statistical) processing within Cesax. This functionality is described in section 11.
The program Cesax is, historically speaking, a descendant of Cesac, a coreference editor for syntactically annotated corpora (Komen 2008). Where Cesac takes the Penn-Treebank format—bracketed labeling—as input, Cesax takes its native xml type called psdx as input, a format that is based on the Text Encoding Initiative standard 5 (TEI-P5). A description of this format is in section 14.1 of the appendix.
When referring to the Cesax programme, please use one of the following references:
Komen, Erwin R. 2012. “Coreferenced corpora for information structure research”. Outposts of Historical Corpus Linguistics: From the Helsinki Corpus to a Proliferation of Resources. (Studies in Variation, Contacts and Change in English 10). ed. by Jukka Tyrkkö, Matti Kilpiö, Terttu Nevalainen and Matti Rissanen. Helsinki, Finland: Research Unit for Variation, Contacts, and Change in English, Online.
Komen, Erwin R. 2013. Corpus databases with feature pre-calculation. In Proceedings of the twelfth workshop on treebanks and linguistic theories (TLT12). Sandra Kübler, Petya Osenova & Martin Volk (eds), 85-96. Sofia, Bulgaria: The institute of information and communication technologies, Bulgarian academy of sciences. pdf.
I truly hope that you enjoy making use of Cesax, and should you have any ideas or comments, feel free to contact me.
Erwin R. Komen
Radboud University Nijmegen // SIL-International
Email: E dot Komen at Let dot ru dot nl
3.1 Requirements
The current version of Cesax takes the following assumptions:
· It works on a computer with the Windows XP, Vista, Windows 7 or the Windows 8 operating system. Cesax has been developed on XP and Windows 7 computers, so any of these operating systems should not give a problem.
· You are working with psdx files (see 3.3).
Cesax apparently is also able to run on a MacIntosh under the VMware emulator of Windows7, and it might also run under that emulator in Linux/Ubuntu. There are no plans yet for a Cesax version that runs directly under MacIntosh or Linux, since the program has been created using “Microsoft Visual Basic .NET”, a programming language that is not available (as far as I am aware) for non-Windows machines.
As far as the psdx file format is concerned, it should be noted that Cesax has been extensively used and tested with psdx files from historical English corpora: YCOE (Old English), PPCME2 (Middle English), PPCEME or PCEEC (Early Modern English), PPCMBE (Late Modern English). While psdx files from other corpora can be created and loaded into Cesax, it may be that not all of the functionality that is available for the historical English corpora can be used in a straightforward way for other texts. This is particularly true for the coreference resolution process, since this process makes use of the part-of-speech and phrasal tagset of the historical English corpora. The adaptation of Cesax for work with other languages is on the list of developments. If there are any particular requests, do contact the developer (see section 2).
3.2 Installation of Cesax
The Cesax program is freely available from its homepage. Installation and setup is as follows:
a) Find the home page of Cesax.
b) Choose “Install Cesax”, which will lead you to the actual “publish” page.
c) For the first time, choose “Install”. Otherwise, choose “launch”.
d)
Follow the instructions in
the setup program
(This includes accepting the fact that Cesax does not come with any security
certificate…)
e) The software will be available under Start/ProgramFiles/RU-English
There are a number of things you need to adjust, when you use the program for the first time. Those are discussed in 3.4.
3.3 Working with psd files?
The Cesax program allows you to work with “psdx” files. Those are treebank files (which normally have the “psd” extension), which have been transformed into a particular kind of XML files (the format of these files is discussed in 14.1). If you don’t have psdx files, but you do have psd files, then there are two things you can do.
a) Make use of the File/Import feature of Cesax to import one particular Treebank (psd) file and convert it into a psdx file. See section 4.3.
b) Convert a directory (possibly even nested) of psd files into psdx ones using the command Tools/Converters/BatchPsdToPsdx (see section 9 for conversion options)
c) [OBSOLETE…] Download the utility TreebankToXml on the above software page as well. Install it (using the same kind of procedure as above for Cesax), and then transform your psd files into the psdx format. This transformation goes one directory at a time. Specify a directory with PSD files as source, and a (new) directory where you want the equivalent PSDX files to be as a destination.
3.4 Using Cesax for the first time
The Cesax program needs to be set up correctly for it to work to your satisfaction. When you start up Cesax for the first time, the program will automatically produce a number of things. You don’t need to worry about these files—they are installed automatically. But you should not delete them afterwards, because if you do, you may lose some of your settings.
· A settings file called CesaxSettings.xml which is put in a new “Cesax” subdirectory of your “ApplicationData” folder (probably on your C-drive).
· One entry in your register, which indicates the location of the CesaxSettings.xml file.
· A ChainDictionary.xml file in your “My Documents” directory.
3.5 The settings
The program Cesax can be fine-tuned to one’s own desires, and the place to do this is in Tools/Settings. The first thing to notice is the location of your settings file “CesaxSettings.xml” in the topmost yellow textbox. The “…” button to the right of this textbox allows you to change the location of your settings file. You can only change to a settings file of the correct XML format!
The settings are divided over a number of tab pages, which will be treated in the following subsections.
3.5.1 The tab page “General”
The General tab page allows the most used settings to be made. There are several directories and file locations you can change:
· Working directory: The working directory is the location where you have the psdx files you are currently working on. So when you do File/Open, then Cesax looks in the working directory to find psdx files.
· Period definition file: Cesax uses a “Period definition file”, which is in a particular XML format, to determine the English time period from which a particular text is. Cesax itself does not allow you to change this period definition file, but the program CorpusStudio does. If you don’t have CorpusStudio installed, Cesax will use a default EnglishPeriods.xml file, and put it in a default location. That should be okay to start with.
·
Chain
dictionary: The chain dictionary is updated and used
in the coreference process described in section Fout! Verwijzingsbron niet gevonden..
It keeps track of which head noun could possibly (by inference) match up with
which other head noun. Such references are only valid within a particular
English time period (i.e. OE, ME, eModE and MBE). One entry from my chain
dictionary, for example, has a link from “insurrection” to “war”.
N.B: the links stored in a chain dictionary are never automatically used
to make new links, but they help in making better suggestions.
· CorpusStudio directory: If you have the program CorpusStudio installed, then this directory is the directory defined in your CorpusStudioSettings where you have your crpx (corpus research project) files. The program Cesax uses this directory if you want to use it in order to work with “Corpus Results Databases”—databases that have been made as a direct result of executing a set of queries in CorpusStudio. Working with such databases is described in Fout! Verwijzingsbron niet gevonden..
The “General” tab page also offers a range of other general settings under the heading of “Preferences”. There are several “flags” that can be checked or unchecked.
· Debugging. This is only used for the development of Cesax. You should leave it unchecked.
·
Show
CODE node in the syntax.
When Cesax shows the syntax (in bracketed labeling format) of a particular
clause, it can show or hide the nodes with the label code.
Such nodes hold meta-textual information.
· Ask user to clarify the PGN for a pro/dem when it is needed.
· Show the whole antecedent stack.
· Check for new categories in new versions of Cesax.
· Check the constraint ranking in new versions of Cesax.
The preferences also include some numerical values and other text that can be set.
· Maximum IP distance in antecedent stack (e.g. Auto). This setting is used in the fully automatic mode of Cesax (see section 8.7). It defines the number of IPs (main or sub clauses) can be between a source and a potential antecedent. All potential antecedents that are further away than this value (e.g. 15) are not considered as antecedents anymore in the fully automatic mode of Cesax coreference resolution.
· Absolute maximum IP distance. This measure is a critical one, and should be set with great care. It defines the maximum number of IPs that may occur between a noun phrase and its antecedent in the semi-automatic coreference resolution process. A value of more than 150 is recommended. Setting this value too high will keep the antecedent stack to large, which makes work more difficult. Setting this value too low will obscure correct antecedents from the coreference resolution process.
· Profile depth level (zero for no profile). This is used in the development of Cesax to time its performance. You should leave it at 0.
· User name. You should fill in your (short) name here. Cesax tries to derive your name from the computer, but this may not be the correct name. The name filled in here is for instance used in the ChainDictionary (see above) and in the Revision tracking (see section 4.2).
· Automatic drive change. This feature is currently not used. It might become useful in the future, though. The idea is that when you specify for instance G>U, all files on drive “G” will be treated as if they were on “U”.
3.5.2 The tab page “Coreference Types”
This tab page defines the different coreference types recognized by the program. For its correct working you should keep the names of the coreference types as they are right now: CrossSpeech, Identity, Inferred, Assumed, New, Inert and NewVar.
What you can do here as user is define the colors by which these categories are shown in the “Editor” tab of the main window. You can also define a description of this type of coreference, for instance including some prototypical examples.
3.5.3 The tab page “Phrase Types”
The information on the “Phrase Types” tab page largely carries over from the earlier “Cesac” program, which was a fully manual variant of Cesax. Phrase types were used to define the phrase categories recognized as being coreference sources (Target=”any”) and coreference antecedents (Target=”dst”). You could also specify what kind of phrases had to be dealt with (Type=”must”), and which were optional (Type=”may”) in the Cesac editor.
The phrase types still have limited use in Cesax. First, phrase types are considered in order to determine what the particular constituents are that can be selected in the “Editor” page of the main window. It is only selectable constituents that can serve as coreference source or antecedent.
Second, phrase types are considered when the function “Must” is used: Must/First, Must/Next, Must/Previous. These functions also carry over from the manual editor Cesac, and they are described in section 8.4.
The current version of Cesax does not allow adding phrase types.[1] Future versions may offer a new system for the phrase type recognition in the “Editor”, and do away with the Cesac “Must” system.
3.5.4 The tab page “Pronouns”
The “Pronouns” tab page is quite an important one for the semi-automatic coreference resolution process. It defines different kinds of personal, possessive and demonstrative pronouns in the “PronounClass” listbox. Each of these classes defines which words from which periods belong to one particular Person/Gender/Number (=PGN) combination. The “Pers-3fs” class, for instance, defines all the personal and possessive pronouns belonging to 3fs (3rd person, feminine, singular).
· Name. The name (short) of this pronoun class. Don’t use spaces.
· Description. A description of this class for your own purposes.
·
Person/Gender/Number. A coding of 1-3 symbols specifying the person, gender and number
combination. Examples: 3p, 2, 2fp, 3ns.
There are two special cases: “unknown” and “empty”.
All the PGN codes must be defined in the NP-feature tab page under “PGN”.
· Old English. Specify all Old English forms belonging to this pronoun class. This is tied with the YCOE(2) and with the Toronto corpus.
· Middle English. Specify the Middle English forms belonging to this pronoun class. Such forms are found in the PPCME2.
· Early Modern. Specify the early Modern English forms belonging to this pronoun class. These forms are found in the PCEEC and the PPCEME
· Modern British. Specify the late Modern English (=Modern British English) forms belonging to this pronoun class. This is connected with the PPCMBE.
· Notes. Here you have room for your own notes pertaining to this pronoun class.
3.5.5 The tab page “NP features”
The NP features tab page allows you to define all possible values that can be associated with a particular NP feature. Currently the list of NP features has the three members listed below. These particular members are essential for the good working of the Cesax semi-automatic coreference resolution process. So please do not delete any of the values!
· GrRole. Subject, Agent, Argument, Oblique, PPobject, PossDet, None and unknown.
· NPtype. ZeroSbj, Pro, DefNP, Dem, DemNP, Proper, IndefNP, Bare, QuantNP, unknown.
· PGN. 1p, 1s, 2, 2p, 2s, 3, 3fs, 3ms, 3ns, 3p, 3s, unknown, empty.
If you have accidentily deleted one or more of the values here, try to restore them from the list above. Each value should be followed by a semicolon, where you can optionally provide a short description of the value.
3.5.6 The tab page “Constraints”
The working of the semi-automatic coreference resolution can be tweaked through the reordering of the constraints in the tab page “Constraints”. Here is a list of constraints that are currently recognized and used by the coreference resolution engine, with the correct multiplication factor in brackets.
· AgrGenderNumber. (2). One violation when gender/number of source disagree with gender/number of antecedent.
· Disjoint. (2). One violation when src+target are in the same IP MAT/SUB/SMC.
· EqualHead. (2). One violation when the src head noun does not agree with any of the head nouns in the chain of the target.
· NoCataphore. (2). One violation for an antecedent that is following the source instead of preceding it.
· NoClause. (2). One violation for an antecedent that is a clause (IP).
· AgrClause. (2). One violation mark when a source does not have PGN 3s/3ns, yet does agree with an antecedent IP.
· NoCrossAgrPerson. (2). One violation when there is agreement in person at a cross speech boundary.
· NearDem. (2). One violation for an antecedent that already has a coreference, unless the antecedent NP also contains a near demonstrative.
· AgrPerson. (2). One violation when the source has a different person than the antecedent.
· IPdist. (20). One violation for every IP between Src and Target.
·
GrRoleDst. (4). Assign a preferential number (between 0 and 3) to the
grammatical role of an NP. Make use of the following scale:
Subject > PossDet;Argument > PPobject > other
·
NPtypeDst. (6). Assign a preferential number (between 0 and 5) to the NP type
of the antecedent. Make use of the following scale:
Zero > Pro > Proper > DefNP;AnchoredNP > DemNP > Other
· NoCrossEqSubject. (2). One violation when source and antecedent are both subject and cross a speech boundary. OR: one violation when the source's IP is imperative, the source itself is an argument and the antecedent is a subject.
The order of the constraints given above works fine for late Modern English (MBE). It may be that a different order is better for earlier variants of English. Future releases of Cesax may also offer additional constraints. If you have any specific requirements in that area, please contact us.
3.5.7 The tab page “Categories”
This tab page hosts additional word type related categories. There are two obligatory categories, defined here. The first category, HumanHeadNoun, is used to identify a suspicious situation. The second one, SpeechIntro, is used for the correct working of the constraint NoCrossEqSubject.
· HumanHeadNoun. Define all possible unambiguously human-related head nouns here, depending on the English version. Examples: human, man, men, person etc. When you have defined something in an earlier version of English (e.g. ME), then it will automatically be used in later versions of English (e.g. eModE).
· SpeechIntro. Give all verbs that introduce indirect speech. For example: say, reply etc. You should give these verb forms with the appropriate wildcards, i.e. the *, the [] and the ? (see section (4)).
The other categories can be specified to your liking. For the recognition of adverb types to take place correctly, a range of adverbs are defined here too. These should come with the standard of the CesaxSettings.xml. If you have an earlier version of Cesax, you can get these adverb types by installing the last version of Cesax from the internet. The program will recognize that you don’t have these adverb types, and ask you to add them to your inventory.
One of the main functions for which Cesax is designed is to modify the contents and the annotation of a psdx file. Cesax has the following commands for opening and saving files—all of them under the File menu item:
· Open (Ctrl+O). Load one particular file into the editor. If the file contains several sections, then Cesax will ask you which section you would like to work with.
· Recent. Open one of the files you have been working on recently.
· Save (Ctrl+S). Save the file you have currently loaded into your editor (this includes all its sections). Cesax will ask you to supply revision information.
· SaveAs. Save your current file under a different name.
4.1 Meta information
The user can supply meta-information to a currently loaded file. It is strongly recommended to equip every corpus file with as much meta information as possible, since meta information can help resolve many issues later on. The meta information is divided into two tab pages, which has been done out of space considerations.
Text information - general
· Title. The official title of the text that is contained in this file. If your text contains several parts, provide an overall title here, and supply the part information in Source.
· Distributor. This is the institute or corpus name (e.g. YCOE, PPCME2) where the current text comes from.
· Source. The origins of the text itself, going as far back as possible. You can supply additional comments and details of other nature here too.
Text information – extended
· Author. The original author of the text.
· Date of original. The date (in any format) of the original document.
· Date of manuscript. The date of the manuscript, which may be different from the original document’s date.
· Subtype. This is the place where you can use your own (short!!!) codes to indicate the language variant’s date/dialect/genre.
· Editor(s). Any editorial information pertaining to the text.
· Ethnologue code (extended). As a minimum, this should contain the three (!!) letter Ethnologue coding of the language of the text. Extend this code with dialect or date information by using underscores and strings. For instance, “eng” would be plain present-day English, but “eng_hist” would be a variant of historical English (possibly further specified by the Subtype), “eng_sla” would be a ‘second language acquisition’ variant of English, and “che_Latn” would be Present-day Chechen, but in a Latin script.
· Language name. Provide the name of the language in prose text.
4.2 Revision tracking
Whenever a changes is made to a psdx file, an attempt to save the text will be preceded by a request to give short information about the “revision” you have made. This short information will be saved together with the date and time information, allowing corpus users and developers to keep track of progress and changes.
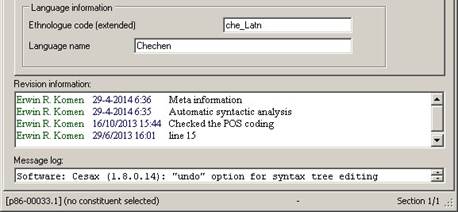
Figure 1 Revision information helps keep track of progress
The revision information is visible on the “General” tab page. Manually adding revision information is possible by double clicking the textbox marked “Revision information”. Deleting revision information is only possible in the raw psdx files.
4.3 Importing special files
There are a few special file types that can be imported into Cesax.
· Treebank (psd). Treebank files (with the psd extension) can be imported straight into Cesax. As an alternative, you can use the TreebankToXml utility to convert a directory of psd files into psdx files.
· ChainDictionary. If others have a chain dictionary you would like to use, or if you want to take your chain dictionary from home to work or vice verse, then Cesax allows importing it. See also section Fout! Verwijzingsbron niet gevonden..
· Translation. Translations of the source file into Present-day English can be imported into Cesax too. See section 7.2 for more details.
4.4 Exporting special files
Cesax allows exporting into the following types.
· Treebank (psd). The XML files can be transformed as Treebank files (with the psd extension). Not all information is carried over to the psd files. The node numbers are not exported, nor are the antecedent node numbers taken over. An example of the resulting output is given below.
· Translation. Translations of the source file into Present-day English can be exported into a psdy format. This is an xml format like the psdx one, but then without the <eTree> and <eLeaf> nodes. See section 7.2 for more details, and section 14.2 for the psdy format.
Here is an example of the PSD output produced by exporting to Treebank format. Notice how the features are exported in nodes that have FS as main label, and the particular feature name as sub label.
((CODE <T06080003700,5.8>)
(IP-MAT
(ADVP-TMP (ADV^T +Da))
(BEDI wear+d)
(NP-NOM
(FS-GrRole Subject)
(FS-PGN 3s)
(FS-NPtype Proper)
(FS-IPdist 10)
(FS-RefType Identity)
(FS-NdDist 120)
(NR^N $Apollonius))
(ADVP (ADV swi+de))
(VBN gedrefed)) (ID coapollo,ApT:5.8.72)
)
Cesax offers a number of options to create parsed text, although most of these options are but an interface to other software doing the ‘real’ job. English and German plain text files can be syntactically parsed into constituency treebanks (the labelled bracketing psd format) through the help of the Stanford parser, which is automatically downloaded and whose training data is used for this process. Spanish texts can be parsed too, but in a bit more cumbersome process. Texts are first dependency-parsed (where each word is assigned to be under one other word, its head) using the Maltparser on a training set. The dependency parsed material is then converted into a relatively minimal constituency parse by making use of a set of rules. Syntactic parsing is available for Chechen too, but in a much more limited way.
5.1 Conversion options
Many options to create parsed texts are, in fact, “conversion options”, and as such, they are also discussed in section 9.2. The list here is intended to help in finding the available options to create parsed texts more quickly:
· Constituency parsed English. Use Tools/Converters/TextToPSD; select “English”. This option uses the Stanford parser and training set.
· Constituency parsed Dutch. Use the “PaQu” web interface to create Alpino xml files of all the sentences in the text. Then use Tools/Converters/AlpinoToPSDX to convert them to .psdx files.
· Constituency parsed German. Use Tools/Converters/TextToPSD; select “German”. This option uses the Stanford parser and training set.
· Constituency parsed Spanish. Use the available Spanish-oriented MaltParser webserver to convert .txt files into the dependency format .conll (see the online pdf documentation as well as the explanatory web page). Next, use the command Tools/Converters/ConllToPsdx in order to convert the dependency-parsed Spanish .conll files into constituency-parsed .psdx ones.
· Constituency parsed Chechen. Text files first need to be part-of-speech tagged, in the way that is described at the Chechen corpus homepage.[2] This process results in “flat” .psdx files: each line contains a forest, and all the words in the line are available as child eTree+eLeaf nodes under this forest. A single part-of-speech tagged .psdx files can be converted into a constituency parsed one in two different ways:
o Two-step method: first perform dependency parsing on the part-of-speech tagged file using Syntax/Dependency. The result can now be edited (and corrected) using the “Dependency” tab page (if unavailable, switch it on by selecting View/Dependency). The second step is to convert the (corrected) dependency-parsed file into a constituency-parse, and this can be done by selecting Syntax/Constituency.
o One-step method: the command Syntax/Parse combines the two steps into one. Correction of the dependency-step is no longer of any use, but the resulting constituency-parsed trees can be manually edited and corrected, as described in section 6.
Some of the options above produce treebank files in the .psd format (bracketed labelling), which allows querying using the “CorpusSearch-II” tool (a command-line program). It is advisable to use the command Tools/Converters/BatchPSDtoPSDX (see section 9.2) in order to convert the .psd files into the .psdx format, which is the xml format that allows querying by the CorpusStudio program; one with a windows-oriented user interface that allows for advanced query descriptions using the “Xquery” language.
5.2 Creating new texts
Cesax facilitates ‘creating’ texts, in a sense. The File/New menu takes the user to a form where the details and the plain text of a new text can be entered. Once the meta-data and the text have been passed on, pressing “OK” does the following jobs:
· Sentencing. A relatively simple algorithm splits the text into sentences. (Note: the assumption is that a newline in your text signals a paragraph break.)
· Tokenization. The words and punctuation marks of the sentence are converted to tokens. The algorithm used here splits on hyphens. If this is not correct, manual adjustment can be made using the editing capabilities of Cesax.
· POS mocking. No real POS tagging takes place at this stage, but since all words and punctuation marks (internally <eLeaf> elements in psdx) must reside under some kind of constituent (an <eTree> element in psdx), they all receive the POS “X”.
Since most parsed texts have, at least to some extend, been created using statistical means, there may be errors in them. This is even more so with texts that have been parsed using one of the approaches described in section 5. Cesax offers manual editing of the syntax tree—the hierarchy in which constituents together form a sentence—in the tab page “Tree”. Version 1.5.0.0 of Cesax only allows rudimentary editing, but, depending on the needs of the users, its capabilities may be extended in future releases.
6.1 Syntactic editing mode
Syntactic editing mode can be entered by pressing Esc while being in the “Tree” tab page. The Escape key can be used to toggle between editing mode and non-editing mode. Editing mode is automatically left when the user switches to a different tab page.
As a signal that editing mode is active, a red textbox will appear in the menu bar with the word: Editing…
6.2 Editing commands
The editing commands that are provided with Cesax are intended to facilitate building and changing the syntactic tree of the sentence currently being evaluated. Be aware that there is currently no undo key for any of the syntactic editing commands. In case of any mistakes in editing (such as inadvertedly deleting one or more nodes), Cesax should be exited without saving the current psdx file.
Once syntactic editing mode has been entered, commands can be issued by using the simple key-strokes. An overview of these keystrokes can at any time be toggled by selecting View/TreeHelp. The following keys are currently active:
<space>. Edit
the label of the node.
When the text of an endnode (an <eLeaf>) is
edited, the @Type of the endnode (Star, Vern, Punct or Zero) is automatically determined by Cesax. Label editing is left by
pressing the <enter> key.
<i>. Insert
a new level between me and my parent
A new <eTree> node is created above me (or if the <forest> is selected: under me). The label will need to be edited by using
the <space> command.
<j>. Join
under the node right of me
The currently selected constituent is moved to become the left-most child of my
right-sibling.
<k>. Join
under the node left of me
The currently selected constituent is moved to become the right-most child of
my left-sibling
<d>. Delete
current node
Delete the current <eTree> or <eLeaf> node. It is not possible to delete <forest> nodes with the current editing commands.
<a>. Add
sibling to the right of me
Add an <eTree> sibling to the right of the currently selected constituent. Since
each <eLeaf> node is necessarily under one single <eTree> constituent, it is not possible to add <eLeaf> elements in
this way.
<f>. Add
sibling to the left of me
Add an <eTree> sibling to the left of the currently selected constituent.
<c>. Create
constituent child under me
Add an <eTree>
constituent under the currently selected node.
<e>. Create
endnode child under me
Add an <eLeaf> node under the currently selected <eTree> constituent.
<r>. Move
node to the right
Move the current <eTree> constituent one sibling
position to the right.
<l>. Move
node to the left
Move the current <eTree> constituent one sibling
position to the left.
<u>. Move
node to upward
Move the current <eTree> constituent one level upwards.
<s>. Re-analyze
sentence
Re-calculate the @from and @to
attributes of all the <eLeaf> nodes,
and all the <eTree> constituents in the current sentence. (This action should no longer
be necessary in the newest versions of Cesax.)
<t>. Truncate
here
The current <forest> node is
split into two <forest> nodes, where the second one starts with the selected <eTree> constituent. The back translation and transliterations available
for the current <forest> node are fully stored in both of the new nodes. The user
will need to manually adapt these, if this is desirable.
<g>. Glue
to preceding node
The current <forest> node is
combined with the preceding<forest> node
into one new node. Any back translation or transliteration sections are simply
combined, and should be edited manually if that is not desirable.
6.3 Undo
Cesax keeps a completel history of all the editing changes done by a user, and the “undo” command (Ctrl+Z) can be used to undo the last of these changes. Subsequent issuing of “undo” results in a step-by-step undoing of the editing changes that have been made.
It is also possible to go back to one particular editing step directly, by selecting that step in the dropdown box that appears right to the menu items of Cesax (next to the red “Editing” textbox):
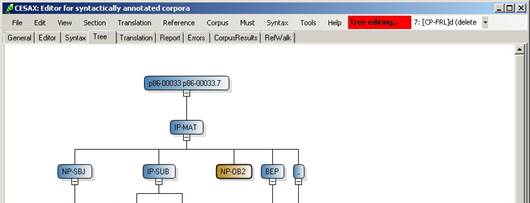
Figure 2 Undoing editing using the combobox to the right of “Tree editing”
6.4 Editing part-of-speech tagged texts
The part-of-speech tagging of texts can be edited as follows:
· Switch on “Dependency” view (using View/Dependency).
· Open the “Dependency” tab page.
· Use the editing commands available here.
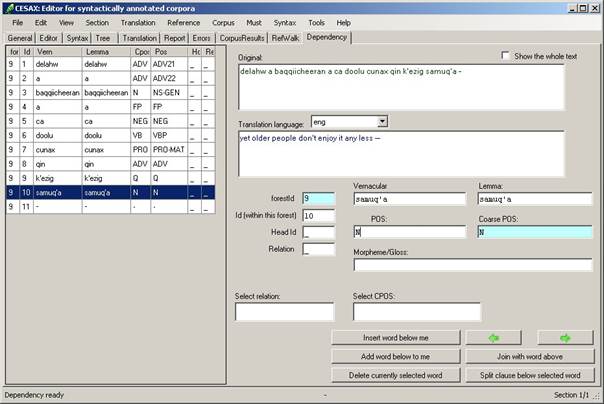
Figure 3 Part-of-speech editing in the dependency tab view
The dependency tab page shows all the words of the currently selected sentence (or the whole text, if the flag “Show the whole text” is set). Each word is accompanied by a number of features:
· forestId. The number of the currently selected sentence.
· Id. The number of the word (or punctuation mark) within the currently selected sentence.
· Lemma. The dictionary entry (lemma) under which the vernacular word should be found. If this is not available, the word itself is repeated here.
· Cpos. The coarse-grained part-of-speech tag for the currently selected word.
· Pos. The fine-grained part-of-speech tag for the current word.
Part-of-speech editing in the dependency tab page can be done by editing the value of the “POS” field. The “Coarse POS” is automatically derived from the POS value through the language-dependant HeadRule_lng.txt file (see the appendix 14.7).
The dependency tab page also allows joining words, deleting words, inserting a new word, and splitting a clause.
Navigation to the next or previous sentence can be done using the arrow keys, or alternatively using Alt+Up (previous sentence) or Alt+Down (next sentence).
The original text and the translation into English (or another language) can also be edited here in the dependency tab page.
6.5 Editing dependency-parsed texts
The dependency-parsing of texts that have been part-of-speech tagged and subsequently dependency-parsed using the Syntax/Dependency command can be edited as follows:
· Switch on “Dependency” view (using View/Dependency).
· Open the “Dependency” tab page.
· Use the editing commands available here.
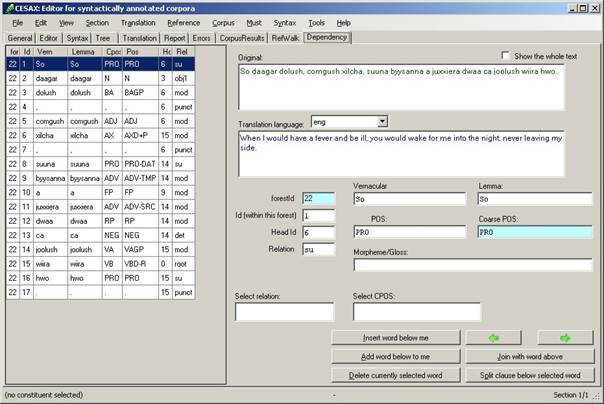
Figure 4 Dependency-parse editing in the dependency tab view
The dependency tab page shows all the words of the currently selected sentence (or the whole text, if the flag “Show the whole text” is set). Each word is accompanied by a number of features:
· forestId. The number of the currently selected sentence.
· Id. The number of the word (or punctuation mark) within the currently selected sentence.
· Lemma. The dictionary entry (lemma) under which the vernacular word should be found. If this is not available, the word itself is repeated here.
· Cpos. The coarse-grained part-of-speech tag for the currently selected word.
· Pos. The fine-grained part-of-speech tag for the current word.
· Head. The identifier of the word that is the current word’s head. (The head of So ‘I’ at position 1, for instance, has been identified as the word xilcha ‘when happens’ at position 6).
· Rel. The dependency-relation between the currently selected word and its head (the word So has the “su” – subject – relation with its head).
Dependency-parse editing can be done by editing the values of a numbe of relevant fields: the POS field, the Head field and the Rel field. The “Coarse POS” is automatically derived from the POS value through the language-dependant HeadRule_lng.txt file (see the appendix 14.7).
The dependency tab page also allows joining words, deleting words, inserting a new word, and splitting a clause.
Navigation to the next or previous sentence can be done using the arrow keys, or alternatively using Alt+Up (previous sentence) or Alt+Down (next sentence).
The original text and the translation into English (or another language) can also be edited here in the dependency tab page.
It is sometimes desirable to add information to existing (or newly created) syntactically parsed texts, thereby enriching them. This is particularly so when it concerns features that cannot completely be derived automatically. Such features include: NP types (such as ‘pronoun’, ‘definiteNP’), grammatical categories of NPs (such as ‘subject’, ‘object’), PNG (person/number/gender) marking of NPs, type marking of adverbials and class marking of verbs. Scholars who have trouble understanding the languages tackled by the corpora may be pleased to learn that Cesax facilitates enriching the texts with back translations as well as transliterations into other orthographies. A parallel text view allows the user to add a modern English back translation line to each line in the original text.
The remainder of this chapter gives an overview of the enrichment tasks that can be tackled with Cesax:
1. Adding features to psdx texts for Noun Phrases, Adverbs and Verbs (section 7.1)
2. Back translation (section 7.2)
Section 12 discusses several ways of reviewing the results of these core tasks.
7.1 Adding features
The psdx format in which the annotated texts are being stored allows each constituent to be extended with features. See the appendix in section 14.1 for the technical details of the xml schema. Users can add features in two different ways: manually or automatically.
7.1.1 Adding features manually
Manually adding features can be done through the “Feature Editor”, and is currently limited to work with the Noun Phrase features, as they are specified in Tools/Settings/NP_features (see section 3.5.5). Adding or changing of features can be done in the following way:
1. If you have not done so, load the annotated text file into Cesax.
2. Make sure you are on the Editor tab page.
3. Select the Noun Phrase you would like to add features to or edit features from.
4. Either choose F9, or select Edit/Feature, in order to open the Feature Editor.
5. The feature editor lists in the listbox to the left which features are assigned to this Noun Phrase currently. Add features to this list or change features from this list:
a. Select a feature name in the middle listbox.
b. Select the correct feature value in the rightmost listbox.
c. Press “Apply”.
If certain feature names or values are missing, you need to supply them at the “NP features” tab of the settings (reachable through Tools/Settings).
7.1.2 Adding features from a database
Corpus Research databases that have been made by CorpusStudio contain one or more features that are pre-calculated and/or manually supplied or edited. Cesax allows enriching your texts (that is, the psdx texts) with these features.
Prerequisits:
1. An opened corpus research database:
a. This is an xml file produced by CorpusStudio (using the Constructor/CreateResultDatabase command).
b. The database may, subsequently, have been opened and edited in Cesax (using the Corpus/LoadResults command).
c. The database should contain the feature field, whose values you want to enrich the texts with.
d. Should only part of the database be processed, then make sure to apply a filter through Corpus/FilterFeatures.
2. The location of the psdx texts that you want to be enriched with your new feature.
3. A backup of your psdx texts, in case you want to reverse the feature enrichment.
4. Think of a (short!!!) name and a type/category for the feature in the psdx texts.
Once all the prerequisites above have been dealt with, the process of transferring the database features to the psdx files can be initiated by selecting Corpus/FeaturesToTexts in Cesax. The following form appears:
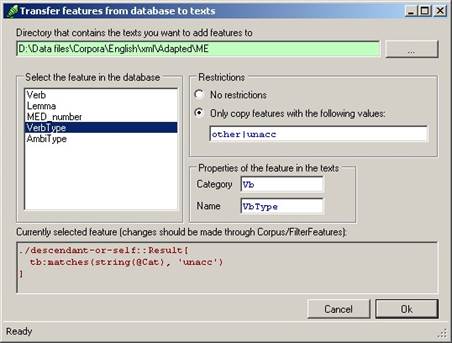
Figure 5 Details needed to transfer features from a database to texts
The directory where the psdx files are located is shown in the top textbox. The initial directory location is taken from the details supplied by the corpus database. The name of the feature as it is known in the corpus database can be selected in the listbox on the left (this box only shows the features that have actually been found in the database). The box called “Restrictions” can be used to limit the feature values to those that need be transferred. If used, supply a white-list of feature values, separated by a vertical bar. The box “Properties of the feature in the texts” contains details of the enrichment that is about to take place: supply a category (or type) and a name for the feature as it will be known in the psdx texts. The category and the name should be as short as possible, since every feature added to a psdx file takes up space, and every increase in space has a negative effect on processing time.
The bottom textbox of the form contains the currently selected filter. This filter will also be used in the process of transferring features to psdx files: only those database records that are selected by the filter will be taken into account.
Pressing “Ok” will initiate the transfer of features from the current database to the psdx files in the indicated directory. This transfer is irrevocable, so make sure you have a backup of the original psdx files.
7.1.3 Changing nodal attributes from a database
Just as a corpus research database can serve to change features in psdx files, so can it serve to change attributes of the nodes in psdx files. This capability of Cesax is particularly useful where systematic changes in the Label attribute of eTree nodes is called for.
The way to transfer changed attribute values from a database to the corresponding psdx files is as described in section 7.1.2, the general procedure to transfer features from a database to texts. The differences are:
a) Properties of the feature in the texts à Category – this is no longer relevant
b) Properties of the feature in the texts à Name – this needs to be exactly the same as the attribute's name that needs changing.
The current version of Cesax only allows changing of the attributes Label, from and to, but only the Label attribute will be of interest, generally speaking.
7.1.4 Adding features automatically
Automatic addition of features is currently possible for Noun Phrases, Adverbs and Verbs. You can either calculate features from scratch, or update existing features.
· Calculate features (Tools/CalculateFeatures). Choose the category (NPs, Adverbs, Verbs), and then Cesax will calculate features for this category from scratch.
· Renew features (Tools/RenewFeatures). Choose the category (NPs, Adverbs, Verbs), and then Cesax will check all features in this category to see if they need updating.
Feature calculation makes use of the settings you have supplied in the tab pages “Pronouns” (see section 3.5.4), “NP features” (see section 3.5.5) and “Categories” (see section 3.5.7).
Features can be checked manually by putting the cursor on a word, and looking at the feature list in the lower-left window of Cesax.
The success rate of the coreference resolution depends on the extent to which NP features have been added correctly, so it is of the utmost importance to check upon features. This is why either of the above options for adding or updating features ends with a “Category report” such as the one in Figure 6. This report is divided into categories. In the example there is only one category: that of the “demonstrative” pronoun. The report notes what variants for which time-periods have been defined for the category of Dem. It continues by giving examples of all the different forms found for this category. The current text apparently only had three forms for the Dem category: đa, þa and þas.
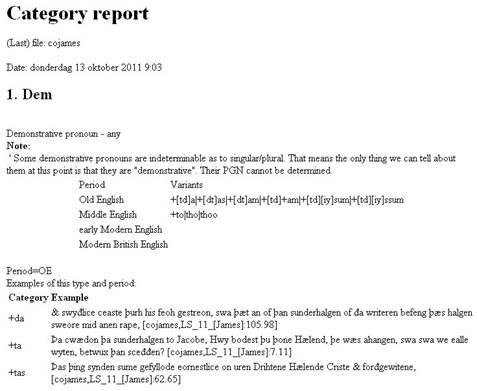
Figure 6 Category report of features renewed in “cojames”
While the category report describes all that has been found automatically in terms of PGN features, an even more important report is, after calculating or renewing NP features, available under the Error tab page, as for example in Figure 7. This report tells us that we need to make the demonstratives þan, þiss, þyssen and þære available in the settings (see section 3.5.4).
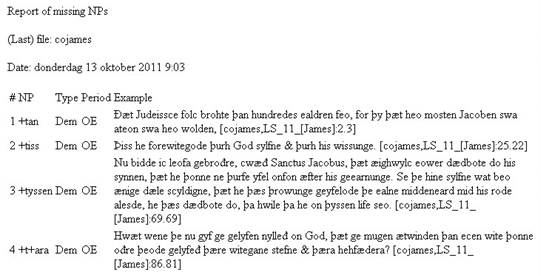
Figure 7 Report of missing NP features
7.2 Back translation
Cesax provides extensive possibilities to add a modern English translation to the original texts you are working with. I will refer to a translation of an original into modern English as a “back translation”. Cesax allows you to make a back translation on a line by line basis, to change this back translation, to view it side by side with the original, and to exchange separate back translation files (in the psdy format) with your colleagues.
7.2.1 Creating a back translation
Select Translation/Create… if you either want to start making a back translation for the text you have loaded, or if you want to continue your back translation. This function will look for the first line that has not been provided with a back translation and immediately allow you to add this. It will jump to the “Translation” tab page, and set the cursor on the middle blue-backgrounded section. This is the place where you can enter your back translation of the last line in the original (which is highlighted blue in the top left window).
Finish your back translation by pressing Enter. Navigation through the back translation is discussed in the next section.
7.2.2 Changing a back translation
Go to the back translation that is available in the “Translation” tab page, and navigate to the line you want to edit using any of the following means:
· Translation/First. Jump to the first line of the whole text or of this current section.
· Translation/Last. Jump to the last line of the whole text or of this current section.
· Translation/Next (Alt+N). Select the next line in the text you want to change the back translation from.
· Translation/Previous (Alt+P). Select the previous line in the text you want to change the back translation from.
· Translation/Goto. Enter the line number in the text you would like to go to.
The scope of the navigation commands shown above is determined by the setting of Translation/CurrentSection. If this option is set, which is default, then the scope is limited to the currently selected section. So when you select Translation/First, you will go to the first line of the currently selected section.
When this option is cleared, then the scope of the translation navigation commands is the whole text.
7.2.3 Exchanging back translations with colleagues
The back translation is normally saved as part of the psdx file (see section 14.1 if you are interested to see the details). But solely for the purpose of exchanging back translations, you can save and read psdy files. Such files contain the original text and the back translation in an XML format that is compatible with the psdx one.
· Reading a back translation. You can read a back translation (psdy file) by selecting File/Import and then selecting “English translation” as the type of file.
· Saving a back translation. Save the back translation you have made yourself by selecting File/Export and then selecting “English translation” as the type of file.
Back translations are normal text files (although they are in the xml format), so you can freely exchange them as email attachments.
7.2.4 Using a back translation in the coreference annotation process
Once you have a back translation inside the text you are working with for the annotation process, you can make use of it in this process. When you have pressed F10 or have selected Tools/AutoCoreference, the semi-automatic coreference resolution system uses the lower right window to display its progress. But instead of the progress information this window can display the available back translation. Press Shift+F10 (or select View/AutoCorefLog) in order to toggle between the coreference progress view and the back translation view.
The back translation shown in the lower right window only is a subset of the whole back translation available. This window shows several preceding lines in black, and the line you are currently working on in red. If you want to see the whole back translation, just press F12 (or select Translation/Show), which will lead you to the translation editor. The whole translation is visible, but the line you are currently working on stands out. The whole translation is not only available on the “Translation” tab page, but can also be viewed on the Report page in a slightly different way.
One particular type of text enrichment is that of coreference resolution. Cesax allows semi-automatical antecedent resolution of all NPs—not only of pronouns and demonstratives, but also of proper names and definite NPs. Based on a separately motivated set of hierarchical constraints, which are inspired by earlier work on coreference resolution (Beaver, 2004) as well as attested linguistical hierarchies (Gundel et al., 1993), it determines for each NP what the most likely antecedent is. If it comes up with one most likely candidate, and if there is no reason to raise suspicion, it then establishes a coreference link. Discourse new NPs are likewise recognized—unless there is reason to believe that user interaction is needed. Depending on the text, Cesax can automatically resolve more than half of all NPs. All suspicious cases are deferred to the user’s judgment, who will, in about another half of the cases, agree with the suggestion made by Cesax’s constraint ranking algorithm. See section 8 for details of this task.
8.1 General
Once a text has been loaded (using File/Open) coreference resolution can be started and stopped as follows:
· F10 (Tools/CoreferenceResolution). Start semi-automatic coreference resolution.
· F11 (Tools/StopResolution). Interupt (stop) coreference resolution.
·
Alt+F10
(Tools/FullAutoMode). Start fully
automatic coreference resolution.
Note: The fully automatic coreference resolution option is not recommended,
since this mode will skip all the constituents where suspicious situations are
detected, and, as a result, will give a skewed result.
· Manual. Cesax allows you to do coreference resolution completely manual, or to manually tweak the results of the semi-automatically resolved coreference.
8.2 Semi-automatic resolution
The process of semi-automatic coreference resolution consists of one optional and two obligatory steps:
· Modern English translation. The semi-automatic process of coreference resolution of older English texts or texts from different languages can sometimes be done more efficiently when you first provide a more understandable English translation (see section 7.2).
· Feature addition. The coreference resolution determines possible dependancies based on NPtype (e.g. pronoun, numeral), GrRole (e.g. subject, object) and PGN (person, gender and number of a whole NP). If Cesax detects that you want to do coreference resolution on a text for which no features at all have yet been supplied, then it suggests determining features automatically for you.
· F10 (Tools/CoreferenceResolution). This starts the process of semi-automatic coreference resolution. (Interrupt the process using F11).
8.2.1 Suspicious situations
Once the process of coreference resolution has started, Cesax will determine as much anaphoric links as possible automatically, and it will also determine whether NPs are referentially new (see the lower-right yellow window in Figure 8). But as soon as it finds a solution that matches one of the built-in suspicious situations, it will stop and ask the user for a decision, as for example in Figure 8.

Figure 8 Request for a user’s decision in coreference resolution
The middle-left yellow window in this example contains a description of the suspicious situation encountered:
LS_11_[James]:4.5[NP-NOM Heo] >> LS_11_[James]:2.4[NP-GEN +t+as]
More than one best match. Please decide what the correct antecedent is.
This message says that Cesax has come up with a “best maching link” from the pronoun Heo in lin 5 to the demonstrative þæs in line 4, but that there is more than one antecedent in the immediate context, that fits equally well (with respect to the algorithm used by Cesax). If we look at the bottom-left listbox, this shows the NP þæs leafe as having the same score (in the column “Eval”) of 560 as has the NP-GEN þæs which is suggested as antecedent (the lower the Eval number, the better). Without knowledge of Old English—the language in which this text is written—a decision will be hard to make.
If we click on Shift+F10 (or choose View/AutoCorefLog), then the lower-right window toggles to the modern English translation of the text (provided you have supplied one, obviously). This results in Figure 9. Quick consultation of the current line #5 and the previous line #4 shows that neither þæs nor þæs leafe is the correct antecedent for heo. Instead, it is heom from line #4.
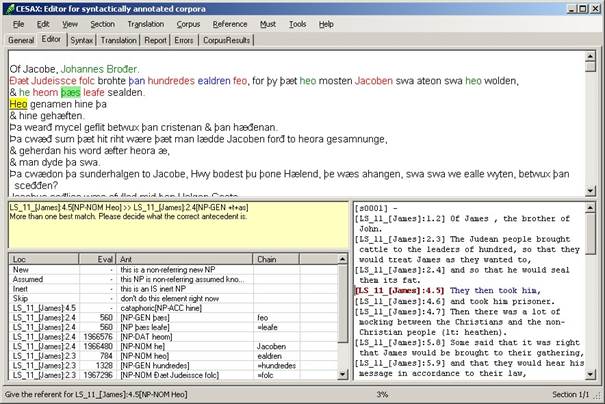
Figure 9 Usage of a back translation in coreference resolution
8.2.2 Interrupting coreference resolution for manual tweaking
You might, at this point, wonder whether Cesax is as bad as it looks like, since it has ranked the correct antecedent heom with a huge value, which means that it is very unlikely to be a correct antecedent for heo by the algorithm used. The reason for the mismatch, however, has nothing to do with the algorithm used by Cesax, but everything with feature resolution. If we click on the correct antecedent heom in the listbox, it will give a breakdown of the feature evaluation, which starts with AgrGenderNumber[1]. This means that Cesax has determined that there is no agreement in gender and/or number between heo and heom. When we interrupt the coreference resolution process with F11, and check the PGN of the two words (see section 7.1.4), then we see that heo is identified as 3rd person, feminine, singular—instead of the 3rd person plural that it should be.
8.2.3 Dealing with ambiguous PGN features
There are several possible ways to continue or try to repair this situation:
· Leave as is. Since the pronoun heo is notoriously ambiguous, we could decide to leave the matter as is, and continue the process of coreference resolution. We can do this by double clicking on the correct antecedent. Cesax will continue to do what it can automatically, until it reaches another suspicious situation and needs user input.
· Manual tweaking. We can change the PGN feature of heo manually into 3p, and then restart coreference resolution again by pressing F10. Cesax will now detect the correct antecedent.
· Adapting features. Since heo is ambiguous, it should occur in the 3fs as well as in the 3p section of the Features tab page of the Settings. So we can go to the settings, and edit them accordingly. If we do that, we have to renew the features by pressing Tools/RenewFeaturesOf, and we have to make sure that we put a tag in “Check Differences” when we do so. Feature renewing will then basically check all the features against the new data in the setting’s Feature tab. Having edited the features, and renewed them, we can now continue with the coreference resolution by pressing F10. At this point the program will occur several different instances of heo in the text, and will ask us in each situation whether the PGN should be 3fs or 3p.
8.2.4 Finishing coreference resolution
Once you finish coreference resolution, do not forget to save your results (Ctrl+S). You will be asked to give short information about the “revision” you have made of this psdx file. This short information will be saved together with the date and time information. This will allow you to keep track of your progress.
8.2.5 Restarting coreference resolution
When you have only partly resolved coreference for a particular text, you can continue the next time by loading the text and pressing F10. This will start coreference resolution from the start, because the resolution engine used by Cesax requires correct information about previous resolutions to be present.
8.3 Manual coreference editing
Manually adding or deleting coreference information is possible, but this should not be done while the semi-automatic process is still running. So before you start to change coreference information manually, be sure to press F11, so that any (semi-)automatic coreference resolution still running is stopped.
Once the automatic resolution has stopped, the manual coreference resolution task can be accomplished with the help of some important screen information:
· Main text window. The top part of tab page “Editor” contains the main text window. Colors indicate the coreference type of the different constituents (see Tools/Settings > Coreference Types).
· Translation window. The bottom right window of the “Editor” tab page contains a translation of the currently selected line and some preceding and following context.
· Node information. The bottom left window of the “Editor” tab page shows all the information that is linked to the currenctly selected constituent in the main text window. It shows the number of the IP that has been selected (each IP is numbered), the NP and coreference feature values (if available), the selected node itself, and the “Chain root” (that is the constituent to which the currently selected constituent ultimately refers).
The manual coreference task starts with the selection of a node. This can simply be done by clicking with the mouse on a part of the constituent. As soon as you do this, the background of the selected constituent receives a light-gray color, the information pertaining to this node becomes visible in the “Node information” window, the back translation of this verse is shown in the “Translation window”, and a summary of the most important information is shown on the status bar.
There are a few more things you can do with the Main text window by pressing a key:
· Plus (+). Try and select a larger constituent.
· Minus (-). Try and select a smaller constituent.
· Space. Select this constituent as source or, if a source has been selected, as antecedent.
· Next (n). Try jump to the first constituent you can find, which refers back to me. (You can alternatively use the letter “s”, referring to “source”.)
· Antecedent (a). Go to the antecedent node the current node points to.
· Delete. Pressing the delete button has the same effect as Reference/Delete: it will clear the coreference information currently associated with this constituent.
Once the automatic resolution has stopped, the manual coreference resolution task can be accomplished with the help of some important screen information:
· Select. Set
· Delete. Start semi-automatic coreference resolution.
· F11 (Tools/StopResolution). Interrupt (stop) coreference resolution.
8.4 Carry over from Cesac: Must
The settings allow defining which constituent types ‘must’ be supplied with a referential category (and possibly an antecedent). The commands available under the menu item Must are meant to navigate through any remaining constituents that need to be enriched, but have not yet been dealt with.
· First. Find the first constituent in the current section of the text that needs to be supplied with coreference information.
· Next. Find the next constituent (starting from the currently selected poin in the text) that needs to be supplied with coreference information.
· Previous. Find the previous constituent (starting from the currently selected poin in the text) that needs to be supplied with coreference information.
8.5 Coreferential chains
Once coreference has been resolved for a file, Cesax can make an overview of the coreferential chains, their characteristics, and their make-up. See section 12.6.
8.6 Check and repair overlapping chains
Once you have done some coreference resolution automatically or manually, you may want to see if any unintended “overlapping chains” have resulted. In order to understand what overlapping chains are, consider Figure 10.
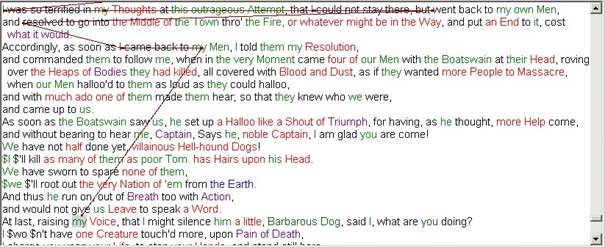

Figure 10 Overlapping chains
The top chain runs from my (Voice) à my (Men) à I, while the bottom figure shows a chain running from my (Resolution) à I à I. It is at this last “I” that the chains intersect. There is no reason for the main (top) chain to point from my (Voice) to my (Men). It should have pointed to my (Resolution) instead.
Use Reference/OverlapCheck, in order to check for and possibly repair these kinds of overlapping chains. Once you have chosen this option, Cesax will make an up-to-date chain model of the currently loaded text, and start looking for possible overlapping chains. It will present such chains one-by-one in a window like in Figure 11.
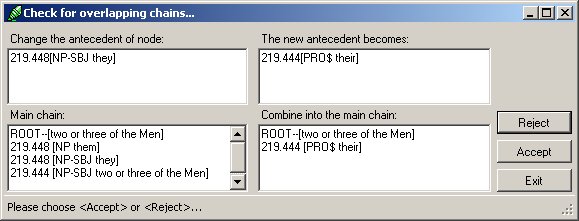
Figure 11 Overlapping chain checking window
The left panes are concerned with the “main” chain—the chain of which Cesax assumes that this is the larger one. The right panes refer to the overlapping (smaller) chain that Cesax has found. The example in Figure 11 suggest that a one-element large overlapping chain formed by the possessive pronoun their be included in the larger chain. It wants to do this by making the 219.448[NP-SBJ they] node point to the 219.444[PRO$ their] node.
If you are satisfied with a suggestion as this, press “Accept”. If you think this is not the right choice, press “Reject”. You can stop the checking process at any time by pressing “Exit” (this will not exit Cesax, but only the overlap checking process).
!!!!! IMPORTANT !!!!!
During the overlap checking process you are free to roam around with the text editor in your text, looking at individual nodes, seeing how they tie to one another etc. But as soon as you make any changes in the referential chains of the editor manually (you can do that!), you should re-start the overlapping chain process by (1) choosing “Exit” from the overlapping chain window, and (2) selecting Reference/OverlapCheck again.
8.7 Fully automatic mode
Cesax is equipped with a mode that allows full automatic coreference resolution. However, there are severe restrictions on this mode, which should be taken into account:
· Incomplete. The fully automatic coreference mode only deals with those references that can be resolved in such a way, that no suspicious situation is met. This means that not all NPs will receive a referential state (nor will all those who need it receive an antecedent link).
· Unpredictable. The results of the fully automatic coreference task are unpredictable, since all kinds of totally different situations may lead to a “suspicious situation”, at which point no resolution is given.
The fully automatic coreference mode is available under Tools/FullAutoMode (or: Alt+F10). Please specify the source directory where the psdx files are located you would like to add coreference information to automatically. Also supply the destination directory, where you would like the result of this operation to be placed.
N.B: The source and destination directory should be different! You really don’t want to use the results of automatic coreferenc resolution as a basis for further manual coreferencing.
8.8 Walking coreferential chains
From version 1.4.3.7 onwards, Cesax contains a tab page “RefWalk”, which facilitates working with coreferential chains.
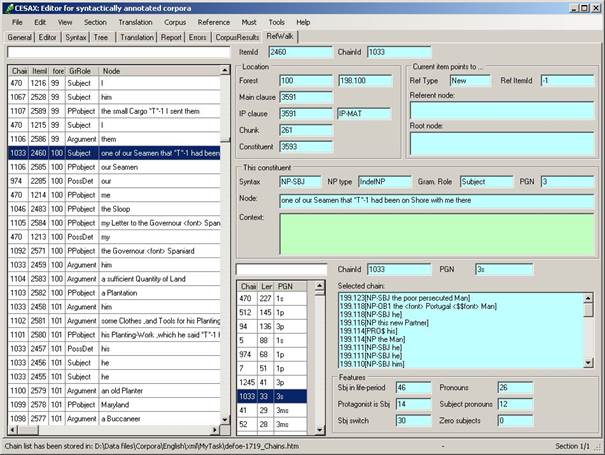
Figure 12 Walking through referential chains
There are a few things that need to be taken care of before this tab page can be used fully:
· Psdx File. Load a psdx file in Cesax using File/Open.
· Coreferential chains. Create coreferential chains through Reference/ListCoreferentialChains, or access existing chains (see section 12.6). Make sure you opt for the “Current text” (which is the one you’ve just loaded).
Once you have completed the two steps above, Cesax has produced an xml file with the coreferential chains of the document you have opened, and it has connected this xml file with the tab page “RefWalk”. So you can access this tab page, and see something like Figure 12.
8.8.1 Elements of the RefWalk tab page
The “RefWalk” tab page contains the following elements:
· List of referring constituents. The left pane of the window contains a listing of all the constituents in the document. Each constituent is identified by:
o ChainId. The number of the “referent” the constituent refers to.
o ItemId. The number of the constituent within the text.
o ForestId. The number of the line in the text.
o GrRole. The grammatical role of the constituent
o Node. The text of the constituent
· Information about the constituent. Additional information on the constituent selected in the “List of referring constituents” is shown in three parts:
o Location. The location identifiers of the currently selected constituent.
o Reference. If the current constituent points to another one, then its reference type is listed, the node to which it refers, and the “root node”: the node to which coreference ultimately ends up.
o This constituent. Several features of this constituent, as well as the “context” in which it occurs: the previous line, the current line (indicated by ***) and the next line.
· List of coreferential chains. The bottom-right pane contains a listbox of all the coreferential chains, sorted by decreasing length. The listbox contains the coreferential chain’s ChainId, Length, and PGN. When you select a chain, then additional information becomes available:
o Selected Chain. All the constituents in the chain are listed from last to first, including their location in the text and the label of the constituent they occur in.
o Features. A number of features that are used to get numeric measures related to coreferential chains are given:
§ Sbj in life-period. Number of subjects occurring in the “life-period” of the selected chain (all the sentences from the first mention of the referent, to the last mention of it).
§ Protagonist is Sbj. The number of times the referent occurs as subject.
§ Sbj switch. The number of times the subject switches from referent during the life-span of the selected chain.
§ Pronouns. The number of pronouns used on the referent’s coreferential chain.
§ Subject pronouns. The number of pronouns that have the grammatical role of “subject” on the referent’s coreferential chain.
§ Zero subjects. The number of times the referent is referred to with a zero subject (a subject elided under coordination).
8.8.2 Jumping to constituents
Both the constituent list as well as the chain list allow you to “double-click”. When you double click the constituent list, Cesax jumps to the indicated constituent and shifts to the “Editor” tab page.
When you double click the chain list, Cesax jumps to the last element on the chain, and shifts to the “Editor” tab page.
One of the aims of Cesax is to make its tools and functionality available to an audience that is as wide as possible. This is why the program allows converting treebank texts from alternative formats to its native psdx one, and it also allows the native psdx format to be transformed into other treebank formats.
|
From |
To |
Language |
Comments |
|
psdx |
psd (standard treebank) |
any |
|
|
txt |
psd |
English, German |
Uses the Stanford Parser to parse plain text; We use it for SLA data |
|
psd (treebank) |
psdx |
any |
|
|
psd (chunk-parsed) |
psdx |
any |
|
|
conll (dependency) |
psdx |
Spanish |
Uses trained model |
|
conll (dependency) |
psdx |
Old Dutch |
Uses limited model |
|
conll (dependency) |
psdx |
Chechen |
Uses limited model |
|
tiger |
psdx |
any |
The ‘tiger’ format is a dependency one used for Geman and Dutch mainly |
|
folia |
psdx |
any |
The ‘FoLiA’ format is relatively new and promises to get more support from our computational linguistics colleagues |
|
psdx |
folia |
any |
|
|
fieldwork |
folia |
any |
SIL’s Fieldwork program handles interlinearisation of texts |
|
psdx |
conll |
…(some)… |
Experimental (ask!) |
Figure 13 Currently available conversion options
The conversion options shown in Figure 9 are available from version 1.8.0.15 onwards; it is
expected that more conversion options will be added.
9.1 Individual text conversion
Conversion of treebank formats can, in some cases, be done by using the File/Import or File/Export commands, but this option is a bit more limited. Part of the Import options are discussed in section 4.3, while part of the Export options are described in 4.4. The options pertaining to treebank format conversion are listed here:
· Treebank. There should be no problem in reading treebank .psd files using File/Import.
· Chunk-parsed. Chunk-parsed .psd texts can be read using File/Import. This option may not work for all languages, but do give it a try!
· Dependency. Dependency files in the CONLL-X format can be imported using File/Import. Select a file, and then indicate the language (see below). Make sure that your dependency data is properly divided into sentences (by using identifiers that start with 1 for each new sentence).
· Folia. Files in the .folia.xml format can be read using File/Import.
Some of the import functions mentioned here may come up with a form where the language of the text needs to be selected. This is necessary for …
Importing dependency data of the CONLL-X format assumes that the input file is properly divided into sentences, such as here, where each new sentence starts with “1”.
1 Det dat D DPRO dem 2 su _ _
2 sin zijn AC AUXP fin,pres,aux_cop,formn 0 root _ _
3 seuen zeven NUM NUM card 4 mod _ _
4 maniren manier N NS plu,formn 2 dis _ _
5 van van P P _ 4 mod _ _
6 minnen minne N N sing,formn 5 comp _ _
7 . . . . period 2 punct _ _
1 Seuen zeven NUM NUM card 2 mod _ _
2 maniren manier N NS plu,formn 3 dis _ _
3 sin zijn AC AUXP fin,pres,aux_cop,formn 0 root _ _
4 van van P P _ 3 mod _ _
5 minnen minne N N sing,formn 4 comp _ _
6 ; ; . ; semicolon 3 punct _ _
7 die die D DPRO dem,forme 8 su _ _
8 comen komen VF VBP fin,pres,lex,formn 3 mod _ _
9 uten_P uit P P _ 8 mod _ _
10 uten_D de D D def,formn 11 det _ _
11 hoegsten hoogste N N_ADJ subs,sing,forme 9 comp _ _
12 , , , , comma 8 punct _ _
13 ende en CONJ CONJ coord 8 fnc _ _
14 keren keren VI VB infin 13 mod _ _
15 weder weder ADV RP prtcl 14 mod _ _
16 ten_P te P P _ 14 mod _ _
17 ten_D de D D def,formn 18 det _ _
18 ouersten overste N N sing,formn 16 comp _ _
19 . . . . period 3 punct _ _
Depending on the language, Cesax will attempt to convert a dependency file it is opening into a deeper annotated constituency format. The way Cesax does this is by looking at the rules defined for this process in the language definition file that is associated with the language id.
Dependency files created for the Chechen language, for instance, have the dependency-to-constituency rules defined in the file called “HeadRule_ch.txt” (see the appendix 14.7). This file is automatically downloaded from the internet and placed in the ru\Cesax subdirectory of the local user’s My Documents directory. The sections used for the dependency-to-constituency and other conversion types are these:
· HeadRules. This table is used by the constituency-to-dependency conversion. It shows the program which constituent (or phrase) should be regarded as the “head” of a phrase.[3]
· DependencyRelations. This contains a list of the available dependency relations (such as “su”, “hd” etc). The list is used for the conversion from constituency to dependency, and it says which phrase label results in which dependency relation.
· PhraseRules. This list is used by the conversion from dependency format to constituency format. It is the combination of the part-of-speech tag (e.g. “N-ERG”) and the dependency relation (e.g. “su”) that results in an appropriate phrase label (e.g. “NP-SBJ”)
· CompactPos. This list shows which part-of-speech tags can be grouped together in a larger group; all the (finite) verb forms, for instance, should be grouped into a larger group for better results with the MaltParser, the conversion from pos-tagged text to depencency.
9.2 Batch text conversion
The bulk of the conversion options are available as “batch conversions”: they convert all the files of a particular type in one directory (sometimes even including its subdirectories) into another kind of treebank format. Here is a list of all the batch conversions available so far:
|
Command |
From |
To |
Characteristics |
|
Tools, ProducePSD |
.psdx |
.psd |
This method converts feature sets (/fs/f in the psdx format) into (FS- nodes. |
|
Tools, ProduceSimplePSD |
.psdx |
.psd |
Feature sets are not translated into nodes. |
|
Tools, Converters, PSDX to Penn Treebank PSD |
.psdx |
.psd |
Feature sets are not translated into nodes. The top node gets the label “ROOT” |
|
Tools, Converters, PSDX to Cesax tagset |
.psdx |
.psdx |
Convert Stanford tagset into the ‘Cesax’ tagset (=historical English parsed texts tagset). See 14.8 for details. |
|
Tools, English txt to psd |
.txt |
.psd |
Converts English plain text files into treebank files, by using (and if necessary downloading) the Stanford parser).[4] |
|
Tools, Converters, Text to PSD |
.txt |
.psd |
Converts plain text files into treebank files, by using (and if necessary downloading) the Stanford parser).[5] |
|
Tools, Converters, Alpino to PSDX |
.xml |
.psdx |
Convert Alpino ds xml texts into constituency.[6] |
|
Tools, Converters, CONLL to PSDX |
.con .conll |
.psdx |
Convert dependency parsed files (CONLL-X format) into constituency.[7] |
|
Tools, Converters, Treebank PSD to PSDX |
.psd .upsd .stp |
.psdx |
Convert treebank PSD files into equivalent PSDX files. This option replaces the earlier program “TreebankToXML”. |
|
Tools, Converters, Tiger to PSDX |
.tig |
.psdx |
Convert “tiger” format dependency into PSDX. This goes for German and Dutch. |
|
Tools, Converters, Folia to PSDX |
.folia.xml |
.psdx |
Convert “folia” format to “psdx”[8]
|
|
Tools, Converters, PSDX to Folia |
.psdx |
.folia.xml |
Convert Cesax native .psdx files into folia format |
|
Tools, Converters, Fieldwork to Folia |
.flextext |
.folia.xml |
Convert interlinearized texts that have been made in SIL’s “Fieldwork” program directly into the folia format (no .psdx is produced) |
|
Tools, Converters, Adelheit to XML |
.txt |
.xml |
Converts the ‘improved’ 5-column “Adelheit” format into and “adelheid-document” xml file |
10 Main task: preparing a corpus search with CorpusStudio
The Cesax program can work in close collaboration with CorpusStudio, a program that facilitates complex searches through xml and treebank texts. There are two areas where the cooperation between the programs is most visible in Cesax. The first area is in that of preparing a corpus search, the second in working with corpus research databases that have been produced by CorpusStudio. The first area is discussed in this section and the second one in section 11.
It is possible to prepare a corpus query by selecting the nodes in the treeview of a sentence from a text. This information can then be made available for CorpusStudio, where a query creation wizard guides the user through the process of creating a corpus-research project to one’s liking.
The first step in the process, then, is opening a syntactically parsed .psdx file in Cesax, and selecting a sentence that contains a configuration that is at the primary interest of the researcher. If one would be looking for main clauses in Chechen, for instance, that contain the equivalent to the English “when-clause”, the clause in Figure 14 might be a good point to start.
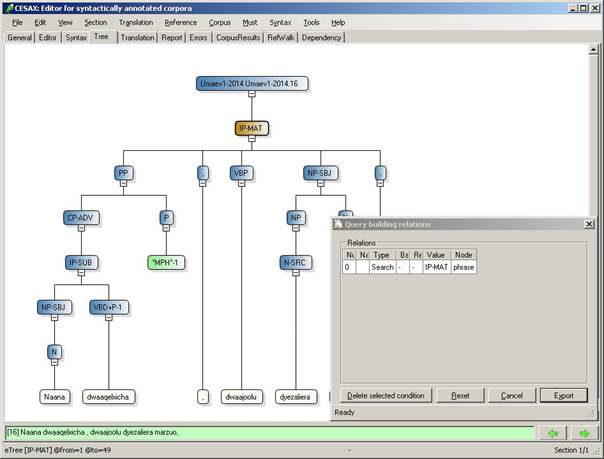
Figure 14 Preparing a Corpus Research for CorpusStudio
The preparation of a corpus research involves selecting all relevant constituents, and this is done in the “Tree” tab page in the following way:
· Select the hierarchically highest node (the “IP-MAT” in Figure 14) and press SPACE. The “Query building relations” window appears, and this first selected node receives the variable name “search”.
· Select all relevant sub-nodes, and each time press SPACE. The program will come up with a textbox, which is where you provide a relevant name for the selected node. See Figure 15:
o The constituent “NP-SBJ” has received the name “sbj”. The “Query building relations” window shows that it is the “child” of “search”, which always is the first node.
o The constituent “VBP” has received the name “vFin”. The “Query building relations” window shows that it too is a “child” of “search”.
o The constituent “PP” is about to receive a name. The name-entering textbox has appeared, and the user is giving it the name “whenClause”.
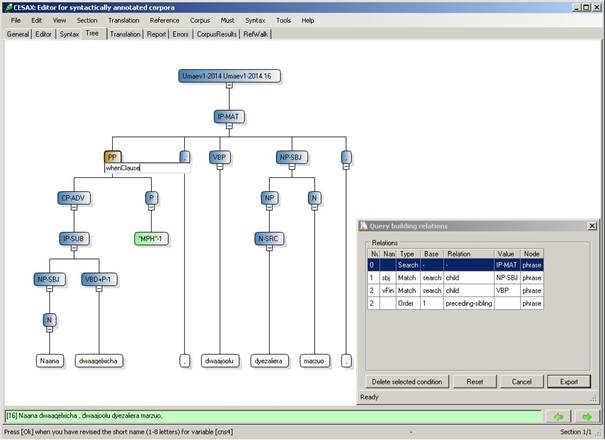
Figure 15 Providing variable names for selected constituents
What about constituent order? Notice that the node vFin has received an ordering relation: node “2” (which is the vFin) should receive node “1” (the sbj). Cesax initially assumes that the identified constituents must appear in the order in which they are available in the clause. If this is undesirable, then the individual ordering conditions can be deleted by “Delete selected condition”. And if anything goes wrong in the query preparation, “Reset” can be used to start the process afresh.
The next step for the purpose of identifying the correct constituents when looking for Chechen “when-clauses” would be to select the constituent “VBD+P-1”, since this heads the when-clause; otherwise a query might just be looking for main clauses with a finite verb, a subject and any kind of PP.
Once all nodes that are needed in identifying the clauses one is looking for have been added to the “Query building” window, “Export” needs to be pressed. This issues the command to save the ingredients of the query-to-be to a special file on the computer. It is this special file that the program CorpusStudio will use in its Query Creation Wizard to automatically prepare the Xquery code that looks for the structure we are interested in. See the CorpusStudio manual for details.
The programs CorpusStudio and Cesax cooperate tightly when it comes to corpus research databases. CorpusStudio facilitates the creation of such corpus research databases, and they can be viewed, edited, and prepared for further (statistical) processing within Cesax.
Cesax allows working with an xml database that is coded in the “Corpus Results database” standard (see the appendix 14.3 for the format of such files, and an xsd file for this xml type should be on the CorpusStudio homepage).
· Reading a results database. Select Corpus/LoadResults, and then choose the file you want to read. The last database you have been working with will be remembered (its name is stored in the CesaxSettings file). So you can always get to your last database by selecting Corpus/1 (i.e: the number “1”).
· Saving a results database. Select Corpus/SaveResults.
11.1 Manual editing of records in the database
Once your database is loaded, you can work with it in the following way.
· Navigation: select one particular result by selecting the line from the list with results. All the information associated with this line will be shown: the name of the file, the line number of the example, the period, etc.
· Category. The list of results already shows the main category of each result. If your database was made with CorpusStudio, then you have selected the type of this category by assigning it as the subcategorization pivot. You can change the value for each result line in the textbox labeled “Category” just above the green syntax window.
· Editing. You can edit the user adaptable features in the lower middle subwindow.
· Notes. Each line in the results database allows for notes to be added in the “Notes” subwindow.
Since you might want to have some more context to the example you are working with, the “CorpusResults” tab page allows you to double-click the current example in the list. This will open the psdx file where this example occurs, and it will navigate to the example’s line.
Note that you may need to specify the section in which your example occurs. So before double-clicking, note the line number of this particular example.
11.2 Automatic and user-guided annotation
There may be particular combinations of features that you would like to be annotated in exactly the same way, and this is where Cesax offers two commands with similar function, but a slightly different user interface:
· CopyAnnotation. Provides a find and replace function for up to 10 user features.
· FindAndReplace. Provides a find and replace function for more features.
11.2.1 CopyAnnotation
When you select the record that contains the features you would like to recognize, and then choose Corpus/CopyAnnotation, the following window appears (the values will be different for the database you are working with):
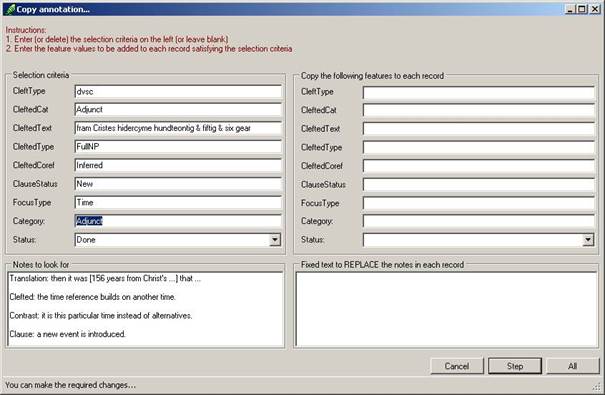
The first action you need to take is entering (or deleting) the selection criteria in the left side of this window. Make sure that each feature (here we have the features “CleftType”, “CleftedCat” and so on until “FocusType”) you want to include in the selection criteria has exactly the values you want to select for (no wildcards are allowed here yet). Make sure the text in the “Category”, the “Status”, and the “Notes” boxes have the correct values—provided you want to include these in your selection criteria.
Any value that you do not want to select on should be made completely empty.
The second step you should take is enter the correct replacement values in the appropriate features in the right hand side of the window. You can select any of the features, the category, the status (but please select from the defined values) as well as the notes section. Be aware that these are replacement values: anything that was, for instance, in the “Notes” section will be overwritten with the text you put in the right hand side “Notes” part. Where you do not want any changes to occur, keep the textbox empty.
The third step requires you to choose the mode of processing:
· Step: This starts a procedure, where the program steps through the entries satisfying the selection criteria, and asks if you want to make the indicated changes at the currently selected entry or not. You can say “Yes” or “No” at each step, and if you inadvertedly made a bad choice, you can select “Cancel”; but you will have to manually change the falsely changed record back into its prior state.
· All. This mode makes all the changes you have indicated in all the records satisfying the selection criteria without stopping. Be sure to make a backup of your data before you apply changes this way!
11.2.2 FindAndReplace
If a corpus database has more than 10 features, then CopyAnnotation does not offer enough possibilities anymore. Cesax offers the function Corpus/FindAndReplace (Ctrl+F3) as an alternative. Selecting this function brings up the following window:
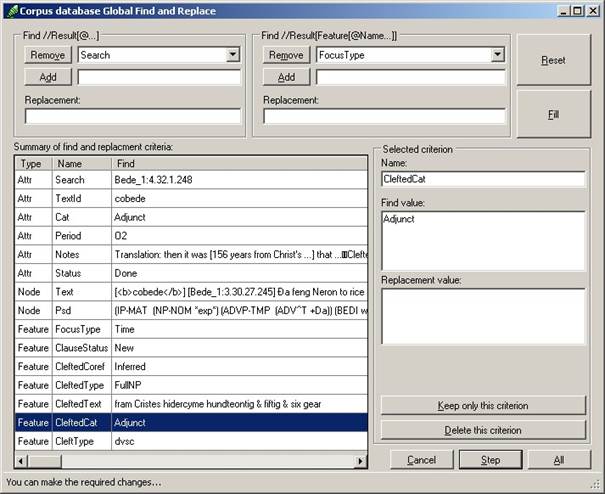
This form allows formulating both the criteria to find particular entries in the corpus database as well as supply particular replacement values. Here is an overview of the actions that can be taken in order to compose the list of criteria and replacement values:
· Clear: If you want to clear all find and replacement criteria simply press “Reset”.
· Fill. The button “Fill” copies all non-zero values from the currently selected entry in the corpus database, treating them as find criteria. They appear in the listbox “Summary of find and replacement criteria”.
· Remove. Individual find criteria can be removed in two different ways. The first method is to select the criteria in the “Summary” list, and then press “Delete this criterion”. The second method is to select the feature in the top-right combobox or the attribute/node in the top-left combobox, and then press the corresponding “Remove” button.
· Keep. When only one criterion from the “Summary” list should remain, and all the other criteria can be removed from the list, then the correct criterion should be selected, and the button “Keep only this criterion” pressed.
· Add. One criterion can be added by selecting it in the top-left combobox (for nodes/attributes) or the top-right combobox (for features), and then pressing the corresponding “Add” button. The value of the criterion can be specified in the textbox right under the combobox and the replacement value can be specified in the textbox labelled “Replacement”.
No replacing takes place where the replacement value is empty.
(Emptying a feature value can only be done by setting the replacement value to something like a hyphen.)
Once the “Summary” list contains all the find criteria, the correct replacement values for the appropriate features or attributes can be entered in the textbox labelled “Replacement value” on the right side of the “Summary” list.
When the find criteria and the replacement values have been specified, the mode of processing can be selected:
· Step: This starts a procedure, where the program steps through the entries satisfying the selection criteria, and asks if you want to make the indicated changes at the currently selected entry or not. You can say “Yes” or “No” at each step, and if you inadvertedly made a bad choice, you can select “Cancel”; but you will have to manually change the falsely changed record back into its prior state.
· All. This mode makes all the changes you have indicated in all the records satisfying the selection criteria without stopping. Be sure to make a backup of your data before you apply changes this way!
11.3 Filtering results databases
When corpus results databases are large, manual editing or reviewing them may become a tedious job. In order to find records (instances) within the database that satisfy particular criteria, Cesax allows filtering the database: showing only a subset of the records that are part of the database. It is important to know that filtering a database does not enter the database itself. Even saving a filtered database does not result in loss of data. A filter can be regarded as a pair of coloured glasses one puts on to look at the world in a particular way.
There is a “Quick” and a “Precise” way of filtering the results. The “Quick” way is to type a word, number or (part of a phrase), possibly including wildcards (the “*” sign), in the textbox just below “Select one result from the database”:
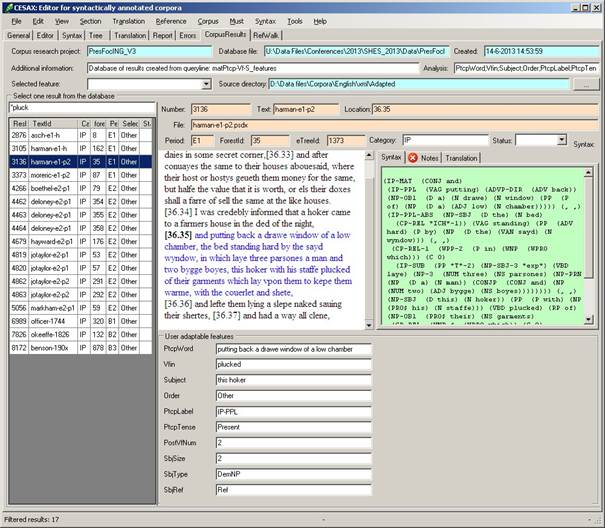
The example above shows how typing in “*pluck” filters the database in such a way, that only 17 results (from a total of 8814) remain visible. The program Cesax filters the results by matching the string “*pluck” with the ‘standard’ attributes belonging to each result record: ResId, TextId, forestId, Period, Select, Text, Psd, Location, File, Category.
There are two notes that need to be made as far as the “Quick” method is concerned:
· Text. since the [Text] node of each result contains the context as well as the text of the target sentence, it may not be possible to filter the database in such a way, that only result sentences with a particular word or phrase are found. Records that contain the word or phrase in their preceding or following context will also be included in the set of filtered results.
· Feature. The “Quick” method does not allow filtering on individual features that accompany each record in the results database. If selection on particular feature values needs to be done, then the “Precise” method should be used.
The “Precise” way of filtering corpus-results (See Corpus/FilterFeatures) allows the user to select records in a very articulate way, and it does so by offering the full Xpath search functionality. A detailed description of Xpath syntax, as well as examples of the way it works, can be found at the w3c area where Xpath originates from. While Cesax allows the full Xpath search functionality, relatively simple filters that specify the presence of particular feature and/or attribute values can be constructed in a simple way.
The filter constructor can be openened by selecting Corpus/FilterFeatures:
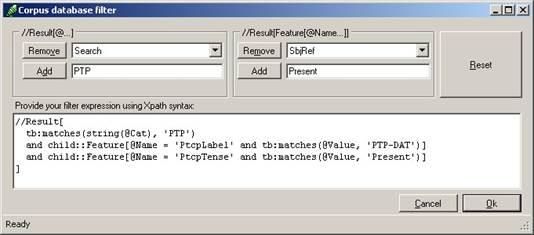
The user now has two ways to come up with a precise filter of the database results: type in a correct Xpath filter expression manually, or construct a proper Xpath filter expression using the buttons and boxes at the top of the form. The constructor provides the following functionality:
· Add (Attribute): Select one of the available attributes in the top-left combobox and add the desired attribute value (possibly including wildcards) in the top-left textbox. Then press the top-left “Add” button.
· Remove (Attribute): Select the attribute line that needs to be deleted and then press the top-left “Remove” button.
· Add (Feature): Select one of the available features in the top-right combobox and add the desired feature value (possibly including wildcards) in the top-right textbox. Then press the top-right “Add” button.
· Remove (Feature): Select the attribute line that needs to be deleted and then press the top-right “Remove” button.
· Reset. To remove all filter expressions press the “Reset” button.
The Xpath expression that results from applying attribute or feature specifications can be fine-tuned manually, if desired.
Once the proper values for the filter have been constructed, press “Ok” to apply the filter. The database is now filtered by making use of the Xpath expression. (This is done by filling the “Select” field with the values “0” or “1”.)
Note 1: You can save particular filters by copying and pasting them to a word document. When you need to apply them in an other session of your work, simply copy and paste them back from the word document to the corpus database filter form, and then press “Ok”.
Note 2: When a filter has been manually adapted, re-selection of the command Corpus/FilterFeatures may result in unexpected behaviour. What happens is that the re-selection of the command results in bringing up the old and un-edited copy of the selection criteria that have been applied. The only way to circumvent this is by copying and saving the manually-adapted filter(s).
11.4 Adding feature values
It is possible to add features to an existing corpus research database. One feature at the time can be added through the function Corpus/FeatureAdd. Specify the name of the feature (which should not contain any spaces) and a possible default value that should be assigned to the feature everywhere.
11.5 Exporting and importing feature values
The features that are stored in a database can be exported and imported individually; this allows for exchange and archiving of individual features.
11.5.1 Association of features to a point in the text
Features are generally calculated for a particular constituent in a particular line of a particular text. This is why each feature is stored together with the combination of (a) its text file name, (b) its forestId value and (c) its eTreeId value visible in the “CorpusResults” tab. If the combination of these values does not lead to a unique constituent within a particular text, then features can still be exported, but importing them to a unique location is still possible, but this is a complex process (see the ‘inexact target node’ feature).
It is not difficult to make sure that feature exchange will run smoothly for a database, but the action to facilitate this lies in the database creation that takes place in CorpusStudio: the function ru:back() must have as its first argument the constituent to which the feature in the database belongs. The reason for this requirement is that the File/ForestId/eTreeId combinations of each record in a database are taken from the ‘coordinates’ of the first argument of ru:back().
11.5.2 Exporting features
This is the procedure to export the values of any user-adaptable feature can be exported to an xml file:
· Filter. If needed, apply a filter to select only those records that contain correct values for the desired user-adaptable feature.
· Export. Select Corpus/ExportFeaturesToFile and set the correct options.
o Feature. Select one feature in the database that needs to be exported
o Restrictions. Either select “No restrictions”, or specify restrictions using a white-list and/or black-list. The values in the lists may contain wild cards, and must be separated by vertical bars.
o Attributes. Select any attributes you want to also save together with the selected feature value.
o Export directory. Change the default directory if you are not satisfied with the one that has been derived from your database file location.
The exported file can be found in the directory specifed in “Export to directory”, and its name consists of the database name + the name of the exported feature. The file extension is .xml.
11.5.3 Exporting features directly to texts
Cesax offers the possibility to export features directly to corpus texts (those with the .psdx extension). Select Corpus/ExportFeatureToTexts, which leads to the form exemplified in Figure 16.
Note: be absolutely sure to have a backup of your .psdx files, should the feature exporting not go as desired!!!
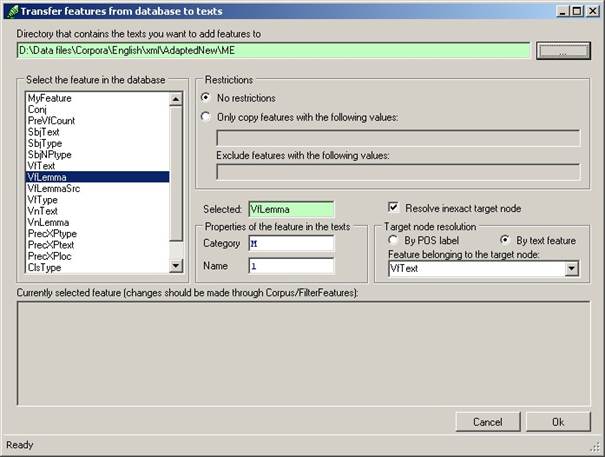
Figure 16 Exporting features from corpus databases directly to .psdx texts
This is the procedure to export the values of a user-adaptable feature to texts:
· Filter. If needed, apply a filter to select only those records that contain correct values for the desired user-adaptable feature.
· Export. Select Corpus/ExportFeaturesToTexts and set the correct options.
o Feature. Select one feature in the database that needs to be exported
o Restrictions. Either select “No restrictions”, or specify restrictions using a white-list and/or black-list. The values in the lists may contain wild cards, and must be separated by vertical bars.
o Properties of the feature in the texts. Provide (by entering) the category and the name of the feature in the .psdx texts. For example: category “M” and name “l” is used for lemma’s.
o Resolve (in)exact target node. If the nodes in your database (that is, the combination of the forestId and the eTreeId over there) do not select the node to which the feature should be added, then check this box and choose between one of two methods:
§ Target node resolution by POS label. (not yet implemented)
§ Target node resolution by text feature. Select the feature from your database that contains the literal text of the node that needs resolution.
§ Targetnode resolution by Id feature. If you have added a feature to the database that contains the @Id value of the <eTree> node to which the feature belongs, then select it here.
The example in Figure 16 shows exporting lemma features: the values from the feature “VfLemma” from the database are to be copied to the M/l lemma features of the .psdx files in directory D:\data files\corpora\English\xml\AdaptedNew\ME. There is inexact node resolution, and the target node can be recognized by matching the text in feature “VfText” with the text of the nodes in the relevant parts of the .psdx texts. Where the resolution does not work out, the log contains a message indicating this.
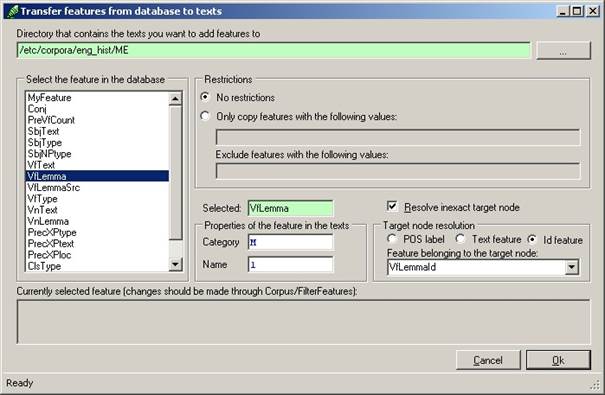
Figure 17 Exporting features from a corpus database to .psdx texts by Id
One of the methods introduced above allows for exact target node resolution, as shown in Figure 17. This kind of resolution assumes that a database has been made that contains a field with the numerical Id of the <eTree> to which the feature should be added.
11.5.4 Importing features
Provided the association of features to points in a text has been taken care of (see section 11.5.1), the features that have been stored previously can be imported into a corpus research database, where they overwrite the existing ones. This is the procedure to import features:
· Filter. If needed, apply a filter to select only those records that should receive a replacement value of the desired user-adaptable feature.
· Import. Select Corpus/ImportFeaturesToFile and set the correct options.
o Import from file. Select the .xml file that contains the one feature that needs to be imported. The name of the file is that of the database it has been taken from + the name of the feature to be imported.
o Feature. Select the feature in the database that needs to receive the values from the file to be imported. (If the file contains values for a different feature, nothing will be imported or overwritten.)
o Restrictions. Either select “No restrictions”, or specify restrictions using a white-list and/or black-list. The values in the lists may contain wild cards, and must be separated by vertical bars.
o Attributes. Select any attributes you want to import together with the selected feature value. (Attributes are only imported if they are found in the .xml file.)
Once the correct options are indicated, pressing “OK” starts the import process.
11.6 Database output for statistics
Cesax implements several different database result output methods that pave the way for further statistical processing of the data that is present in a database: (a) Report, (b) SPSSprepare and (c) TimblPrepare.
11.6.1 Making a corpus database report (for Excel)
Selecting Corpus/Report converts the database line-by-line into a text file (UTF8 encoded, with the extension .txt). An example of applying this command is shown in Figure 18.

Figure 18 A corpus result execution report
Each line in the text file contains the information of one record in the database; the fields are separated by the “tab” symbol. The report given by Cesax shows the fields that are used in the text file. These fields include:
· Standard Cesax fields. These fields show the values that help identify the records:
o Period. The period of the text from which the result in this line comes.
o TextId. The short name of the text from which the result in this line comes.
o Search. The search string used for the text.
o forestId.The text-specific line number of the result in this line.
o eTreeId. The text-specific node number of the result in this line.
o Status. The status as supplied by the user for this result.
o Cat. The ‘subcategory’ (if this has been used) to which the result in this line was assigned by CorpusStudio.
· The user-defined features. The example above uses the features [Clause] … [AmbiType]. All the features that have been calculated in the corpus research project come out here in the report.
· The example. This is the text of the clause in which the database ‘hit’ has been found.
The corpus result report can be opened in Excel. The best results are obtained by first (a) opening the Excel program, and (b) doing File/Open within Excel on the text file produced by Corpus/Report. This ensures correct rendering of unicode characters and correct alignment of the string values of each field.
The text file produced by the corpus report can, of course, also be processed by other programs. The only possible disadvantage of this format for further statistical processing is that the values of the features are provided as string (text) values instead of as numerical ones. This disadvantage is overcome by the SPSS output method described in the next section.
11.6.2 Preparations for SPSS processing
Selecting Corpus/PrepareForSPSS converts the database line-by-line into a text file (UTF8 encoded, with the extension .txt), and it converts the feature strings into numbers. The command comes with a form where the fields can be selected that need to be turned into numerical values.

Figure 19 Selecting which features are turned into numerical values for SPSS processing
Initially, the PrepareForSPSS command assumes that all user-defined features (as well as the system’s “Example” feature, the text of the clause in which the hit resides) are to be converted into numerical values.[9] Those features that should not be turned into numerical values should be put into the box “Do not include in statistics” by selecting each of these features and then changing its “Characteristic” into “No statistics”. Features that one should not turn into numerical values include:
· Numerical features. Features that are numerical themselves already, should be placed in the box “Do not include in statistics”.
· Text features. Those textual features that, for instance, represent the text of a phrase and are not part of the database for statistical purposes, should not be included in statistics.
Once the correct feature translation division has been selected, pressing “OK” causes Cesax to calculate feature values and prepare three files for SPSS:
·
Corpus
results (.htm).
This contains the information as is visible on the “Report” page. This can be
used as a quick reference to see the connection between the feature names and
their numerical values.
· SPSS syntax file (.sps). The connection between the feature string and numerical values that can be opened as an SPSS statistics syntax file.
· SPSS tab-delimited data (.txt). Much like the Corpus/Report file, this contains all the lines of the database, where each line contains all the user-defined features, information that allows locating the ‘hit’ (Period, TextId, forestId, eTreeId) and the ‘example’ line (the line in the text that contains this hit).
Once the text and SPSS syntax file have been prepared, the data can be opened in the SPSS program by following these steps:
1) Open the SPSS program.
2) Import the .txt file that has been produced
a) Choose “Open an existing data source” … “More files…”
b) Set the file type to “Text (*.txt, *.dat)”
c) Locate and select the “…_Dbase_spss.txt” file that has been produced, press “Open”
d) Walk through the “Text import wizard” of SPSS:
i) Step 1 of 6: press “Next” (no predefined format)
ii) Step 2 of 6:
(1) choose “Delimited”
(2) choose “Variable names included = [Yes]”
(3) press “Next”
iii) Step 3 of 6: press “Next” (no deviations from the standard)
iv) Step 4 of 6:
(1) Make sure only “Tab” is selected in “Which delimiters appear between variables”
(2) The “text qualifier” is a “Double quote”
(3) Press “Next”
v) Step 5 of 6: press “Next” (variable specification can better be done later)
vi) Step 6 of 6: press “Finish” (no deviations from the standard)
e)
SPSS imports your data and
puts it in an “untitled” dataset.
If you want to, you can save the dataset (it will turn it into a .sav
file).
3) Process the .sps syntax file
a) Choose File/Open/Syntax
b) Locate the .sps file that Cesax has made, select it and press “Open”
c) The “Syntax editor” should open.
d) Select Run/All.[10]
e) The syntax editor can now be closed.
4) Specify variable characteristics in SPSS
a) Turn to the SPSS window of your new dataset
b) Switch to the “Variable view” tab page (tabs are located on the bottom of the window)
c) For each of the variable, check and correct the columns “Measure” and “Role”
i) Measure: make sure your own numerical values come out correctly as “scale” (if they are a scale), and that the other numerical values are labelled as “nominal”.
ii) Role.
(1) Variables [Period, TextId, forestId, eTreeId, Example] should normally be given the role “None”.
(2) The variable [Cat] should also be given the role “None”, since [Cat] is not standardly included in the string-to-number conversion.[11]
(3) Make sure you select at least one variable as “Target”.
5) Save the SPSS dataset as a .sav file.
Everything is now ready for further syntactic analysis within SPSS. See the manual of that program for specific questions.
11.6.3 Preparations for processing by Timbl
<TODO: provide explanation>
The core tasks of Cesax, as specified in section 7, produce different kinds of results. This chapter discusses the different possibilities of evaluating and processing results made with the core tasks.
1. Noun Phrase feature adding
a. Feature report (see 12.1)
b. Feature dictionary (see 12.2)
2. Coreference resolution
a. Overview of all coreference links (for verification) (see 12.3)
b. Report on automatically resolved coreferences (see 12.4)
c. Statistics of fully automatic coreference resolution (see 12.5)
d. A list of all coreferential chains in the current text (see 12.6)
3. Back translation
a. Show translation (see 12.7)
12.1 Feature report
Use Tools/Show_features_of to get a report on the NP, Adverb or Verb features as defined in the settings. The definition of features runs across different setctions of the settings (reachable with Tools/Settings), depending on the feature type.
1. NP features. See the NP features tab.
2. Adverb features. See the Categories tab. The names of the Adverb feature categories should all precede with Adv-.
3. Verb features. See the Categories tab. The names of the Verb feature categories should all precede with Vb-.
The feature report appears on the Report tab, and is also stored as an html file. The location and name of that file are shown in the status bar. The report lists the different categories, and the features are shown per period. Here is an example of an adverb feature report
Type: Contr
|
Period |
Adverb/Contr |
|
MBE |
besides |
|
eModE |
$only, $onlye, aloane, alone, alonly, but, eune, meerely, meerly, merely, onelie, onely, onelye, onlie, only, onlye, oonelie, oonly, singuler, solely, yet |
|
ME |
$but, $bute, $only, +get, +giet, +git, +tach, +to, alane, allane, allanly, allone, alon, alone, an, anely, anen, anes, anley, anly, bot, bote, botte, but, bute, elless, ellis, ellys, enelpi, on, on~ly, one, oneli, onelich, oneliche, onely, onlepi, onlich, onliche, only, onlyche, onlye, oonli, oonly, tah, yet, yit |
|
OE |
$ana, +aalles, +alles, ana, ane, butan, buten, buton, butun, elles |
(NOTE: only Adverb feature reports are supported in the current version of Cesax)
12.2 Feature dictionary
Use Tools/Show_features_of to get a report on the NP, Adverb or Verb features as defined in the settings. The definition of features runs across different setctions of the settings (reachable with Tools/Settings), depending on the feature type.
1. NP features. See the NP features tab.
2. Adverb features. See the Categories tab. The names of the Adverb feature categories should all precede with Adv-.
3. Verb features. See the Categories tab. The names of the Verb feature categories should all precede with Vb-.
The feature report appears on the Report tab, and is also stored as an html file. The location and name of that file are shown in the status bar. The report lists the different categories, and the features are shown per period. Here is an example of the adverb feature dictionary:
+aalles - Adverb/Contr OE
+afre - Adverb/Time ME
+alles - Adverb/Contr OE
+arest - Adverb/Number ME
+astan - Adverb/Loc OE
+atg+adre - Adverb/Manner OE
+dyllice - Adverb/Manner OE
+get - Adverb/Contr ME
+giet - Adverb/Contr ME
+git - Adverb/Contr ME
+ta - Adverb/Unknown ME
+tach - Adverb/Contr ME
+te - Adverb/(empty) ME
$+ter - Adverb/Loc ME
+tere - Adverb/Loc ME
(NOTE: only the Adverb features allow for a dictionary in the current version of Cesax)
12.3 Coreference links
12.4 Automatically resolved coreferences
12.5 Statistics of fully automatic coreference resolution
12.6 Coreferential chains
When you have been using Cesax to resolve coreference, adding links from a constituent to its antecedent, the resulting text will contain a number of “coreferential chains”. A coreferential chain is a series of constituents linked to one another by head-antecedent relations. Figure 20 gives an example of a coreferential chain (taken from brightland-1711). The possessive pronoun his in line 5.42 of the text points back to the subject our Censor in line 5.41, and this in turn points back to the indirect object our British Censor in line 4.30.
[4.30] And can we give our British Censor just Cause to complain of the continual corruption in our Stile, that a Catalogue could be produc'd of lately-written English Books of 100 l. price, without ten Lines together of Common Grammar, or Common Sense? [5.31] …[5.38] Now I think I may modestly ask, Whether that small Piece, call'd Observations on Monsieur Sorbier's Voyage into England, will not bear reading after the Celebrated Commentaries of Caesar? [5.39] Nor has the Province of Poetry been so ill serv'd, as not to answer the Character given by the same sagacious noble Critic, that- One Massy English Line Drawn in French Wire, would thro' whole Pages shine. [5.40] What shall we say then? [5.41] has our Censor complain'd without Cause, and given a false Alarm of Danger to the Language of our Country, that our Sterling English is got into the Hands of Clippers and Coyners? [5.42] I refer those that make a Doubt, to his Remonstrance of the Case.
Coreferential chain #45 (len=4)
|
Loc: |
RefType |
Syntax |
NPtype |
GrRole |
Node |
|
|
6.44 |
Identity |
NP-OB1 |
DefNP |
Argument |
the Censor of Great Britain |
points to... |
|
5.42 |
Identity |
PRO$ |
PossPro |
PossDet |
his |
points to... |
|
5.41 |
Identity |
NP-SBJ |
AnchoredNP |
Subject |
our Censor |
points to... |
|
4.30 |
New |
NP-OB2 |
AnchoredNP |
Argument |
our British Censor |
Figure 20 Example of a coreferential chain
Select Reference/List_Coreferential_Chains in order to start the process of deriving coreferential chains from one or more files. You will be prompted for several choices:
· Scope. If you only want to make a coreferential chain report of the current file, then choose “Current text only”. Otherwise choose “All texts in this directory”. You can change the chosen directory by clicking on the button to the right side of the textbox.
· Action. If you select “Recalculate chains”, the coreferential chains are calculated afresh, irrespective of the availability of up-to-date data. Choose “Update if outdated”, if you only want to recalculate the chains when they are outdated.
Cesax will, depending on your choice, produce one or more xml files that contain the coreferential chain information and some statistical information. Cesax also produces one html document for each file it has processed the coreferential chains from.
This html file contains the following elements:
· Filename. The report starts with the complete filename and location of the text.
· Date. This is the date when the report has been made.
· Statistics. Cesax provides several global and interval based statistics, such as chain length distribution. You can easily copy this information to Word or Excel and use it for further statistical processing from there.
· List of chains. All chains that were found are given in reverse order, starting with the last chain, and finishing with the first chain in the document. Each chain is presented as a table of the elements of the chain. Each line in the table presents the characteristics of one element in the chain:
o Loc. The line number where this constituent in the chain is found.
o Reftype. The coreference relation with which this constituent refers back to its antecedent (if it is of type Identity, Inferred or CrossSpeech), or the kind of unlinked type it is (Assumed, New, NewVar, Inert). For a description of these types see 3.5.2.
o Syntax. The syntactic label of the constituent in the coreferential chain.
o NPtype. The NP type of the constituent in the coreferential chain. The NP type has been determined automatically and possibly corrected manually, and resides in a fs/f branch under the node in the XML text.
o GrRole. The grammatical role of the constituent in the coreferential chain. This role has been determined automatically and possibly corrected manually, and resides in a fs/f branch under the node in the XML text.
o Node. The text of the constituent in the coreferential chain.
You can, instead of relying on the html file provided by Cesax, investigate the coreferential chains yourself by taking the xml file containing the chain information as input for your own research. The specification of the xml format for the file is provided in the appendix 14.4.
· List of chains. The xml file will have a table with chains, and each chain will consist of a table of chain constituents. The chain constituents will have the features Loc, RefType, Syntax, NPtype and Node, as mentioned above for the html file. They contain the following additional features:
o IPdist. The distance to the antecedent in number of IP boundaries. One “IP” boundary roughly equates to a main clause or subclause boundary, but not completely (Komen, 2011).
o NdDist. The distance to the antecedent in number of nodes. This is not equal to the number of words. Nodes are the <eTree> elements, representing phrases and clauses.
o GrRole. The grammatical role assigned to the constituent in the chain.
o PGN. The person/gender/number feature assigned to the constituent.
12.7 Show translation
Use View/Translation to get an html overview of the translation of the complete text.
A translation can only be shown if it is provided in the psdx file that is currently loaded in Cesax. Check which ‘translations’ (or transliterations) are available for the currently loaded file by going to the “General” tab page (see also section 7.2):
![]()

Figure 21 The “General” tab page contains a combobox with “Translation languages”
This tab page contains a combobox “Translation language”. The combobox contains the translation languages that are available for the currently loaded file. Selecting one of these languages will make it become the preferred translation language in the “Editor” and the “Translation” tab pages.
Section 7.2 contains a detailed treatment of working with translations.
Komen, E. R. (2011). Cesax: semi-automatic coreference resolution. (2011).
14.1 The format used by Cesax: psdx
The psdx format is fully specified in a schema file of the xsd type that is available on the homepage of Cesax.
1) <TEI> – top level tag
a) <teiHeader> - meta textual information
i) <fileDesc> - about this particular file
(1) <editionStmt> - not used right now
(2) <extent> - not used right now
(3) <seriesStmt> - not used right now
(4) <notesStmt> - not used right now
(5) <titleStmt> - Title of this file, with attributes:
(a) “title” –the file’s name
(b) “author” –the author of the original text
(c) “editor” –the editor that has emended the text
(6) <publicationStmt> - How this file was published
(a) “distributor” – Who distributed this file
(7) <sourceDesc> - Where the text in this file comes from
(a) “bibl” – Any information showing where the text comes from
(b) “date” – The date when the original has been created
ii) <revisionDesc> - Information about the revisions produced by Cesax
(1) “when” – Date of this revision
(2) “who” – Who made the revision
(3) “comment” – Annotation to this revision
iii) <profileDesc> - Additional information about the text/file
(1) <langUsage> - Language-related information
(a) “language.ident” – The Ethnologue identifier of the language, possibly extended with dialect and writing-system information (e.g. che_Lat says that this is Chechen, written in the Latin orthography).
(b) “language.name” – The name under which the language is generally known
(c) “creation.original” – The creation date of the original
(d) “creation.manuscript” – The date of the manuscript creation
(e) “creation.subtype” – Period or genre classification
iv) <metaInfo> - Any other meta information belonging to this text file
(1) <metaItem> - One item of meta-information
(a) “name” – The name of this meta-information item (e.g: translated_from)
(b) “value” – The value for this meta-information item (e.g: Latin)
b) <forestGrp> - One text, stored in “File”
i) <forest> - One line of text with id “forestId’, taken from file “File”. The text itself had id “TextId”. The location of this particular line is in “Location”. The attribute “Section” is present if this line is the start of a new section in the text.
(1) <div> - The complete line of text in the language specified by “lang”. Use lang=”org” to specify the original language of the text.
(a) <seg> - The actual text of this line
(2) <eTree> - Defines a syntactic phrase with unique number “Id” and syntactic label “Label”. The text of this syntactic phrase is stored in div[@lang=”org”]/seg, and runs from “from” to “to”. This phrase belongs to the IP (clause) with number “IPnum”.
(a) <eLeaf> - This is an endnode with attributes:
(i) “Type” – the kind of node: Vern, Punct, Star.
(ii) “Text” – the actual text of this endnode
(iii) “from” – position within <div> this node starts from
(iv) “to” – position within <div> this node ends.
(b) <fs> - Opens a feature bundle of a particular “type” (e.g. “NP”, “Adv”).
(i) <f> - One feature under this bundle, named “name” and having a value of “value”.
14.2 The back translation format: psdy
The psdy format closely follows the psdx format above (which is a derivative of TEI-P5). The difference is that the <forest> node does not contain <eTree> children. The only children of the <forest> node are <div> tags with the sentence in the specified language.
<forest forestId="8" File="cmkentse.m2"
TextId="cmkentse" Location="214.8">
<div lang="eng">
<seg>As soon as they found his birth out by the star, they decided with one another that they wanted to go worship (?) him and offer him gold, "stor" and myrrh. </seg>
</div>
<div lang="org">
<seg>And al swo hi biknewe his beringe bi þo sterre. swo hi nomen conseil betuene hem þet hi wolden gon for to hyne anuri. and þet hi wolden offri him gold and stor and Mirre.</seg>
</div>
</forest>
14.3 The format of Corpus Results Databases
Corpus Results databases can be created with the help of CorpusStudio. The information offered here allows you to make your own Corpus Results Databases, which you can then subsequently import into Cesax, where such a database can be efficiently edited.
1) <CrpOview> – top level tag
a) <General> - meta textual information
i) <ProjectName> - about this particular file
ii) <Created> - date when the results were created
iii) <DstDir> - destination directory
iv) <SrcDir> - source directory
v) <Notes> - Notes to this results database
vi) <Analysis> - Title of this file, with attributes:
(1) “title” –the file’s name
b) <Result> - Information about the revisions produced by Cesax, with attributes:
(1) “ResId” – the ID of this result (numbered from “1” onwards)
(2) “OviewId” – the ID in the <OviewList> (not used for the database)
(3) “File” – the name of the file the result is taken from
(4) “Search” – the complete location line number (see 14.6)
(5) “TextId” – the short name of the text this result is from (without any extension)
(6) “Cat” – the category assigned to this result from from the corpus research project made with CorpusStudio
(7) “forestId” – the ID of the <forest> node this result is from (number).
(8) “eTreeId” – the ID of the <eTree> the result mainly pertains to (number).
(9) “Period” – the string defining the period the text from the result is from.
(10) “Notes” – Any comments, notes, annotation supplied to this particular result.
ii) <Text> - The result line, including preceding and following context
iii) <Psd> - The syntax of the result line in treebank format
iv) <Feature> - The feature for this result with name “Name” and value “Value”.
14.4 The format of coreferential chain xml files
The format of the xml files containing the coreferential chain information is as follows.
1) <RefChain> – top level tag
a) <General> - general parameters for this file, with attributes
i) “Name” – name of this parameter
ii) “Value” – value for this parameter
b) <ChainList> - Listing of coreferential chains
i) <Chain> - Contains the items of one coreferential chain, with attributes
(1) “ChainId” – the ID of this coreferential chain.
(2) “Len” – number of items on this chain.
(3) “NoTraceLen” – Number of items that do not have NPtype=”Trace”.
(4) Each chain consists of several elements, named “Item”
(5) <Item> - Each chain consists of several elements, named “Item”
(a) “ChainId” – the ID of this coreferential chain.
(b) “ItemId” – the ID of this item on the chain.
(c) “eTreeId” – the id of the <eTree> element this element associates with.
(d) “IPmatId” – the id of the nearest <eTree> main clause ancestor, identified by having a label starting with IP-MAT.
(e) “Loc” – Location of this element in the file.
(f) “RefType” – Type of coreference link (see 3.5.2).
(g) “Syntax” – Syntactic label assigned to this constituent by the annotators.
(h) “NPtype” – NP type of this constituent (if it is an NP).
(i) “GrRole” – Grammatical role of this constituent.
(j) “Node” – Text of this node.
(k) ** “IPnum” – The number of the clause (IP-chunk) this item belongs to.
(l) ** “Ipdist” - The distance to the antecedent in number of IP boundaries. This is slightly more than the number of clause boundaries (Komen, 2011).
c) <StatList> - Starts a section of <Stat> elements
i) <Stat> - One item that can be used for statistics, with attributes
(1) “StatId” – the ID of this statistics element.
(2) “Type” – Three types of statistics measures are distinguished:
(a) Global - Measure for the whole file
(b) One - Measure for chains of one length
(c) Interval -
Measure for chains with a length in an interval
(This interval depends on the LogBase that can be
set by Tools/Settings)
(3) “File” – Short name of the file this measure belongs to.
(4) “Name” – Name of the statistics being presented.
(5) “From” – Starting value of interval (is “0” for no-interval measures).
(6) “Until” – Last value of the interval (is “0” when there is no interval).
(7) “Count” – Number of occurrances for this measure.
(8) “Total” – Total number of possibilities for this measure.
14.5 Wildcards
Cesax works with wildcards in different places. The following types are recognized:
|
Wildcard |
Purpose |
Example |
Matches |
|
* |
zero or more symbols |
sai* |
sai, said, saiyng |
|
? |
one symbol |
s?d |
sod, sad, sid |
|
[xyz] |
x or y or z |
[td]ou |
tou, dou |
14.6 Line numbers
The English corpora for which the program Cesax has been designed are divided into lines. Each line has a location indicator, and this indicator can be relatively small or long, depending on the particular period (OE, ME etc) and the particular text you are working with. These location indicators usually refer to a page in a book, to a volume in a range of books, and possibly even to a line number of a page in a book. What these numbers all have in common, is that the number following the last digit is the line number in the electronically available text.
Here is an example from the Apollonius text (coapollo, Old English period 3). The location indicator consists of ApT: followed by a chapter number and a line number within that chapter. Then follows a global line number for the whole text. In the example this number runs from 404 to 407.
ApT:19.18.404: Nim nu, lareow Apolloni, swa hit þe ne mislicyge,
ApT:19.18.405: and bryng þinum lærincgmædene.
ApT:20.1.406: Đa nam Apollonius þa gewrita
ApT:20.1.407: and eode to đare cynelican healle.
Cesax uses the number after the last digit in the location indicator, when it is asked to jump to a particular line in the main text editor (Editor/GotoLine, or Ctrl+G), or when it is asked to jump to a line in the translation editor (Translation/GotoLine, or Ctrl+Alt+G).
14.7 Language specific head rules
The conversion from dependency to constituency makes use of language-specific head rules. The rules for Chechen (the file HeadRule_ch.txt) are provided here as an example.
# ==================================================================
#
# Dependency HeadRules and dependency relation specifications
# Language: Chechen
#
# History:
# 28/aug/2013 ERK Created
# 17/sep/2013 ERK Added sections, copying from Dutch
#
# ------------------------------------------------------------------
#section HeadRules
ADJP r ADJ;*+ADJ;CONJP;NUM;D
ADVP r ADV;*+ADV;ADJ;CONJP;N;P;VAGP;VANP;RP;Q;CONJ
CONJP r CONJ;CONJP;VB*;ADJ;BE*;NUMP;P;*
CP l C;IP;IP-*
INTJP l INTJ;P;*+P
IP r VB*;*+VB*;VA*;*+VA*;BA*;*+BA*;BE*;*+BE*;AX*;*+AX*;*OB1;CP;WH;*
NP r N;NS;NPR;NUM;NUMS;Q;QP;NP;CONJP;CP;D;FW;PRO$
NUM r NUM
NUMP r NUM;N
PP r P;*+P;ADV
QP r Q;NUM;IP*
WADJP r ADJ
WADVP r WADV*;WPRO*;W*;*
WNP r WPRO
WPP r P
#section DependencyRelations
su * *-SBJ|*-SBJ-*
obj1 * *-OB1|*-OB1-*
obj2 * *-OB2|*-OB2-*
det * NP-POS*|N-GEN*|NS-GEN*|NEG|D|D^*
appos * NP-PRN*
mod * *-LOC|*-TMP|*-INS|*-OBL|PP|PP-*|NP|NP-*|ADJ|ADJ-*|ADJP|ADJP-*|IP-INF|IP-INF-*|IP-PPL|ADVP*|CP-REL*
#section CompactPos
#
# Syntax: CPOS - POS
#
ADJ ADJ*
ADV ADV*
AX AX*
D D-*|D
NPR NPR*
N N|NS|N-*|NS-*
PRO PRO|PRO*
VA VA*
VB VB*
BE BE*
BA BA*
#section PosRules
# Syntax: POS - CPOS - features - Vernacular
#
#section PhraseRules
#
# Syntax: PhraseLabel - POS list - dependency relation
#
NP-SBJ N|N-*|NS|NS-*|PRO*|DPRO*|D-*|NPR|NPR-* su|root
NP-OB1 N|N-*|NS|NS-*|PRO*|DPRO*|D-*|NPR|NPR-*R obj1
NP-OB2 N|N-*|NS|NS-*|PRO*|DPRO*|D-*|NPR|NPR-*R obj2
NP-POS N-GEN|NS-GEN|PRO-GEN|D-GEN|NPR-GEN det
NP NEG|NEG+FP|NEG+Q *
NP-LOC N-LOC|NS-LOC|PRO-LOC|D-LOC|NPR-LOC *
NP-ADV N-DAT|N-INS|NS-DAT|NS-INS|NPR-DAT|NPR-INS *
NP FW mod
NP N|N-*|NS|NS-*||NS+CONJ|PRO*|DPRO*|D-*|Q|QS|Q-*|NPR|NPR-* *
WNP WPRO* *
PP P *
ADJP ADJ|ADJ-*|*+ADJ|*+ADJ-* *
ADVP ADV|ADV-* *
NUMP NUM|NUM-* *
CP-REL VANA*|VAGA*|AXNA*|AXGA*|BAGA* *
CP C|WADV *
CONJP CONJ *
IP-IMV BEI|VBI|AXI|*+BEI|*+VBI|*+AXI *
IP-INF BE|VB|AX|*+BE|*+VB|*+AX *
IP-INF-LOC VB+N-LOC|AX+N-LOC|*+VB+N-LOC|*+AX+N-LOC *
IP-INF VB+N|VB+N-*|*+VB+N|*+VB+N-* *
IP-SUB VBP*|VBD*|VBF*|*+VBP*|*+VBD*|*+VBF* *
IP-SUB VA*|*+VA* det
IP-SUB INTJ mod
IP-PPL VA*|*+VA* *
IP-MAT FW|INTJ root|ROOT
IP V*|B*|AX*|*+V*|*+B*|*+AX*|RP *
14.8 Stanford to Cesax tagset conversion
Plain English texts can be converted to PSDX using the Stanford parser, which results in the Stanford tagset being used. These files can be converted into the ‘Cesax’ tagset, which is the tagset used in the English historical texts. The conversion between the two is done by making use of the table below. See also section 9.2.
|
Stanford |
Node |
Action |
Cesax |
Child |
GrandChild |
Parent |
|
ADJP |
phrase |
none |
ADJP |
|
|
|
|
ADVP |
phrase |
none |
ADVP |
|
|
|
|
FRAG |
phrase |
none |
FRAG |
|
|
|
|
NP |
phrase |
label |
NP-OB1 |
|
|
PP |
|
NP |
phrase |
label |
NP-SBJ |
|
|
S|SINV|IP* |
|
NP |
phrase |
label |
NP-SBJ-1 |
EX |
|
S|IP* |
|
NP |
phrase |
none |
NP |
|
|
|
|
NP-TMP |
phrase |
none |
|
|
|
|
|
PP |
phrase |
none |
PP |
|
|
|
|
PRN |
phrase |
none |
IP-MAT-PRN |
|
|
|
|
PRT |
phrase |
delete |
|
RP |
|
|
|
QP |
phrase |
none |
QP |
|
|
|
|
S |
phrase |
label |
IP-PPL |
V[AB]G|BAG |
|
|
|
S |
phrase |
label |
IP-PPL |
VP |
V[AB]G|BAG |
|
|
S |
phrase |
label |
IP-SUB |
|
|
CP*|SBAR |
|
S |
phrase |
label |
IP-MAT |
|
|
null |
|
S |
phrase |
label |
IP-INF |
TO |
|
|
|
S |
phrase |
label |
IP-SUB |
|
|
|
|
SBAR |
phrase |
label |
CP-REL |
W* |
|
NP* |
|
SBAR |
phrase |
label |
CP-QUE |
W* |
|
|
|
SBAR |
phrase |
label |
PP |
P |
|
|
|
SBAR |
phrase |
label |
CP-ADV |
RB|ADV* |
|
|
|
SBAR |
phrase |
label |
CP-REL |
|
|
NP* |
|
SBAR |
phrase |
label |
CP |
|
|
|
|
SBARQ |
phrase |
label |
CP-QUE |
|
|
|
|
SINV |
phrase |
label |
IP-MAT |
|
|
|
|
SQ |
phrase |
label |
IP-SUB |
|
|
|
|
VP |
phrase |
delete |
|
|
|
|
|
WHADVP |
phrase |
label |
WADVP |
|
|
|
|
WHNP |
phrase |
label |
WNP |
|
|
|
|
CC |
end |
label |
CONJ |
|
|
|
|
CD |
end |
label |
NUM |
|
|
|
|
DT |
end |
label |
Q |
all|each|every|some|any |
|
|
|
DT |
end |
label |
D |
a|an|the|that|this|these|those |
|
|
|
DT |
end |
label |
NEG |
no |
|
|
|
EX |
end |
none |
EX |
|
|
|
|
IN |
end |
label |
C |
that |
|
SBAR|CP* |
|
IN |
end |
label |
ADV |
so |
|
S|IP* |
|
IN |
end |
label |
P |
|
|
|
|
RB |
end |
label |
ADVR |
as |
|
ADVP |
|
INTJ |
end |
none |
INTJ |
|
|
|
|
JJ |
end |
label |
ADJR |
enough |
|
|
|
JJ |
end |
label |
Q |
few|many|several|some |
|
|
|
JJ |
end |
label |
ADJ |
|
|
|
|
JJR |
end |
label |
ADJR |
|
|
|
|
JJS |
end |
label |
ADJS |
|
|
|
|
MD |
end |
none |
MD |
|
|
|
|
NN |
end |
label |
N |
|
|
|
|
NNP |
end |
label |
NPR |
|
|
|
|
Stanford |
Node |
Action |
Cesax |
Child |
GrandChild |
Parent |
|
NNS |
end |
label |
NS |
|
|
|
|
PRP |
end |
label |
PRO |
|
|
|
|
PRP$ |
end |
label |
PRO$ |
|
|
|
|
PDT |
end |
label |
Q |
|
|
|
|
POS |
end |
appendleft |
$ |
|
|
|
|
RB |
end |
label |
ADV |
|
|
|
|
RBR |
end |
label |
ADVR |
|
|
|
|
RP |
end |
none |
RP |
|
|
|
|
TO |
end |
none |
|
|
|
|
|
UH |
end |
label |
INTJ |
|
|
|
|
VB |
end |
label |
DO |
do |
|
|
|
VB |
end |
label |
HV |
have |
|
|
|
VB |
end |
label |
BE |
be |
|
|
|
VB |
end |
none |
VB |
|
|
|
|
VBD |
end |
label |
HVD |
had |
|
|
|
VBD |
end |
label |
BED |
were|was |
|
|
|
VBD |
end |
none |
VBD |
|
|
|
|
VBG |
end |
label |
HVG |
having |
|
|
|
VBG |
end |
label |
BAG |
being |
|
|
|
VBG |
end |
label |
VAG |
|
|
|
|
VBN |
end |
label |
BEN |
been |
|
|
|
VBN |
end |
none |
|
|
|
|
|
VBP |
end |
label |
BEP |
are|am |
|
|
|
VBP |
end |
none |
|
|
|
|
|
VBP |
end |
label |
HVP |
have |
|
|
|
VBZ |
end |
label |
BEP |
is|are |
|
|
|
VBZ |
end |
label |
HVP |
has|have |
|
|
|
VBZ |
end |
label |
VBP |
|
|
|
|
WDT |
end |
none |
|
|
|
|
|
WP |
end |
label |
WPRO |
|
|
|
|
WP$ |
end |
label |
WPRO$ |
|
|
|
|
WRB |
end |
label |
WADV |
|
|
|
|
, |
end |
none |
|
|
|
|
|
. |
end |
none |
|
|
|
|
|
`` |
end |
label |
" |
|
|
|
|
'' |
end |
label |
" |
|
|
|
|
" |
end |
none |
|
|
|
|